Skip to content

Bloom Where You’re Planted

Bloom Where You’re Planted published on 2 Comments on Bloom Where You’re Planted

I’m so excited to be able to share with you another card I made for the collaboration this month between My Sweet Petunia and Joy Clair.  This is a month long partnership and it gives you lots of opportunities to win!  With two full designs teams (I’m guesting in with My Sweet Petunia), all you have to do is comment on posts where you see this blog hop banner.  You are then entered to win these prizes: two $25 gift certificates to Joy Clair or one MISTI (your choice of original or mini).  Winners will be announced in April on both blogs.

Bloom by Jen Timko | Grow in Faith Stamp by Joy Clair, Christmas Nativity by Joy Clair, MISTI by My Sweet Petunia
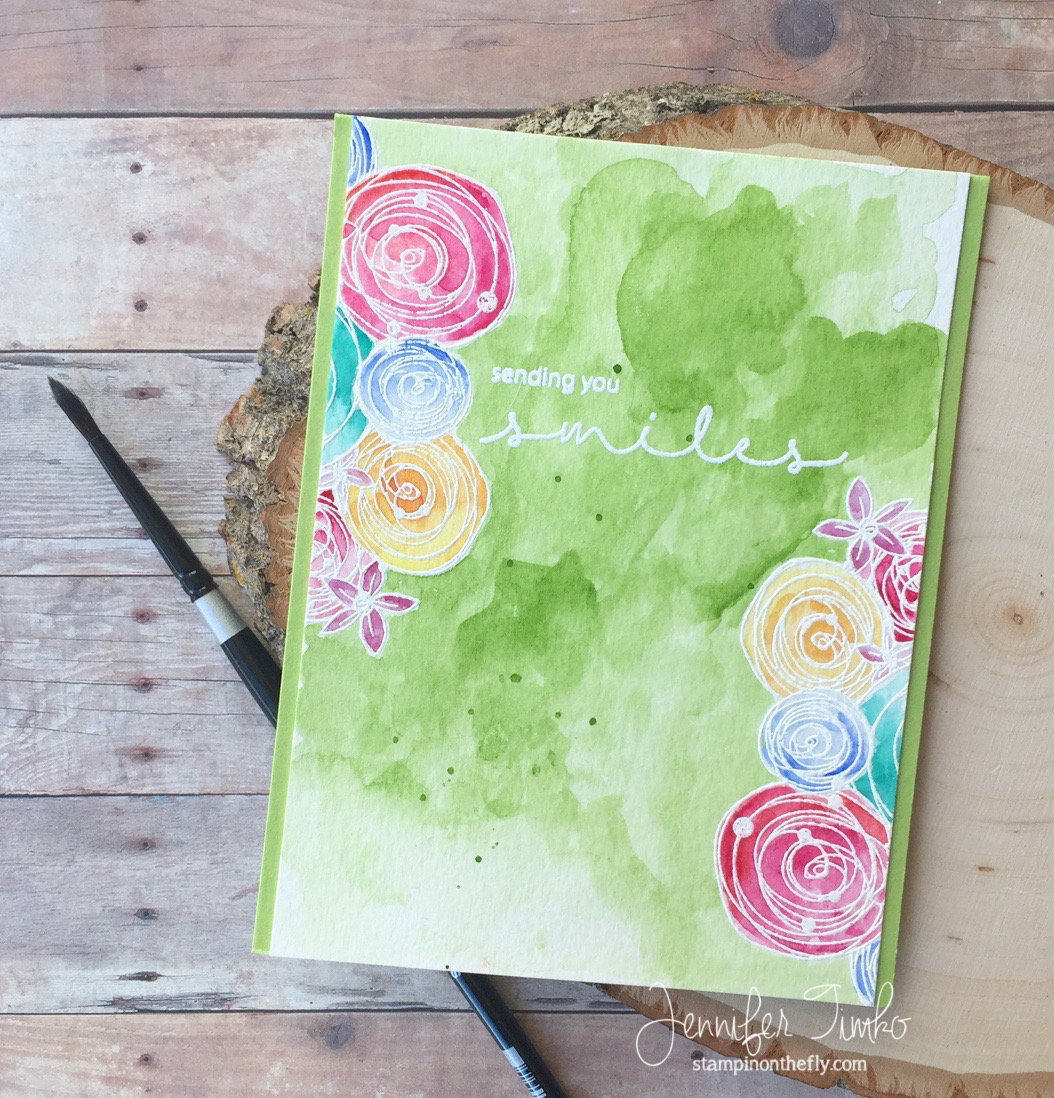
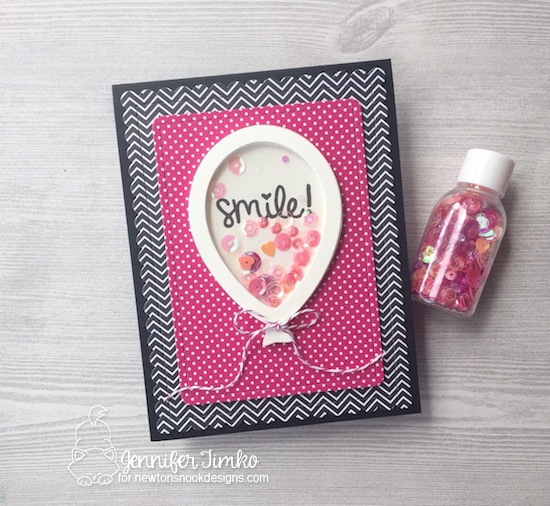
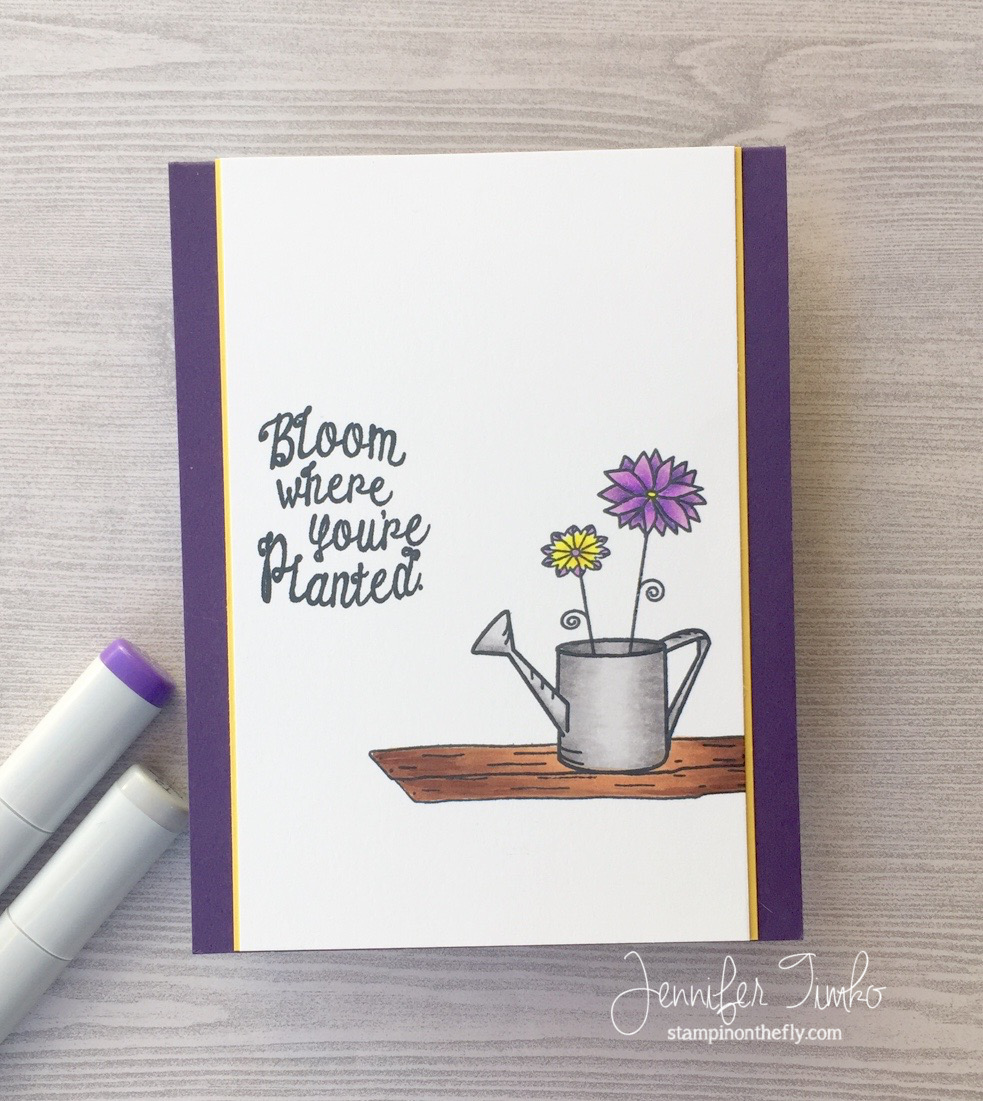
I’m continuing on my spring theme today with this sweet little flower set called Grow in Faith.  I just love all the little flowers in the set but thought it would be fun to but them in the watering pail.  There was a bit of masking for this card.  First, I stamped the pail using Momento Tuxedo Black ink.  Then I put down my mask over the pail.  I pulled this wooden image from the Christmas Nativity set (part of a stable) to create a table for the flowers.  With mask safely in place, I stamped the first (top) board, then I masked that and stamped the second one.  The MISTI takes away all the fear on making mistakes…and no starting over if there is incomplete stamping!  I do find that on masking projects I always need to stamp twice.  Once those were done, I stamped the flowers (with the pail mask still in place).  Notice that I had cut the little top part off the pail mask so that the flower appear to be in the pail.

So after all that was done, I pulled off all the masks and YAY!!  There is always a bit of a moment of holding your breath with masking…at least for me.  I stamped the sentiment and then colored the images using Copic markers.  Such a sweet little card!

Make sure you go over to the  Joy Clair and My Sweet Petunia blogs to see what other inspiration they have for you.  And don’t forget to leave your comments for a chance to win!

Supplies (affiliate links may be included):

Stamp: Grow in Faith(Joy Clair), Christmas Nativity (Joy Clair); Ink:  Momento Tuxedo Black; Paper: Thick Whisper White (SU), Elegant Eggplant (SU), Daffodil Delight (SU); Accessories:  Original MISTI, Copic Markers, Masking Paper (SSS)

Signature 2016 - 1


Sending You Smiles

Sending You Smiles published on 4 Comments on Sending You Smiles

I’m so excited to be able to share with you a card I made for the collaboration this month between My Sweet Petunia and Joy Clair.  This is a month long partnership and it gives you lots of opportunities to win!  With two full designs teams (I’m guesting in with My Sweet Petunia), all you have to do is comment on posts where you see this blog hop banner.  You are then entered to win these prizes: two $25 gift certificates to Joy Clair or one MISTI (your choice of original or mini).  Winners will be announced in April on both blogs.

Sending You Smiles by Jen Timko | Hugs and Smiles Stamp by Joy Clair, MISTI by My Sweet Petunia, WatercolorSo today, I pulled out this amazing Hugs and Smiles stamp set.  These flowers are so pretty and I love the sentiments.  I lined up the stamp on one side of the watercolor paper and stamped using Versamark Ink, then heat embossed with Wow White Embossing Powder.  I did stamp twice with my Versamark because it is kind of hard to see if you missed a spot.  Of course, the MISTI makes that super easy!  Then, and here is where the MISTI really earns her keep, I flipped the card stock and stamped again.  The stamp positions exactly where it was on the opposite side with no stress.  Perfectly symmetrical!!

Using some watercolor paints, I painted the flowers and then chose the green for the center section.  Something about a nice spring green makes me happy!  Also, it was snowing when I made this…in spring…when there had not been snow all winter….  So yes, spring green!  I splattered on a little extra paint and then decided which sentiment to use.  Now, without a MISTI, this card would have gone without a sentiment because it would certainly have been ruined.  I know we all did that before this tool came around!!  But into the breach I went (not really…there was no stress, lol), and I stamped the sentiment with Versamark and heat embossed it too.  The whole panel is so pretty on this green base, don’t you think?!

Ok, now I made you look so you need to go find all the blogs participating this month.  Start with Joy Clair and My Sweet Petunia and you will find their teams!  I’ll be back in a few days with more from this collaboration.  Until then, have a great weekend!

Supplies (affiliate links may be included):

Stamp: Hugs and Smiles (Joy Clair); Ink:  Versamark; Paper: Montval Watercolor (Canson), Green Leaf (Simon Says Stamp); Accessories:  Original MISTI, Silver #4 Round Paint Brush, Debby’s Set Watercolor Palette (Simon Says Stamp)

Signature 2016 - 1

SaveSave

SaveSave

CTS264 – Hello Friend

CTS264 – Hello Friend published on 3 Comments on CTS264 – Hello Friend

Hello Friend by Jen Timko | Hearts and Flowers Stamps and Dies by Gina K Designs (Sentiments), Magic Stamp by ClearsnapI got a chance yesterday to create a quick card and I knew when I saw that latest from CAS(E) this Sketch I had to join in.  And I knew exactly what I wanted to use for the sketch element….my Magic Stamp!

I showed you a card with a Newton’s Nook sentiment during the release that used a background made with this and for today’s card, I used a background that was created using a wooden basket.  The texture is really fun!  Something about the sunny yellow seemed right (since I am ready for spring) so I used my Tim Holtz Distress Oxide Ink in Squeezed Lemonade.  What a pretty color!  The sentiment comes from Gina K Designs (I love that die with the ‘hello’) and then I just added some sequins.

The sketch over at CTS is a great one for CAS cards and you are sure to want to join in too.  Glad you stopped in today.  Back tomorrow with another fun collaboration that I get to share in.  Until then, have a great day!

Supplies:

Stamp:  Hearts and Flowers (Gina K Designs), Magic Stamp (Clearsnap); Paper: Basic Black (SU), Solar White (Neenah); Ink: Tim Holtz Distress Oxide Ink (Squeezed Lemonade), Versafine Onyx Black; Accessories: Big Shot, Stitched Rectangles Dies (SSS), Sequins

Signature 2016 - 1

SaveSave

SaveSave

SaveSave

Freshly Made Sketches #329

Freshly Made Sketches #329 published on 9 Comments on Freshly Made Sketches #329

FMS329 by Jen Timko | Free Spirit Stamp Set by Taylored Expressions, Mandala Cutting Plate by Taylored Expressions, Tim Holtz Distress InkI’m busy, busy showing you projects this week and I have been waiting to show you this one.  I made this while I was at Stamping Away and just love it!!  It seems perfect that the wonderful Kim Singdahlsen is the sketch hostess this week at Freshly Made Sketches.  I love what she creates with Taylored Expressions products so it seems fitting that I was able to use some of those for her sketch.

I started with the Mandala Cutting Plate and what a wow it is!  I cut it out of some Bristol Smooth paper so that I could watercolor it.  I smooshed some Distress Ink onto a clear block and added some water, then used that to color the mandala.  I saved the large cut out section on the right side so that I could color it too.  So bold and super simple to do!  Another of the TE design team members, Jen Shults, brought this die (and many of its friends) to Stamping Away and she also brought a ton of TE stamps.  I was like a kid in a candy store!!  Took me a while but I finally narrowed down to the perfect sentiment from the Free Spirit stamp set.  I cut out a banner with the Double Ended Flag Stacklet and then stamped on the sentiment using my Misti.

This may be my favorite card that I have made in a while and I was clearly inspired by all the rainbows and creativity while I was at the Whatever Craft House!  I hope you enjoy this sketch as well…so many beautiful projects from our design team!!  Thanks so much for stopping in.  I’ll see you soon!

Supplies (affiliate links included):

Stamp: Free Spirit (Taylored Expressions); Paper:  Neenah Solar White #110, Strathmore Bristol Smooth; Ink: Versafine Onyx Black, Tim Holtz Distress Ink (Broken China, Picked Raspberry, Squeezed Lemonade, Spiced Marmalade, Twisted Citron); Accessories: Misti, Big Shot, Mandala Cutting Plate (Taylored Expressions), Double Ended Flag Stacklet (Taylored Expressions

Signature 2016 - 1

SaveSave

SaveSave

Reverse Confetti and Misti Blog Hop

Reverse Confetti and Misti Blog Hop published on 62 Comments on Reverse Confetti and Misti Blog Hop

I cannot even tell you how excited I am to be participating today in a hop with Reverse Confetti and My Sweet Petunia!  You are going to be blown away by all the inspiration as the two design teams combine.

Enjoy Today by Jen Timko | Take Flight Stamp and Dies by Reverse Confetti, Sunburst Tag Layer Confetti Cuts (Reverse Confetti), Copic Coloring, My Sweet Petunia's Original Misti

I fell completely in love with the Take Flight stamp set (big surprise, right?!) and thought it would be such fun to use with the Sunburst Tag Layer.  I knew the sentiment was a great fit in that circle but making sure it stamped there perfectly was up to my Misti!

Enjoy Today - Jen Timko | Take Flight Stamp (Reverse Confetti) with a Misti Original by My Sweet PetuniaHonestly the best part of the Misti is just KNOWING it will be right.  And if it isn’t the first time, it becomes perfect because you can stamp again.  I’m not sure how I ever created without this tool and I know for certain that there is no going back.  It simply lives on my table.

After stamping, I attached the Sunburst tag to the Topped Off Tag base and tied on a bit of baker’s twine.  The kite from the stamp set was the perfect little image to add.  Something about a kite brings thoughts of a happy summer day and that seemed to fit so well with the sentiment.  After attaching the kite to the tag, I just put the whole thing on a pretty polka dotted base.

As if all this crafty goodness wasn’t enough, we will choose two lucky commenters from the hop to win one of two prizes: a $60 shopping spree at www.mysweetpetunia.com and a $60 shopping spree at www.Reverseconfetti.com.  You must leave your comments no later than Sunday, March 25th, at 11:59 PM Central time and winners will be announced on Tuesday March 27th, on the Reverse Confetti and My Sweet Petunia blogs.

So make sure you stop by all the amazing blogs and leave a little love!  Up next is the incredible Kelly Lunceford.  And here is the whole list to make it easy to find everyone.

Amy Tsuruta
Ilina Crouse
Lisa Henke
Jeanne Streiff
Susan Liles
My Sweet Petunia
Tricia Barber
Kia Gibson-Clapper
Deanne Kuntz
Ceal Pritchett
Melissa Phillips
Giovana Smith
Audrey Tokach
Chris Dayton
Kathy Schweinfurth
Stephanie Severin
Laurie Schmidlin
Janine Tinklenberg
Amy Rohl
Dina Kowal
Heather Hoffman
Jana Millen
Reverse Confetti
Jennifer Timko (you are here)
Kelly Lunceford
Joan Bardee
Olga Moss
Judy Rozema
Jeanne Jachna
Susan Wymer
Lydia Fiedler

Stamp: Take Flight (Reverse Confetti); Ink:  Versafine Onyx Black, Momento Tuxedo Black; Paper: Thick Whisper White (SU), Itsy Bitsy Polka Dots Pastels Pack (MFT); Accessories:  Big Shot, Sunburst Tag Layer Confetti Cuts (Reverse Confetti), Topped Off Tag Confetti Cuts (Reverse Confetti), Original MISTI, Yellow Baker’s Twine, Mini Dimensionals (SU)

Signature 2016 - 1

SaveSave

SaveSave

SaveSave

SaveSave

So Very Kind

So Very Kind published on No Comments on So Very Kind

So Very Kind by Jen Timko | So Very Kind Greeting Die by Lil' Inker Designs, Tim Holtz Distress InksDropping in today to show you some sweet little note cards that I made.  Something about a little card that you can tuck into a package always makes me smile.  And I don’t seem to make them enough.  This little die with the sentiment comes from Lil’ Inker Designs and was among the sweet products I got at Stamping Away (I might as well warn you that I have many posts worth of enabling as I get to use these items).  I made little 3″ x 3″ squares and then used the die to cut out the centers.  Because I used Bristol Smooth paper, I was able to add these fun watercolor looks using Tim Holtz Distress Ink.  I simply smooshed the ink onto a small acrylic block, spritzed with water and dabbed the color onto cut sentiments.  So easy and yet so fun!  Once dry, I attached them onto 3″ x 3″ cards and they are all ready to go.  These already have homes that they are going to so I think I need to set about making more to have on hand.

Thanks so much to Lil’ Inker Designs for sponsoring Stamping Away.  You are, indeed, so very kind!

Back tomorrow with a fun hop that you are going to LOVE!  Until then, have a great day!

Supplies (affiliate links may be included):

Paper: Thick Whisper White (SU), Strathmore Bristol Smooth; Ink: Tim Holtz Distress Ink (Twisted Citron, Peacock Feathers, Picked Raspberry); Accessories: Big Shot, So Very Kind Greetings Die (Lil’ Inker Designs)

Signature 2016 - 1

SaveSave

Thanks a Bunch

Thanks a Bunch published on No Comments on Thanks a Bunch

Thanks a Bunch by Jen Timko | Posie Fill In Stamps and Dies by Concord and 9th, C9Happy weekend!!  Just a fun extra post to show you a great new set from Concord and 9th called the Posie Fill-In.  I was lucky enough to get this from my Stamping Away retreat and could not wait to use it.  I stamped the background using Versafine Onyx Black and then added in the different elements with Altenew inks.  The flowers were all stamped and cut with the coordinating dies.  Such a sweet way to make a fun card and there are so many options!!

Now back to your regularly schedule browsing.  I’m off to watch some soccer today!!  WOOHOO!!  Until next time, have a great day!  And to Concord and 9th….THANKS A BUNCH for this awesome bundle!

Supplies (affiliate links included):

Stamp: Posie Fill-In Bundle (Concord and 9th); Paper: Thick Whisper White (SU), Basic Black (SU); Ink: Versafine Onyx Black, Pocketful of Sunshine Cubes (Altenew), Green Fields Cubes (Altenew), Deep Blue Sea Cubes (Altenew); Accessories: Misti, Big Shot, Posie Fill-In Dies (Concord and 9th)

Signature 2016 - 1

Newton’s Nook Designs March Release – Birthday Essentials

Newton’s Nook Designs March Release – Birthday Essentials published on 28 Comments on Newton’s Nook Designs March Release – Birthday Essentials

Welcome back for the last day of the March Release from Newton’s Nook Designs.  For our final reveal I have what you are sure to see as a “work horse” stamp set…a wonderful sentiment set called Birthday Essentials.

Celebrate by Jen Timko | Birthday Essentials Stamp Set by Newton's Nook Designs, Magic Stamp by Clear Snap, Distress Oxide Ink by Tim HoltzSo I have a confession to make.  My name is Jennifer and I’m a sentiment hoarder.  I love sentiment sets.  I “collect” sentiment sets.  Having just the right ones for inside and outside the card is simply a quest so I hold on to them even as I let images go now and then.  So when a set that is all about birthdays comes along, you can bet that I’m doing a happy dance.  Another truth (because, hey it is just among friends)…I never seem to have enough masculine cards.  Perhaps it is because Kitty Kate and I are outnumbered.  Perhaps it is my obsession with cute images and all flowers.  But somehow, when it comes time to reach for a card for man, I don’t have the right one.  So I committed to making one (and I’ll be making a few more just like it).  I felt like I need a cool background so I used this fun Magic Stamp by Clearsnap.  It allows you to make your own background and just stamp.  I was playing with it on my trip to Kansas and the incredible Jen Shults (yes, I did just name drop) suggested I press it into some concrete on the sidewalk.  And I got this texture.  Cool!!  I inked it up with Distress Oxide Ink and just stamped onto watercolor paper, then spritzed with a little water.

Celebrate by Jen Timko closeup | Birthday Essentials Stamp by Newton's Nook Designs, Magic Stamp by Clear SnapThis big bold sentiment (which fits perfectly onto the Frames and Flags Die banner) becomes the focus and I have a fabulous, non-girly, no bling birthday card.  Yay!!!  And while this is super clean, the great script sentiment makes this still feel special.  Birthday Essentials for the win!!

I hope you like this card idea and I’m just sure you will love everything the team made for today.  Now one more time for this release…  A chance to win!!

Would you like to win the “Birthday Essentials” Stamp Set?

Each set will be given away to ONE lucky winner!

Here’s how to win:

Comment on the NND blog and Design Team blogs (see list below)! The winner will be chosen at random from the collective reveal posts. Make sure to check out each of their blogs and comment for your chance to win. You will not know which blog has been chosen so the more you comment on the better your chances are of winning! You have until Thursday, March 15th at 9pm CST to comment  — winners will be announced on the blog post on Friday, March 16th.

Thanks for stopping in today and during this whole week.  All of your comments are so appreciated and I’m so happy you share some of your time with me.  The release goes live tomorrow so make your list and check it twice.  I think this one is going fly off the shelves!Supplies:

Stamps: Birthday Essentials (Newton’s Nook Designs), Magic Stamp (Clear Snap); Ink:  Broken China Distress Oxide Ink (Tim Holtz); Paper:  Canson XL Watercolor Paper; Accessories:  Big Shot, Frames and Flags Dies (NND), Stitched Rectangles Dies (SSS), Dimensionals (SU)

Signature 2016 - 1


SaveSave

SaveSave

SaveSave

SaveSave

SaveSave


SaveSave

SaveSave

SaveSave

SaveSave


SaveSave

SaveSave

SaveSave


SaveSave


SaveSave

Newton’s Nook Designs March Release – Newton’s Birthday Balloons

Newton’s Nook Designs March Release – Newton’s Birthday Balloons published on 29 Comments on Newton’s Nook Designs March Release – Newton’s Birthday Balloons

Welcome back for day 3 of the March Release from Newton’s Nook Designs.  Wednesdays in release week are doubly good since I get a sketch from Freshly Made Sketches too!  AND….we get to introduce a new Newton…Newton’s Birthday Balloons.

Wish by Jen Timko | Newton's Birthday Balloons Stamp Set and Dies by Newton's Nook Designs, Bubbly Stencil by Newton's Nook Designs, Copic ColoringI colored up my little kitty with Copic markers and gave him some balloons in fun colors.  It looks to me like the balloons are carrying him away.  The sentiment is from the Balloon Shaker Die shown yesterday.  The sketch from Linda today gave me a great chance to show off Newton with the new Bubbly stencil (used to emboss).  In my brain those bubbles are just helping to lift Newton up and away.  I added some Clear Drops to help highlight the bubbles too.  Yeah…I may have had a little too much fun with this whole card.

I know all you Newton fans are going to love this set!  And I hope you’ll be able to join us this week at Freshly Made Sketches too.  Now on to everyone’s favorite part of release week.  A chance to win!!

Would you like to win the “Newton’s Birthday Balloons” Stamp Set?

Each set will be given away to ONE lucky winner!

Here’s how to win:

Comment on the NND blog and Design Team blogs (see list below)! The winner will be chosen at random from the collective reveal posts. Make sure to check out each of their blogs and comment for your chance to win. You will not know which blog has been chosen so the more you comment on the better your chances are of winning! You have until Thursday, March 15th at 9pm CST to comment  — winners will be announced on the blog post on Friday, March 16th.

Thanks for stopping in today and during this whole week.  Make sure you stop back in tomorrow for Day 3 of the release.

Supplies:

Stamp: Newton’s Birthday Balloons (Newton’s Nook Designs); Ink:  Momento Tuxedo Black; Paper:  Thick Whisper White(SU), Dapper Denim (SU), White Vellum (SU); Accessories:  Big Shot, Newton’s Birthday Balloons Dies (Newton’s Nook Designs), Bubbly Stencil (Newton’s Nook Designs), Balloon Shaker Dies (Newton’s Nook Designs), Stitched Shapes Dies (SU), Stitched Rectangles Dies (SU), Dimensionals (SU), Clear Round Drops (Studio Katia)

Signature 2016 - 1


SaveSave

SaveSave

SaveSave

SaveSave

SaveSave


SaveSave

SaveSave

SaveSave

SaveSave


SaveSave

SaveSave

SaveSave


SaveSave


SaveSave

Newton’s Nook Designs March Release – Uplifting Wishes Stamp and Balloon Shaker Die

Newton’s Nook Designs March Release – Uplifting Wishes Stamp and Balloon Shaker Die published on 30 Comments on Newton’s Nook Designs March Release – Uplifting Wishes Stamp and Balloon Shaker Die

Welcome back for day 2 of the March Release from Newton’s Nook Designs.  We are back with a pair that is sure to bring a smile.  Introducing the Uplifting Wishes Stamp Set and the coordinating Balloon Shaker Die.

Smile by Jen Timko | Uplifting Wishes Stamp Set by Newton's Nook Designs, Balloon Shaker Die by Newton's Nook Designs, 28 Lilac Lane SequinsIs there anyone that doesn’t love a shaker card?!  I think not!  I love the idea of a balloon shaker and today’s combination of products is fun for so many occasions.  I stamped this sentiment onto Shimmery White paper with Versafine Onyx Black ink and then cut it out using the outline balloon.  I cut another piece of the same white with the shaker border die.  I ran some of the double sided foam (NND) through with the shaker border die and the acetate (NND) through with the outline.  I ran some antistatic powder around the inside edge of the foam (to keep the sequins from sticking) and they put the whole thing together.  I think it takes longer to type up how to do it than to actually make this fun balloon!  Once my little shaker was together, all I had to do was put it on a fun background.  I used the Frames and Flags dies to layer these prints and tied on a little coordinating twine to finish the balloon before attaching it.

I hope you enjoy my card for today and I know you’ll enjoy the projects from the rest of the team.  Now on to everyone’s favorite part of release week.  A chance to win!!

Would you like to win the “Uplifting Wishes” Stamp Set?

Each set will be given away to ONE lucky winner!

Here’s how to win:

Comment on the NND blog and Design Team blogs (see list below)! The winner will be chosen at random from the collective reveal posts. Make sure to check out each of their blogs and comment for your chance to win. You will not know which blog has been chosen so the more you comment on the better your chances are of winning! You have until Thursday, March 15th at 9pm CST to comment  — winners will be announced on the blog post on Friday, March 16th.

Thanks for stopping in today and during this whole week.  Make sure you stop back in tomorrow for Day 3 of the release.

Supplies:

Stamp: Uplifting Wishes (Newton’s Nook Designs); Ink:  Versafine Onyx Black; Paper:  Shimmery White(SU), Pop of Pink DSP (SU Retired); Accessories:  Big Shot, Balloon Shaker Dies (Newton’s Nook Designs), Frames and Flags Dies (NND), Dimensionals (SU), Sequins (28 Lilac Lane), Double Sided Foam (NND), Acetate (NND)

Signature 2016 - 1


SaveSave

SaveSave

SaveSave

SaveSave

SaveSave


SaveSave

SaveSave

SaveSave

SaveSave


SaveSave

SaveSave

SaveSave


SaveSave


SaveSave

Primary Sidebar