Skip to content

Creative Gratitude

Creative Gratitude published on 13 Comments on Creative Gratitude

Somehow I didn’t get to the post I promised for yesterday so today I have two cards.  The first is a card for the new sketch challenge Freshly Made Sketches.  After getting chosen as a Perfect Princess last week, I just had to play again!!  What a thrill to be chosen on the first challenge!!  They ask for clean cards.  Not clean and simple, but clean lines.  Love that!!  Here is their sketch for this week:

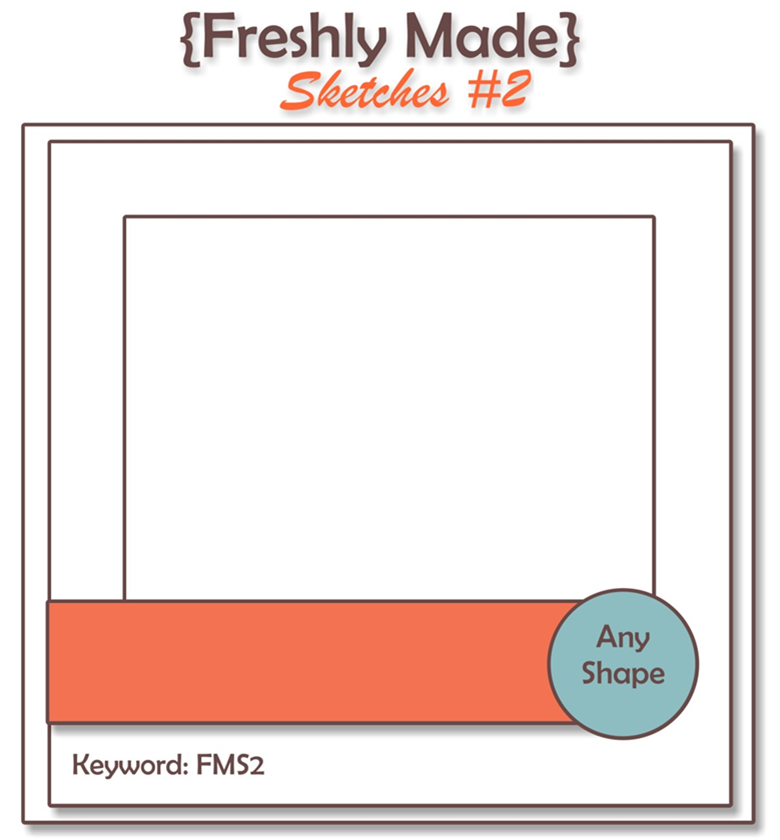
This is one that will go in the files to use again and again!

I started in an unusual place on this card…the “any shape” panel.  I just got my new Designer Frames Embossing Folder and knew I had to use it!  One of the first sets I fell in love with in the new catalog was Creative Elements and I haven’t used it nearly enough.  It is perfect for this layout.  I have said it before, one of my favorite things about Stampin’ Up is how much thought goes into the coordination of products.  It makes me so happy when I find corresponding elements in things.  For this card, I noticed the little tulips in the big flourish and immediately added my Framed Tulips Embossing Folder to the mix.  Both the oval (without the little dots) and the butterfly are hand cut.  Some Basic Pearls were added to the butterfly and then the sentiment for balance.  Let’s face it, the pearls make everything more elegant!!  Finally, I scrunched up the new Quilted Satin Ribbon using Sticky Strip and tied a little bow out of hand-colored thread.  Just used a Stampin’ Write marker to make it whatever color you need.

My second card for the day is a wonderful treasure!  My oldest son asked to use some stamps to make a card for me.  How could I say no??!!  He also asked me to see my markers so he could choose colors and came away with Always Artichoke and Cherry Cobbler (that apple doesn’t fall too far from the tree!!).  I was summarily kicked out of the stamping area while he created.  There was some consultation with my youngest son, I think, and this is the result.  They chose the hummingbird because we have enjoyed our feeder all summer long.  Now just look at that beautiful marker work!!!  Oh, I am a proud mommy!  And mostly because they made something they knew I would treasure forever.  Am I lucky or what??!!  *smile*  This was posted with permission of the artist of course.

Thanks for dropping in today.  I’ll be back on Tuesday with our next Stampin’ Up Only Challenge.  You are going to love it!!  I’m working busily on some class, club and Creative Crew projects.  I’ll share them all just as soon as I can.  Have a great weekend!

Card 1:  Stamps:  Creative Elements, Day of Gratitude; Paper:  River Rock, Early Espresso, Very Vanilla; Ink:  River Rock, Early Espresso; Accessories:  Big Shot, Framed Tulips Embossing Folder, Designer Frames Embossing Folder, Espresso Quilted Satin Ribbon, Basic Pearls, Dimensionals, Sticky Strip, Thread

Creative Crew Sketch

Creative Crew Sketch published on 8 Comments on Creative Crew Sketch

This month, the Creative Crew at Splitcoaststampers is challenging you to play with a new sketch.  There are a lot of little details on this one and it was fun to use.

I started with the pocket portion of the layout and decided to create a little pocket for my tag.  My new Bright Hopes stamp set from the Holiday Mini seemed like the perfect choice to decorate both.  I found this cool marbled paper in the Well Worn DSP and knew it was the background I was looking for!  Basic Pearls and Very Vanilla Seam Binding were an easy choice for the sketch elements.

On the little tag, I stamped the snowflake in Frost White Shimmer Paint.  Just apply the Shimmer Paint to the stamp with a sponge dauber.  The sentiment is from Teeny Tiny Wishes.

I don’t put little tags on cards very often and I love that this sketch had us do that.  I hope you will give this one a try too.  If you post your card, don’t forget to add keywords CCREW0911HF and CreativeCrew so the design team won’t miss your fabulous project!

Thanks for stopping by today.  I will be back tomorrow with a beautiful card that I received.  You will love it too!  See you soon!

Stamps:  Bright Hopes, Teeny Tiny Wishes; Paper:  Well Worn DSP, Very Vanilla, Early Espresso; Ink:  Not Quite Navy; Accessories:  Frost White Shimmer Paint, Basic Pearls, Vanilla Seam Binding, Sponge Daubers, Tag Punch, 1/8″ Circle Punch, Dimensionals, Mini Glue Dots

All products are Stampin’ Up!

Tenth anniversary

Tenth anniversary published on 19 Comments on Tenth anniversary

Today marks 10 years since one of the darkest days in recent history.  Last year I wrote about some of my experiences that day while working at United Airlines.  As I went back to read that post, I realized how much I didn’t cover.  I know everyone remembers that day with their own unique point of view and mine is very much as a working pilot.  I told you about flying that morning and the sky being so clear.  It is one of the things I will always picture clearly, I think.  I also spoke of how my day transpired.  On this landmark anniversary, I want to speak of another important thing I took away from the day.

While at O’Hare, after our passengers had been helped, my Captain and I were then left like many others.  We had no idea what to do to help.  You see, pilots are generally type A personalities and we like to fix things…immediately.  Like everyone else, we were left helpless as we watched the horror of the day unfolding.  We watched film of OUR airplane, our brothers and sisters, our customers being used to commit an atrocity.  There was a banding together in the crew room with people I had never met as we cried over the losses.  We became friends even though we had never met.  When we finally got to our hotel room, we rode in on a bus with some of our customers.  Later at dinner, while we watched the President speak to the country, those same customers bought our dinners.  They thanked us, even though they didn’t know us, for doing our job safely every day.  After we finally got the air traffic control system moving again, I was on my final leg home out of Portland, OR.  We came to the airport to find passengers dressed in their red, white and blue.  Perfect strangers banding together to go get on an airplane to Washington, DC, because no one was going to keep them from taking their trip.  They bonded, they hugged and that flight home was one of the best of my career.

So I guess that is my focus for this tenth anniversary.  Putting away the differences, showing civility to a stranger, assuming the best instead of the worst.  Figuratively letting the clouds clear and allowing ourselves see that beautiful blue sky again.

I suppose it isn’t hard to see my inspiration for today’s card.  I am thinking of all those who lost their lives on Sept. 11, 2011 and of all the heroes who stepped in to save even more from being lost.  This sketch is courtesy of a brand new sketch challenge, Freshly Made Sketches and is their first sketch FMS1.

Thanks for stopping in today.  I wish you a safe Patriot Day!

In memory of:

United 93:  Jason Dahl, LeRoy Homer, Lorraine Bay, Sandra Bradshaw, Wanda Green, CeeCee Lyles, Deorah Welsh

United 175:  Victor Saracini, Michael Horrocks, Robert Fangman, Amy Jarret, Amy King, Kathryn Laborie, Alfred Marchand, Michael Tarrou, Alicia Titus

American 11:  John Ogonowski, Thomas McGuinness, Barbara Arestegui, Jeffrey Collman, Sara Low, Karen Martin, Kathleen Nicosia, Betty Ong, Jean D. Roger, Dianne Snyder, Amy Sweeney

American 77:  Charles Burlingame III, David Charlebois, Michele Heidenberger, Jennifer Lewis, Kenneth Lewis, Renee May

Blueberry Jam

Blueberry Jam published on 8 Comments on Blueberry Jam

Hope you are not too hungry because you are really going to want Blueberry Jam after this post!!  My third project for the Creative Crew was to create a gift, recipe or home-style item based on the Domestic Goddess Suite.  I immediately thought of Blueberry Jam!

I love blueberry anything so jam is awesome!  Conveniently, I found a great recipe for it in the July edition of Real Simple magazine.  I thought about using it as a gift and the rest came into place quickly.  I found these little Ball 4 oz. jars (wide mouth) that are just perfect for giving.  The ring on the lid is the right size for the scallop circles from my Perfect Pennants die for the Big Shot so I stuck to decorating just the ring.

See how easy it is to remove the lid without messing up any of the pretty decorations??  I layered the two scallop circles and popped the Daffodil Delight one up on Dimensionals.  The little flowers come from the Fruit & Flowers stamp set and were inked up in the Suite’s colors.  I added some Calypso Coral Ruffled Ribbon and cinched the bow with a Daffodil Delight button.  The ribbon was secured around the ring using Sticky Strip.  Of course I had to make a recipe card to match since anyone who tastes it will want to make it!

This fun little project is quick and fun!  I can see changing the colors and stamps to create wonderful holiday gifts for friends and neighbors!

I’m glad you stopped by today.  Don’t forget that if you make a project for this challenge, post it and use key words CreativeCrew and CCREW0911CF.  I look forward to seeing your “Domestic Goddess” side!

Stamps:  Fruit & Flowers, Teeny Tiny Wishes; Paper:  Pool Party, Calypso Coral, Daffodil Delight, Whisper White; Ink:  Pool Party, Calypso Coral, Daffodil Delight, Basic Gray; Accessories:  Calypso Coral Ruffled Ribbon, Bright Designer Buttons, Ball 4 oz. jars, Big Shot, Perfect Pennants Die, Scallop Edge Border Punch


Petals for you

Petals for you published on 15 Comments on Petals for you

Just a quick card today…a birthday card for a dear friend!  She is a beautiful and elegant person so I wanted a card to match.  What fun to make a card like that!  I have Open Stamp at my house and it is so fun to get together with my friends.  They make wonderful cards and have such great creativity.  Today was our day to stamp and I used the sketch challenge from Splitcoaststampers.  The sketch is very similar to yesterday’s card and is fun to use!

The focus of this card is on the Paisley Petals DSP pack.  What beautiful paper!!  I chose the neutral pattern as the background and then some flowers to cut out of another sheet.  The Bravo Burgandy print adds a great pop of color.  Finally, I pulled out some Always Artichoke Seam Binding and made another “potato masher” bow from yesterday’s tutorial.  The sentiment comes from the hostess set Precious Butterflies.

Hope you like this one as much as I liked making it!  Because it is a birthday card (the inside says “Celebrate”), it also qualifies for The Paper Players Challenge to make birthday cards this week.  I’ll be back tomorrow with another project from the Creative Crew Challenge.  Thanks for stopping in today!

Stamp:  Precious Butterflies; Paper:  Paisley Petals DSP, Always Artichoke, Very Vanilla; Ink:  Always Artichoke; Accessories:  Always Artichoke Seam Binding, Dimensionals, Mini Glue Dots

All products are Stampin’ Up!

Quilted Bow

Quilted Bow published on 21 Comments on Quilted Bow

Guess what our theme is over at SU Only Challenges this week??!!!  RIBBONS AND BOWS!!!!!  Sorry to shout but I think we can agree that ribbon is one of the best ever accessories from Stampin’ Up!!  I love them all.  So then I was presented with a dilemma.  How do I choose which ribbon??!!  After much debate I simply went with the newest ribbon to my “collection”…Early Espresso Quilted Satin Ribbon.

I made the bow here using the same method as some previous cards and I will give you all the details further down in the post.  The card started with the new-to-me set French Foliage.  It was first introduced in last year’s Holiday Mini and when it made the big catalog went on my first order.  I looked to the Well Worn DSP and found this wood print.  Perfect background for the leaves!  The Early Espresso lines on the bottom of the DSP are part of the print and I created a matching top by running the edge of my ink pad along the DSP.  The leaves were inked in Cajun Craze, River Rock and Soft Suede with a bit of Early Espresso added to the edges with a sponge dauber.  Now to the bow…

You saw my previous tutorial on the fork bow and this is another variation using a potato masher.  It happens to make just the right size bow!!  The bow I made today is a triple bow but you can also use this for a single or double version.  Since it is so similar to the fork bow, the picture above shows it wrapped three times, one tail pulled down and the other pulled over (if you need to see the first steps better, click to the fork bow tutorial).

Turn over the potato masher and put it down on the table.

Add an additional piece of ribbon that long enough to go across the panel and wrap around a little to the back.  Position it so that the bow is in the correct place for your card.

Tie the first half of a know and position the tails of your bow to hang correctly.  Make any adjustments to your wrap-around piece before further tightening (this is especially important with Seam Binding).  Tighten knot as much as you can then pull off the tines of the masher.   Hold the sides of the bow as you do any final tightening.

Here is your final bow.  If it is a triple version, pull one of the inner loops to the top and one to the bottom to make it look like this.  I used a double version of this on the Always Artichoke Bright Hopes Card from the SA Blog Hop.  I do recommend that you try this with Seam Binding first and get the feel of the technique.  The Quilted Satin Ribbon is a bit thicker and you have to work a little bit to get the knot tight.  It is definitely worth the effort though!!

This is part of my continuing search for the “perfect” bow.  I love how consistent these are and the more you do, the faster they get!  I can’t wait to see what you make with the Stampin’ Up ribbons this week.  Make sure you get right over and see what the rest of the design team has made…I’m in love with the ribbon flowers, the poofy bows, the scrunching…well, all of them!

Thanks for stopping in today.  I hope you had a wonderful weekend!!

Stamps:  French Foliage, Always Thankful; Paper:  Well Worn DSP, Early Espresso, Naturals Ivory; Ink:  Cajun Craze, River Rock, Soft Suede, Early Espresso; Accessories:  Espresso Quilted Satin Ribbon, Color Spritzer Tool, Sponge Daubers

All products are Stampin’ Up!

Steampunk Inspiration

Steampunk Inspiration published on 8 Comments on Steampunk Inspiration

As promised, I am here to give you a little more information on the scrapbook inspiration project for September’s Creative Crew Challenges, CCREW0911SF.  You are challenged to take this scrapbook page and convert it into a Stampin’ Up Only creation while keeping the vintage/chic/steampunk feeling.  I have to admit that I was a bit overwhelmed by this one at first!!  Then I started playing with My Digital Studio and finally came upon a solution.  The MDS cog punch.  That got everything moving in the right direction.

I was able to create gears in all different sizes and colors.  I simply printed them out and cut them out (using circle punches for the centers).  Basic Black and Cajun Craze are the final colors.  Next I created an overlay to print onto First Edition DSP.  I started with Vintage Overlays and chose the pattern with the eagle.  Then I added the ruler from Timeless.  Once it was printed, I started playing around with the layout and needed a few extra details.  The line art from the retired Plane & Simple seemed perfect so I used the goggles and the airplane.  The cogs were too plain so I embossed them with clear embossing powder to add some dimension.  Finding the perfect picture was the most important part of all, of course!  This is my oldest son and one of his very best friends at an airshow last year.  I edited the photo to ensure you could still see the airplane parts from the C-5 in the background and printed it in sepia.  Finally, I spritzed on some black spatters.

I love this shadowbox (and so do my son and his friend)!  I took pictures without the glass and it was still hard to photograph.  If you click on either picture you can see some more of the detail.  I can’t say that this is truly steampunk but I think you can see the inspiration.  I hope you will give this challenge a try too…you never know where the creative challenge will take you!!  Don’t forget to upload on Splitcoaststampers and include the keywords CreativeCrew and CCREW0911SF.

Thanks for stopping in today.  Whew…6 days in a row of posting!!  I will be back on Tuesday for the next SU Only Challenge.  I’ll give you a small hint…the challenge includes one of my very favorite things from Stampin’ Up!!  Until Tuesday, have a safe and happy Labor Day weekend!

Stamps:  Plane & Simple (ret), Timeless (digital), Vintage Overlays (digital); Paper:  First Edition DSP, Well Worn DSP, Basic Black, Very Vanilla; Ink:  Basic Black, Basic Gray; Accessories:  My Digital Studio (MDS), 1″, 1 1/4″ and 1 3/8″ Circle Punches, Color Spritzer Tool, Dimensionals, Mini Glue Dots, Shadow Box (non-SU)

All products are Stampin’ Up unless otherwise indicated.

It is official…

It is official… published on 7 Comments on It is official…

the holiday stamping season is officially here!  Oh, I know the Holiday Mini went live yesterday but that is NOT what I am talking about.  I know that the holiday stamping season is officially here because Dasher has ink on him!!  And now that he has ink on him there is a good chance he will not leave the stamp table until January.  I know I should not  play favorites among my stamp sets but this little fellow never lets me down!

This week I get to be a guest designer for A La Card Monkey’s Challenge 72.  They have an awesome sketch that is combined with a Christmas theme.  So now you see why Dasher “had” to get inky!  Just look at the layout…doesn’t it just cry out for a reindeer???!!!  Ok, it did to me!

I think it is becoming clear that I am leaning towards monochromatic cards for Christmas this year.  Today I used Early Espresso and Whisper White.  The designer paper is from the Berry Blossoms DSP pack.  Early Espresso Baker’s Twine seemed like a natural to pair with the paper!  I wrapped it around the Early Espresso frame layer first and secured it in back.  Then I tied on the bow.  Some little bows on my buttons and it is complete!  The best part about this card is that it doesn’t take hours to make and you can make lots of them, in a variety of colors, using different Baker’s Twine choices, Linen Thread, or Twine.  Now is the time to get to work on those cards so you aren’t in the last minute rush!  We can now pretend that I’m not always in the last minute rush!!  *smile*

With a layout this fun to use, you need to get right to work and play along!!  Maybe you can pair it with the Creative Crew Color Focus Challenge too.  See??  Your card is almost done!

Thanks for stopping in today!  Can you believe that I have posted this many days in a row??  Might be a new record!  Hang on to your stamps but I will be back tomorrow with some more details about my vintage/chic/steampunk inspired shadow box project.  Have a great day!!

Stamps:  Dasher, Short & Sweet; Paper:  Berry Blossoms DSP, Early Espresso, Whisper White; Ink:  Early Espresso; Accessories:  Early Espresso Baker’s Twine, Neutrals Designer Buttons, Dimensionals

All products are Stampin’ Up!

Creative Crew Color Focus

Creative Crew Color Focus published on 15 Comments on Creative Crew Color Focus

Well, as you can see I am lucky enough to have been chosen to be on the Creative Crew at Splitcoaststampers for the fall quarter.  Yippee!!!  I have posted all four of the challenges in the Splitcoaststampers Creative Crew Gallery and will be detailing them here over the next few days.

Today I am starting with the Color Focus Challenge,  CC0911DF.  The September focus is based on the Timeless Portrait DSP.  You can use the DSP or you can use at least three of the colors:  River Rock, Basic Black, Cherry Cobbler, Very Vanilla and Island Indigo.

My goal was to use all of the colors so that I could demonstrate the “feel” of the paper without actually using it.  I don’t have any of the stamps from the suite (yet) so I used the a set that has a similar bold image, Precious Butterflies.  I cut the large butterfly with the Big Shot and the Beautiful Butterflies die.  I overstamped it in Basic Black.  The little butterfly was cut using the Beautiful Wings Embosslit out of Island Indigo card stock.  The embossed pattern on the River Rock panel is from a Backgrounds 1 Texturz Plate.  Don’t all the swirls and images go together perfectly??  Now, what are those black pearls??  Stampin’ Up doesn’t carry black pearls!!  No, they carry Basic Pearls and you can use them for almost everything!  I just took a black Sharpie marker to the ones I needed and made them black.  Cool, huh??!!  I scrunched the Cherry Cobbler Seam Binding using Sticky Strip behind it.  This is a fast and easy way to add texture without adding a bow.  Finally, I put my whole layer on a background of  First Edition DSP.  Hard to see here, but I chose a print that talks about butterflies.  This awesome layout is courtesy of the Operators at Stampin’ 411.

I can’t wait to tell you more about my other projects so stop back by over the next week to see more.  Now it is your turn to play.  You have a WHOLE MONTH…there is no excuse.  You can use the key word CreativeCrew (one word) to any project you upload.  I can’t wait to see what awesome projects await!

Stamp:  Precious Butterflies; Paper:  First Edition DSP, River Rock, Cherry Cobbler, Basic Black, Very Vanilla; Ink: Basic Black; Accessories:  Big Shot, Beautiful Butterflies Die, Beautiful Wings Embosslit, Backgrounds 1 Texturz Plates, Cherry Cobbler Seam Binding, Sticky Strip, Basic Pearls

Bright Hopes Gift Box

Bright Hopes Gift Box published on 6 Comments on Bright Hopes Gift Box

Today I am going to show you a little more detail about the Kraft Gift Box project from the Stampin’ Addicts Holiday Mini Blog Hop.  I love these little boxes and you really can’t beat the price!!  To start, I stamped the snowflake from Bright Hopes all around the sides of the box using Soft Suede and then assembled the box per the included instructions.

Next I created a tag using a Naturals Ivory.  I used my Champagne Mist Shimmer paint to create a Shimmer Spray.  All you have to do is fill a travel size spray container with about 1 ounce (half a bottle) of regular rubbing alcohol.  Then add drops of Shimmer Paint until it is as shimmery as you like (I use about 12-15 drops since I want some sparkle).  Shake well before each use.  I recommend you use this where the alcohol will not cause damage, either using the Color Catcher or other protective surface.  Spray your tag and set aside to dry.  Then I stamped with Soft Suede Ink again and Night of Navy.  You can see the sparkle if you click to look close-up but it is much prettier in person!

Next was the ribbon.  I used the Puffy Bow Tutorial from the extraordinarily talented stampers at Stampin’ 411.  I love their challenges but make sure you take some time to peruse their tutorials.  Fantastic information!!  The Denim Jean Ribbon is not quite as easy to cut as the Seam Binding shown in the tutorial but with a little patience you just follow the same instructions.  I left “tails” and attached the bow and tails to the top with Sticky Strip (I wrapped the ends around the lid).  I did the same with a length of ribbon around the box to make it look like a package.  Trim the ribbon to the right length and carefully, really carefully, seal the ends of the ribbon with a lighter so they don’t fray.

This allows you to open the box without having to take anything apart.  Just so you know, the box was perfect for five chocolate chip cookies.  Sadly, the cookies didn’t last much beyond this photo being taken.  My boys were waiting very patiently for me to finish and how could I say no??!!

I’m planning on ordering more packages of these little boxes and using them for all kinds of holiday gifts.  I can’t wait to make more of these bows using all kinds of other ribbon.  Just make sure you tell the Operators thanks for the tutorial and give them credit if you use it!!

I’m off to put some last minute touches on a project for tomorrow.  I look forward to sharing it and some fun news!  See you then!

Stamp:  Bright Hopes; Paper:  Naturals Ivory, Night of Navy; Ink:  Night Of Navy, Soft Suede: Accessories:  Kraft Gift Box, Blue Denim Jean Ribbon, Sticky Strip

All products are Stampin’ Up!

Primary Sidebar