Skip to content

SUOC8 – Garnet and Gold

SUOC8 – Garnet and Gold published on 9 Comments on SUOC8 – Garnet and Gold

Ok, it isn’t really Garnet and Gold but when you went to The Florida State University that is what Bravo Burgandy and More Mustard look like to you!!  While it wasn’t an auspicious football year, at least we beat the Gators and that is something to cheer for (Gators, please hold your comments…it has been quite a while since we have won!). 

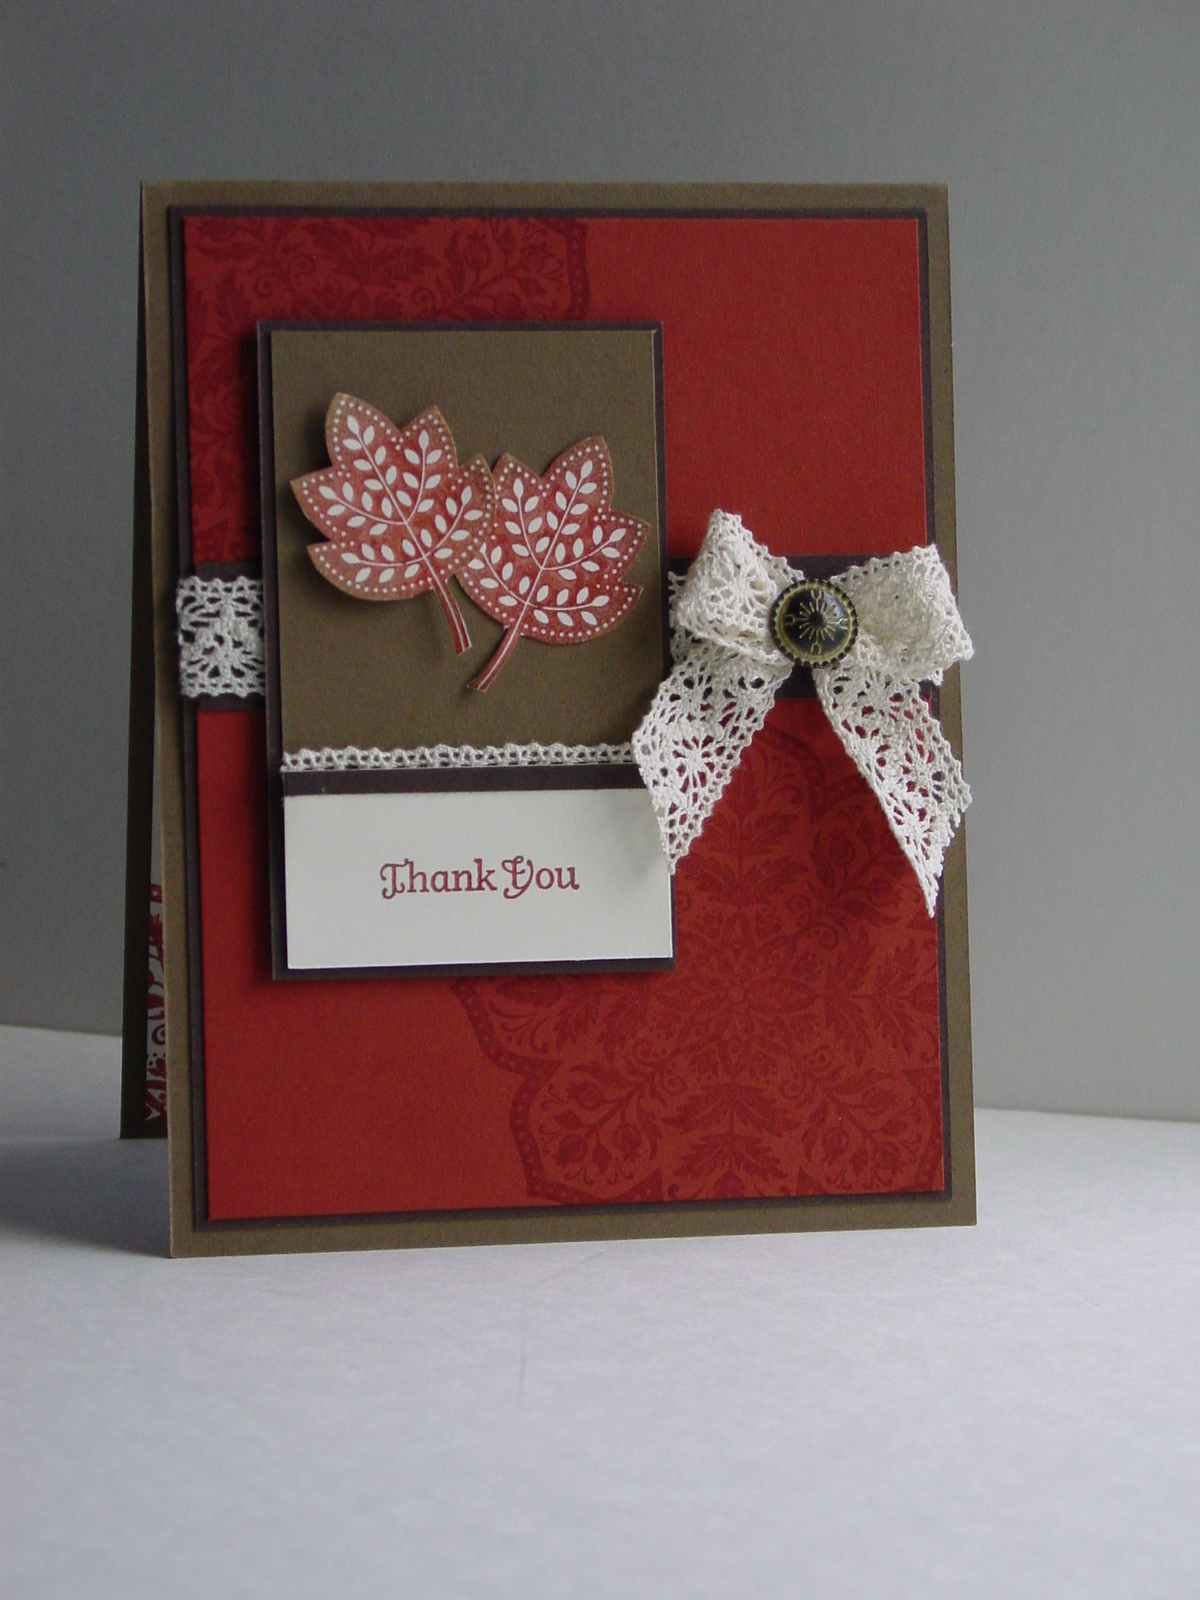
Alright, back on task…the challenge this week for the SUO Challenges is Embossing with a Color Challenge:  Bravo Burgandy, More Mustard and Very Vanilla.  The easiest way I know of to add dry embossing to a project is to pull out the Big Shot and there is no better way to add dimension to a simple layout than using the Square Lattice Embossing Folder!  For any new readers, this had been my favorite embossing folder and I have used it heavily since I bought it.  You just can’t go wrong with it!  I stamped out some leaves from my Day of Gratitude set and stamped them in Mustard and Burgandy.  I cut one out and popped it up on Dimesionals and put on a sentiment from the same set. 

I tied on the button from the Regals Collection with some thread.  I took the thread and colored it with my Burgandy marker to give it that finished look.  Amazing how such a small (and easy) detail can complete the coordination!

I don’t know about you but I get so focused on making all my Christmas cards that I forget about all the thank you cards I’m going to need after the holidays!  At least one is done now!  Don’t forget to go see all the fantastic projects from the rest of the team at SUO Challenges…you’ll be impressed with the wide variety of styles with this color set!  The challenge is open for two weeks so you should have plenty of time to join in.  Can’t wait to see what you make!

I’ll be back later this week with a beautiful card that I received Australia (imagine my excitement!)!!  Until then, have a great week!

Stamp:  Day of Gratitude (Holiday Mini); Paper:  Bravo Burgandy, More Mustard, Very Vanilla; Ink:  Bravo Burgandy, More Mustard; Accessories:  Vanilla Satin Ribbon, Regals Designer Buttons, Thread (non-SU)

All products are Stampin’ Up unless otherwise indicated.

SUO Challenges Design Team

SUO Challenges Design Team published on 6 Comments on SUO Challenges Design Team

You may notice today that I have a new little blinkie on my sidebar.  I was asked to be one of the new members of the SUO Challenges Design Team and I couldn’t be more thrilled!!  If you are not familiar with the SUO Challenges site, you really should take a look.  They post challenges every other Tuesday demonstrating wonderful ways to showcase the fabulous products offered by Stampin’ Up!  It isn’t too late to join in the current challenge, SUO Challenge 7 Clean & Simple Christmas Cards.  We all have those in our repetoire and I would love to see them (because I still have to finish mine…she says quite selfishly looking for more ideas). 

My sincere thanks to the whole team for choosing me to join their ranks.  Go take a look at their blogs and you will see some amazing talent!!

Amy Fink

Cindy Coutts

Deb Hoekstra

Karen Barber

Melina Pylant

Michelle Laycock

Patricia Weitzel

I look forward to my first challenge with them starting next Tuesday.  Make sure you drop by the challenge site then to see what everyone has to show you!  I hope you have a great Friday!

Shimmer rewash

Shimmer rewash published on 10 Comments on Shimmer rewash

I’m back to work on my Christmas cards this week and there were some challenges to get me on track.  The first is the SUO Challenge 7 for Clean & Simple Christmas Cards.  Over at Splitcoaststampers there are two challenges today, the first is the CAS challenge to use bows and the other is the Technique Lovers Challenge for emboss resist.  Finally, Shelli Gardner over at So Shelli asked for techniques as her challenge this month.  I have to say that after all the classes I have been having that my creative level is a little low.  I’m sure that will be fixed soon enough but I was happy to have a little help from the challenges. 

I saw the technique called “emboss rewash” while I was at the Stampin’ Up Regionals in October.  Shannon West did a demo of the technique and I loved it!  It is a version of emboss resist using watercolor paper and an Aquapainter.  You emboss your image and then, instead of sponging, you “wash” the color around the image with your wet Aquapainter and ink.  I tried it on today’s card with the snowflake from Snow Swirled.  I stamped it in Versamark ink, embossed it with Clear Stampin’ Emboss Powder then washed over my Night of Navy ink.  It looks incredibly cool!  To add a touch of holiday feel, I then washed over some Frost White Shimmer Paint too.  Finally I stamped the words from All Holidays (one of my favorite sentiments for Christmas cards!) in Night of Navy ink.  I kept the layout simple and just added my Vanilla Satin bow and a Basic Pearl.  I love how the shimmer paint and ribbon make this feel special but that it is really easy to duplicate for a lot of cards!  The hardest part of this was getting a good picture since the shimmer kept reflecting back.

I know this picture is a bit dark but I had to take it in shadows so you could see the image.  Here are a couple more pictures where you can really see the pearlized look of the Frost White Shimmer Paint.

You can see all the reflection bouncing back in these two pictures.  I must say that this card is so much prettier in person!!

Now that I have this one done, I’m off to complete some more.  My Advent countdown calendar says 19 days and I have lots more work to do.  I will be back tomorrow with the rest of my tags from my class last week.  Hope your day is full of Peace, Love and Joy!

Stamps:  Snow Swirled, All Holidays; Paper:  Watercolor, Very Vanilla, Night of Navy; Ink:  Versamark, Night of Navy; Accessories:  Stampin’ Emboss Powder, Heat Tool, Frost White Shimmer Paint, Aquapainter, Vanilla Satin Ribbon, Dimensionals, Basic Pearls

All products are Stampin’ Up!

All wrapped up!

All wrapped up! published on 12 Comments on All wrapped up!

My planning for my gifts class next week, that is!  At least almost all wrapped up.  I am so excited to show you my card that is meant to go with the wreath posted here.  My initial inspiration for a wreath card came from Cindy over at Heart’s Delight Cards and her delightful work in the Holiday Mini Blog Hop.  Her wreath card is just stunning!!  After some playing with the idea, I realized that I needed a card that “matched” my wreath a little better.  I saw the SUO Challenge 5 for Punch Art and it got me thinking.  Here is the card that resulted:

So where, you ask, are the punches??  I am definitely not a punch art talent like so many you will see over on the SUO Challenge page, but I am pretty excited about this.  The wreath “form” is made using punches. 

You start with a 1 3/8″ Circle Punch and pop your circle out of Always Artichoke paper.  Make sure you leave room for the larger punch to go around the circle.  Next, center your circle inside the 1 3/4″ Circle Punch and make your ring.

Cut approximately 12 inches of ribbon.  This may have to be adjusted based on the width of your ribbon choice.  My ribbon is the Always Artichoke Seam Binding which is 1/2″ wide.  Next, you attach one end of your ribbon to the back side of your ring.  I used Dotto so that I could reposition the ribbon a bit if necessary.  Then you just wrap the ribbon around the ring.

In the interest of space, I kept the pictures small but you can see them bigger simply by clicking on them.  Once I got all the way around, I attached the end to the back of the wreath with a Mini Glue Dot and trimmed the excess.  I put my bow on top of the beginning/end point to cover the overlap. 

The layout was still influenced by Cindy’s beautiful card and I used the Heard from the Heart sentiment.  I love the message in that one!!  I have to show you the wreath and its accompanying card together, of course, so here they are.

See how special it is to make a Handmade Holiday combination??  Stampin’ Up continues to celebrate the idea of the handmade gift with their Holiday Bundles (see sidebar).  On that note, Shelli Gardner from So Shelli (and the CEO of Stampin’ Up!, of course) has posted her Creative Challenge for November…Holiday Hellos.  I think this card fits the bill perfectly. 

I hope you have a great day!  Thanks for stopping by!  More from the Christmas Gifts Class coming soon!

Stamp:  Heard from the Heart; Paper:  Naturals Ivory, Always Artichoke; Ink:  Cherry Cobbler, Always Artichoke; Accessories:  Seam Binding in Cherry Cobbler and Always Artichoke, Mini Glue Dots, 1 3/8″ and 1 3/4″ Circle Punches

All products are Stampin’ Up!

…Fa, la, la, la, la…

…Fa, la, la, la, la… published on 13 Comments on …Fa, la, la, la, la…

My thanks to SUO Challenges and Stampin’ Royalty for choosing this wreath as the SUO Top 3 and a Goddess Pick!!  All the projects were stunning and I am thrilled to be chosen!

Sing along with me!  Deck the Halls with fabric and ribbon, fa la la la la, la la la la!!  Or, just use Deck the Halls fabric and Seam Binding ribbon to make something fabulous!  Conveniently enough, there are three challenges this week which want you to use fabric or ribbon.  The first is the SUO Challenge #4 which asks you to use Fabric or Waffle Paper on your project.  The second is from Stampin’ Royalty with the theme Ribbons, Ribbons, Ribbons.  Last is WT293 (Ways to Use It) over at Splitcoaststampers.  Ever since seeing the new fabric offering from Stampin’ Up, I have had the idea of a wreath spinning around in my head.  You must understand that this is significant since I don’t really sew!  My mother is a quilter and makes the most beautiful things but…yes, I don’t really sew.  That meant my wreath had to be a no-sew project.  I had a pretty good idea of what to do for the wreath itself but when I saw these rosette flowers created by Betty at Kitty Stamp, I knew this was the perfect embellishment.  I have to make sure that I give credit to my mom.  When I first made this, it only had three flowers.  I sent the picture to my mom for an honest critique and she told me to add two more for a better balance.  She was right, don’t you think??!!  I am in love with the clean lines of this wreath! 

Here is a close-up of the flowers:

The best part is that I can actually make two of these out of one package of fabric and still have some of the Cherry/Vanilla fabric left for other uses. 

This wreath will be part of a  gift class I am offering in November.  Please forgive me if I hold onto the specifics until that class is over.  I can’t begin to tell you how lovely this fabric is in person.  In fact, getting this inspired me to finally give in on the Deck the Halls DSP.  I know…it is shocking that I held off as long as I as i did!  I hope this starts getting you into the spirit of creating and giving your “Handmade Holiday” gifts this season (don’t forget the Handmade Holiday bundles listed on my sidebar)!!

Fabric:  Deck the Halls; Ribbon:  Cherry Cobbler Seam Binding; SU Accessories:  Sticky Pages, 1 3/4″ Circle Punch, Mini Glue Dots; Non SU items:  Wreath form, pins

All products are Stampin’ Up unless otherwise indicated.

Fall thank you

Fall thank you published on 14 Comments on Fall thank you

Thanks to the SUO Challenge team for choosing this as Top 3 Winner!!

I mentioned yesterday how much I have to be thankful for and I continued on my thank you card trend today.  While I was at Regionals, my fabulous upline gave me some fun goodies to play with so I “had” to use them today.  Brandi knows that I can’t resist a pretty ribbon and she gave me a whole pack of samples to use (expect to keep seeing them).  One was the beautiful Victoria Crochet Trim.  How did I not already have this??  Rest assured, it has been ordered now!  She also included some Antique Brads which are particularly great with the Crochet Trim.  Of course I used the Day of Gratitude set again.  Here is the result:

The sketch comes from Stacey Schafer who is a guest designer at 2 Sketches 4 You this week.  I used her bonus sketch.  This card also meets the requirement for the Stampin’ Up Only Challenge #3 to use products from the Holiday Mini.  Finally, it is another card for Shelli’s October Challenge .

The leaves are stamped using a technique taught last weekend by the very talented Ilina Crouse from My Creations.  You ink up the image and then sponge another color on the edges using a sponge dauber.  Love the look!  I going to be playing with variations of color and this technique for a while. 

Hope your week is going well.  I’m going to be working on more fun stuff for my hostess clubs that meet next week so expect to see those soon. 

Stamp:  Day of Gratitude; Paper:  Cajun Craze, Soft Suede, Early Espresso, Very Vanilla; Ink:  Cajun Craze, Soft Suede, Versamark; Accessories:  Victoria Crochet Trim, Antique Brads, Dimensionals

All products are Stampin’ Up!

Rejoicing in CAS

Rejoicing in CAS published on 11 Comments on Rejoicing in CAS

Now I have to admit that I almost didn’t post this card because it is similar to another I’ve already posted.  The reason I changed my mind is that I wanted to show you how the addition of a textured panel can really take the card up a notch.  My layout today is a slight modification of the OWH Sketch #35.  They post wonderful sketches every Sunday, most of which are the Clean and Simple style (all the better to make lots of cards for heroes).  I mentioned last week that there is a new challenge, SUO Challenges, and they have a new challenge up – SUOC2.  They are, in fact, the reason I decided to post this card.  While my little panel is a small example of how much the Big Shot can add to your stamping, I thought it important to show how this tool can help you add dimension.  When I am stamping in monochomatic or subdued tones, texture becomes very important.  I love how the Square Lattice Embossing Folder adds that certain something to this card.  On the stamped panel I used watercolor paper for its lovely blending qualities.  On both Mary and Joseph’s headpieces, I finished the watercoloring by adding shimmer paint.  Champagne Mist was used on Joseph and Frost White on Mary.

Here is a closeup of the shimmer paint.

I continue to love this set!  It lends itself to clean and simple cards that put the focus squarely on the Holy Family itself.  I got a bit behind on my own Christmas stamping with my OWH card drive so this one (and the ones I will make like it) will go a towards my little stash of personal cards.  I hope you have a great day…thanks for stopping by!

Stamp:  Rejoicing in Christmas; Paper:  Crumb Cake, Early Espresso, Watercolor; Ink:  Stazon, Early Espresso, Not Quite Navy, Always Artichoke, Crumb Cake; Accessories:  Shimmer Paints, Vanilla Satin Ribbon, Big Shot, Square Lattice Embossing Folder, Dimensionals

All products are Stampin’ Up!

Primary Sidebar