Welcome to our “Facebook Friday” edition of the May Artisan Wednesday Wow hop. Boy do we have some fun for you this month!! This week, we are showing off even more fun from the new catalog. Did you see the projects posted in the Artisan Showcase on the Stampin’ Up Facebook page? Now is the time to get all the details. If you just came over from the amazing Jeanna, welcome to the next stop. If you are starting here, just continue around using the next buttons until you get back to me.
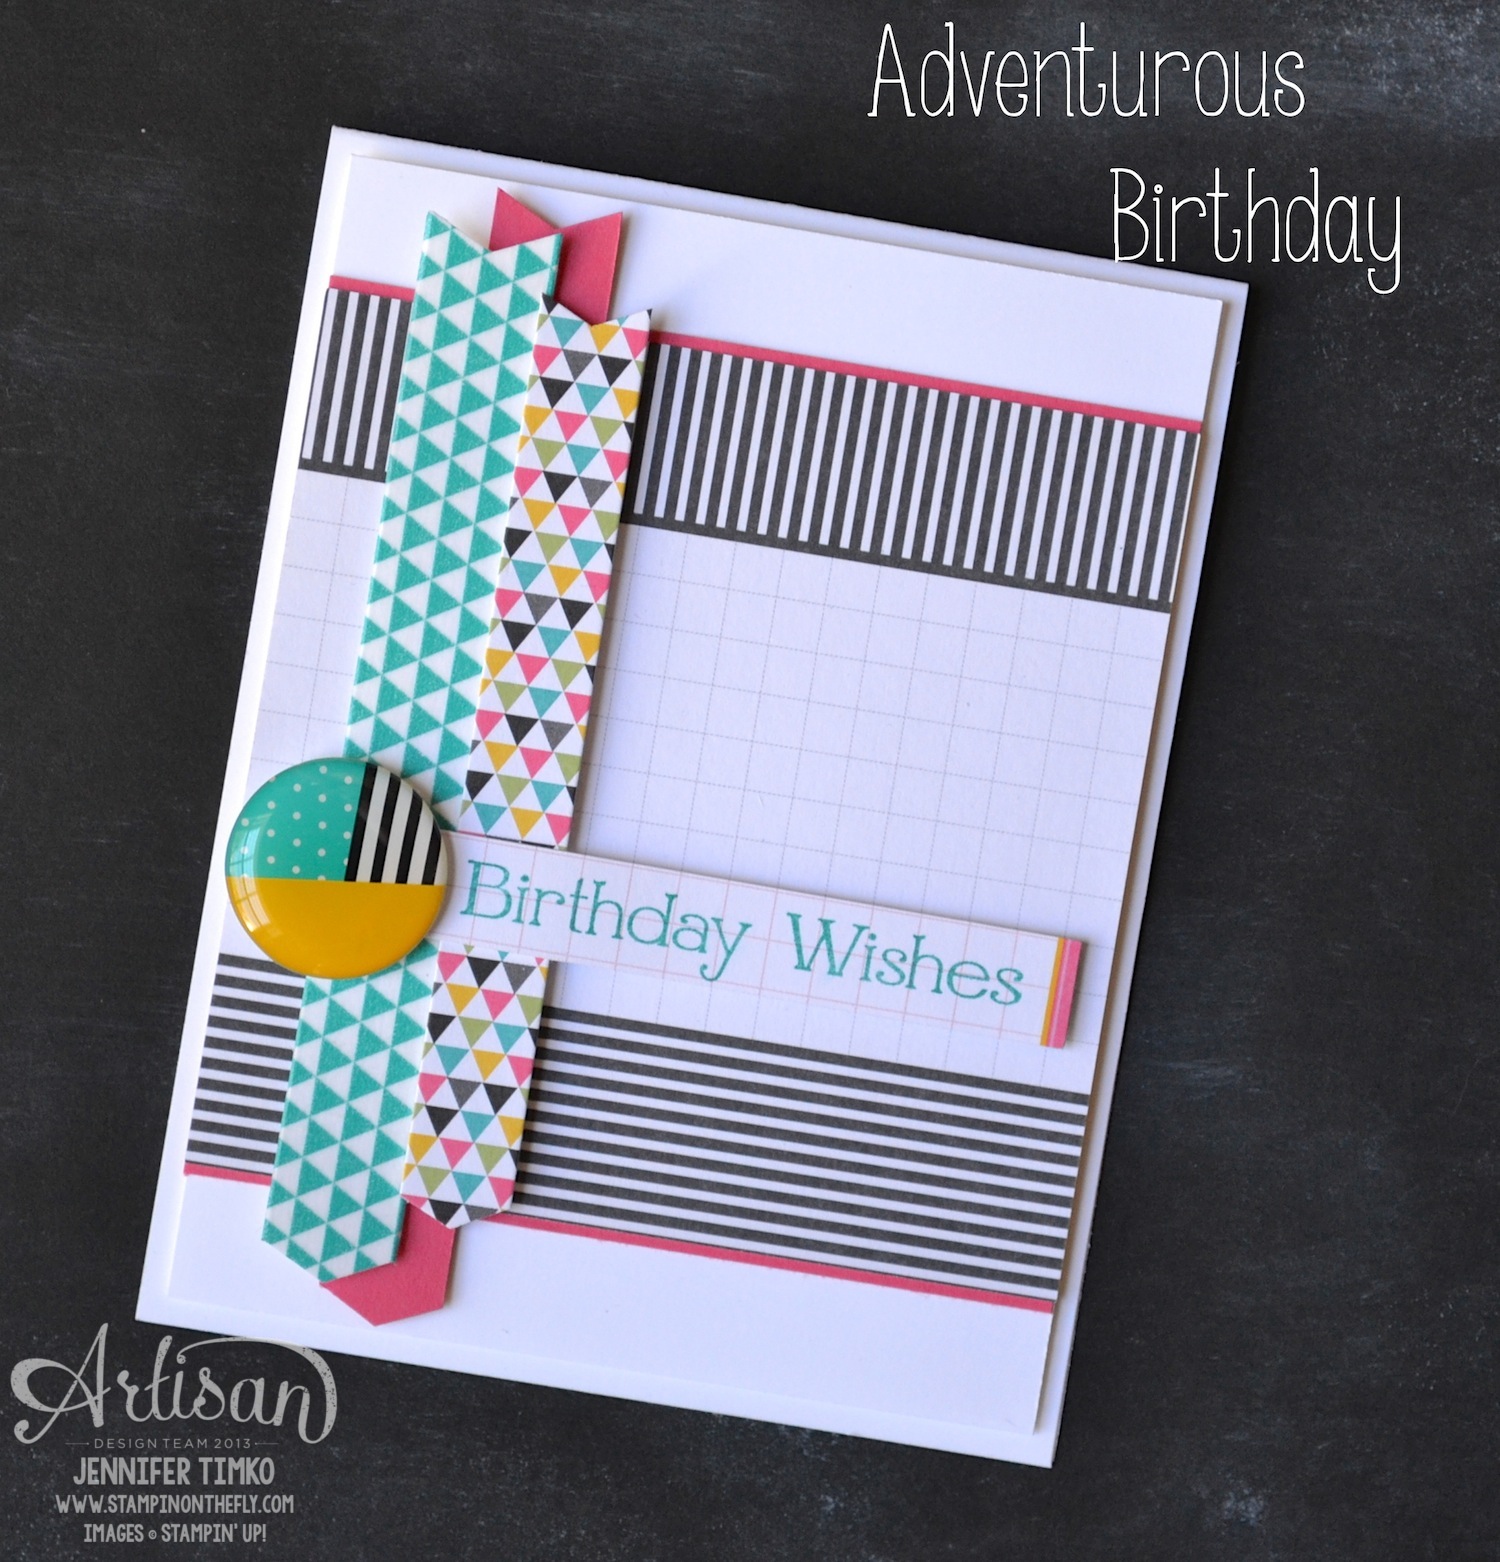
I’m back this week to showing you something made with the Project Life® by Stampin’ Up® line of products (abbreviation PLxSU). They Everyday Adventure collection is such fun! Of course it is great for scrapbooking but I wanted to see how it is for making cards. Yep, it is great! Each of the cards in the PLxSU collection are different so this is not for mass production. It is, however, perfect for fun and fast one of a kind cards. I chose the striped card and cut it down to the right size then let the rest of the products to the work. The Bermuda Bay chevron is made using the Washi Tape from the Everyday Adventure Accessories Collection, the multicolored chevron is one of the stickers and the flair button is from the accessories too. I took a second card that had a coordinating grid in Strawberry Slush and stamped on the sentiment from Four You. The color in this collection are perfect for anyone so sit down and make a stack of cards to have ready when you need them!
Okay, off to go visit the awesome Mercedes Weber. I can’t wait for you to see what she has created! Make sure you hop around the whole loop to take a look at beautiful creations by the whole team…you’ll be happy you did!
Click HERE to purchase any of these wonderful Stampin’ Up products.
Stamp: Four You; Ink: Bermuda Bay; Paper: Strawberry Slush, Whisper White; Accessories: Everyday Adventure Project Life Accessory Pack, Everyday Adventure Project Life Card Collection
Welcome to our next edition of the May Artisan Wednesday Wow hop. Boy do we have some fun for you this month!! Last week the whole team showcased the new Project Life® by Stampin’ Up® line of products. This week, we are showing off even more fun from the new catalog. If you just came over from the amazing Jeanna, welcome to the next stop. If you are starting here, just continue around using the next buttons until you get back to me.
I know Mother’s Day has already passed but I could not resist showing you this card. The stamp sets are Peaceful Petals from the Occasions Catalog and Papillon Potpourri that continues into the new catalog. They are perfect together!! I stamped the flowers with the new Memento Black Ink and then stamped the leaves with a mask to protect the flowers. Those vibrant colors are courtesy of the new Blendabilities Alcohol Markers and wow are they fun! The depth of color is so extraordinary!! I used the Cherry Cobbler set on the flowers, Old Olive on the leaves and then a combination of Daffodil Delight and Coastal Cabana on the butterfly. And about those gems. They are not new to the catalog. They are the ever so fabulous staple Basic Rhinestones, except colored with the Daffodil Delight Blendabilities (medium color). Makes all the difference, doesn’t it?! Oh, and you can color the Vintage Faceted Buttons too (I colored the back side only with the same marker as the rhinestones). The ink stays put and you can coordinate with your image. Swoon!! I’m officially in love! I used the Hardwood stamp to create the background. Early Espresso stamped on Crumb Cake Card Stock to start. Then I cut the image apart and sponged each piece. They are attached back to a Crumb Cake base and they look almost real….even next to my real wood background. The sentiment is from Teeny Tiny Wishes and you could sub out almost any little sentiment in its place. This card was for my mom and for once she actually saw it before it went on my blog. Hope your day was great mom!!
Okay, off to go visit the awesome Mercedes Weber. I can’t wait for you to see what she has created! Make sure you hop around the whole loop to take a look at beautiful creations by the whole team…you’ll be happy you did!
Click HERE to purchase any of these wonderful Stampin’ Up products.
Welcome to the first edition of the May Artisan Wednesday Wow hop. Boy do we have some fun for you this month!! Did you hear the big news at Stampin’ Up? Ok….there is lots of big news. So did you hear the news about Project Life® by Stampin’ Up®?? Well the Artisan Design Team has all the available products and we are showing them off this week! If you just came over from the amazing Jeanna, welcome to the next stop. If you are starting here, just continue around using the next buttons until you get back to me.
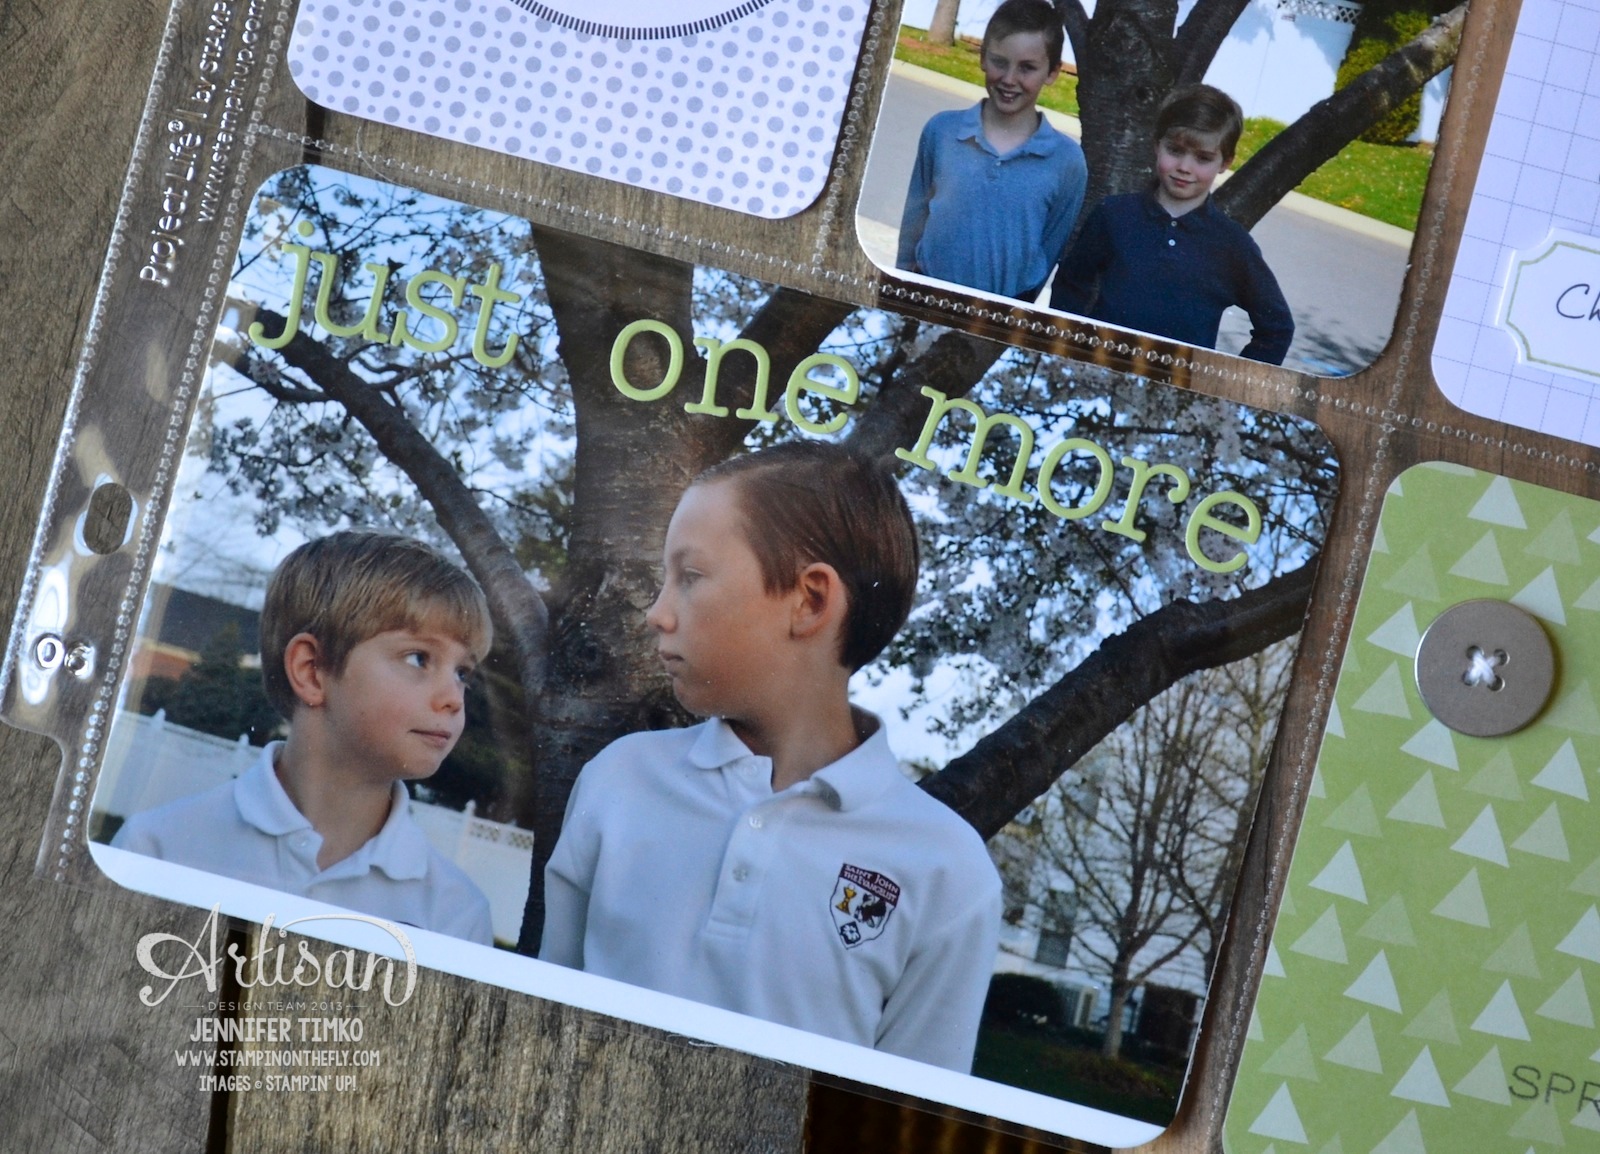
True confession time. I am not much of a scrapbooker. Yes, I make scrapbook pages but that is not the same thing. Creating a whole book somehow seems overwhelming to me. When I heard about Project Life® by Stampin’ Up®, I wasn’t sure what to think. So let me tell you how my process for this page went. Came home from dropping off kids from school. Turned on computer and scanned for pictures. Pondered pictures, almost panicked, chose pictures. Edited pictures and threw them into MDS for easy printing. Added little banner onto one picture in MDS. Went to printer, fought with printer, printed out pictures. Took pictures to “Mom Cave” (my stamp room). Breathed sigh of relief when I realized the new Project Life® Cards & Labels Framelits would cut pictures to perfect size. Cut them out with Big Shot. Laid pictures on Photo Pocket Page, figured out which sections still needed to be filled. Went through Project Life® Everyday Adventure Card Collection and Accessory Pack and picked cards and doodads that match pictures. Yes…there are official names I’m sure but the doodads are more fun to say. Rounded corners of cards with new Project Life® Corner Punch. Pulled out new Day to Day stamp and stamped date onto card. Figured out that Starburst Sayings stamp would be good in circle. Stamped and cut with Starburst Framelits. Grabbed Basic Metal Buttons, added where needed. Panicked slightly over terrible handwriting. Wrote accurate assessment of taking pictures with children (not the Facebook version where everything is perfect, lol). DONE!!!! Total time fussing with pictures: 1 hour. Total time to make scrapbook page: 45 minutes. Hmmm….might need to get some pictures organized and printed!!!
More truth (if you can stand it). I thought that maybe this wasn’t Artisan-y enough. After all, you have all come to expect great things from the hops. But while I was tempted to pull out the sewing machine and all kinds of extras, that isn’t really the point of this way of scrapping. This is supposed to document real life in a really manageable way. Which means actually makable by busy people in spare minutes. So here it is. My first step in becoming a real live scrapbooker.
I know the team has all kinds of cool stuff planned for you today! I hope you enjoy our introduction of this fabulous new collaboration!
Okay, off to go visit the awesome Mercedes Weber. I can’t wait for you to see what she has created! Make sure you hop around the whole loop to take a look at beautiful creations by the whole team…you’ll be happy you did!
Click HERE to purchase any of these wonderful Stampin’ Up products.
Stamps: Day to Day, Point & Click, Starburst Sayings; Ink: Bermuda Bay, Basic Gray, Pear Pizzazz; Accessories: Project Life® by Stampin’ Up® Everyday Adventures Card Collection and Accessory Pack, Project Life® Photo Pocket Pages, Project Life® Corner Punch, Project Life® Journaling Pens, Basic Metal Buttons, White Baker’s Twine, Paper Clip, Stapler, Dimensionals, MDS, Starburst Framelits
This is our bonus week in May for the Artisan Wednesday Wow hop and we are all announcing our giveaway winners. If you just came over from the amazing Jeanna, welcome to the next stop. If you are starting here, just continue around using the next buttons until you get back to me.
So without further delay…the winner of the Burlap and Blooms Simply Created Wreath Kit and Tea Lace Doilies is:
JODI CASTEEL – from your Pinterest Pin
Please contact me and I’ll get your information for Stampin’ Up to send out your prize! I need it by May 5th or I’ll have to choose another name.
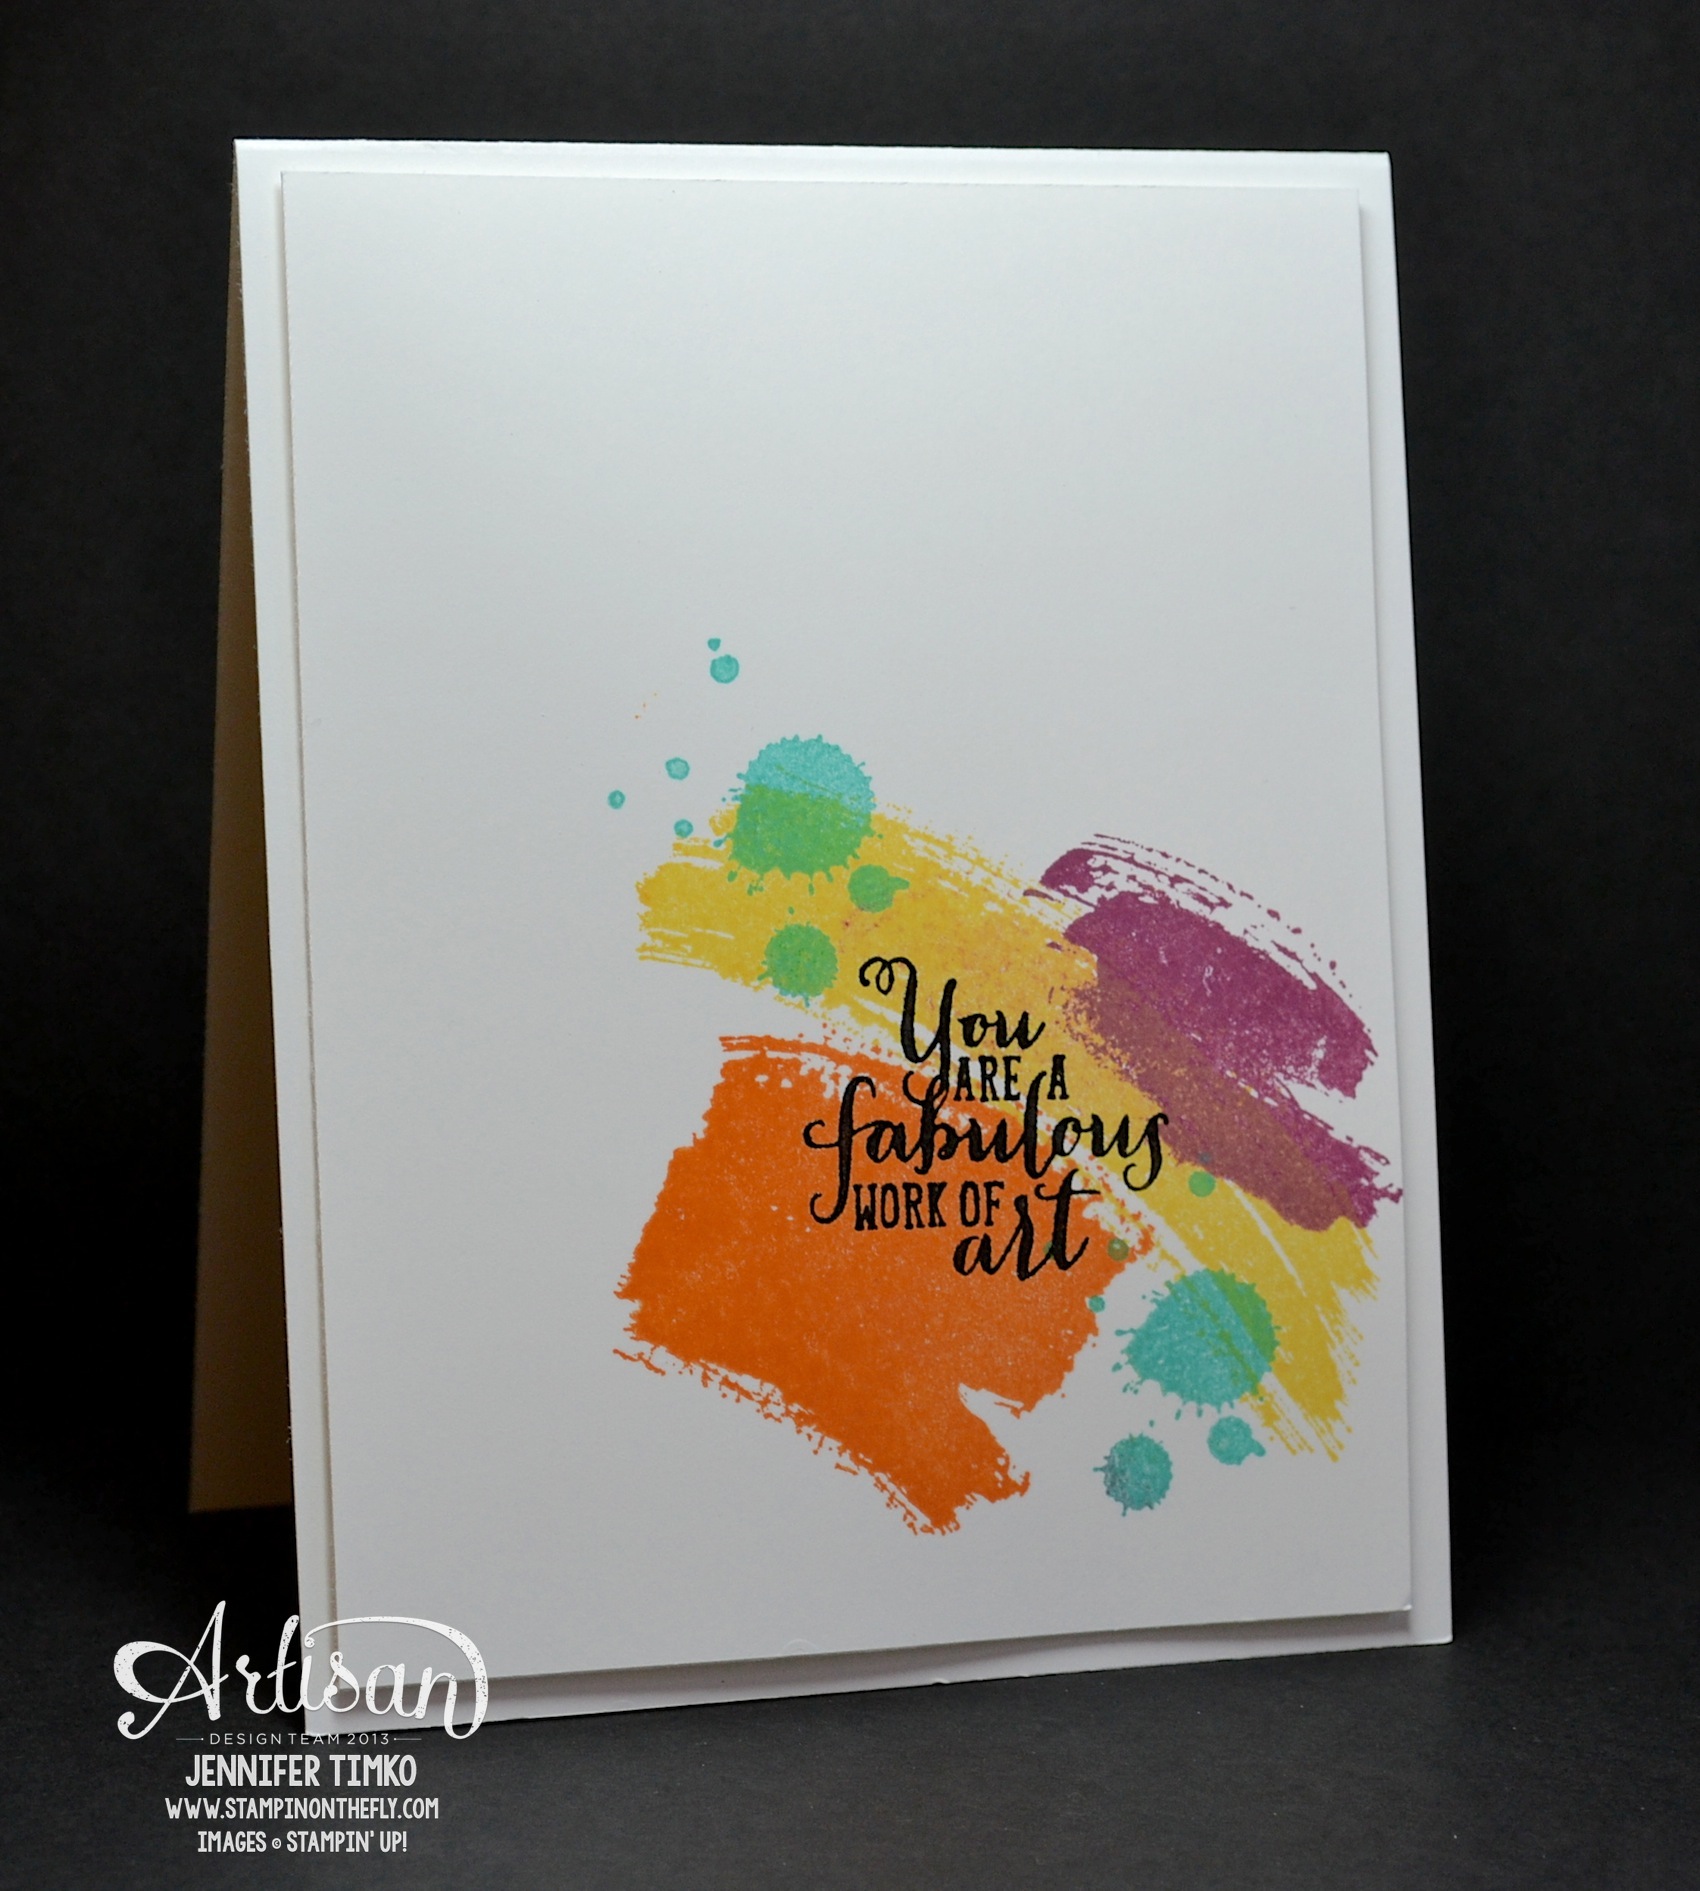
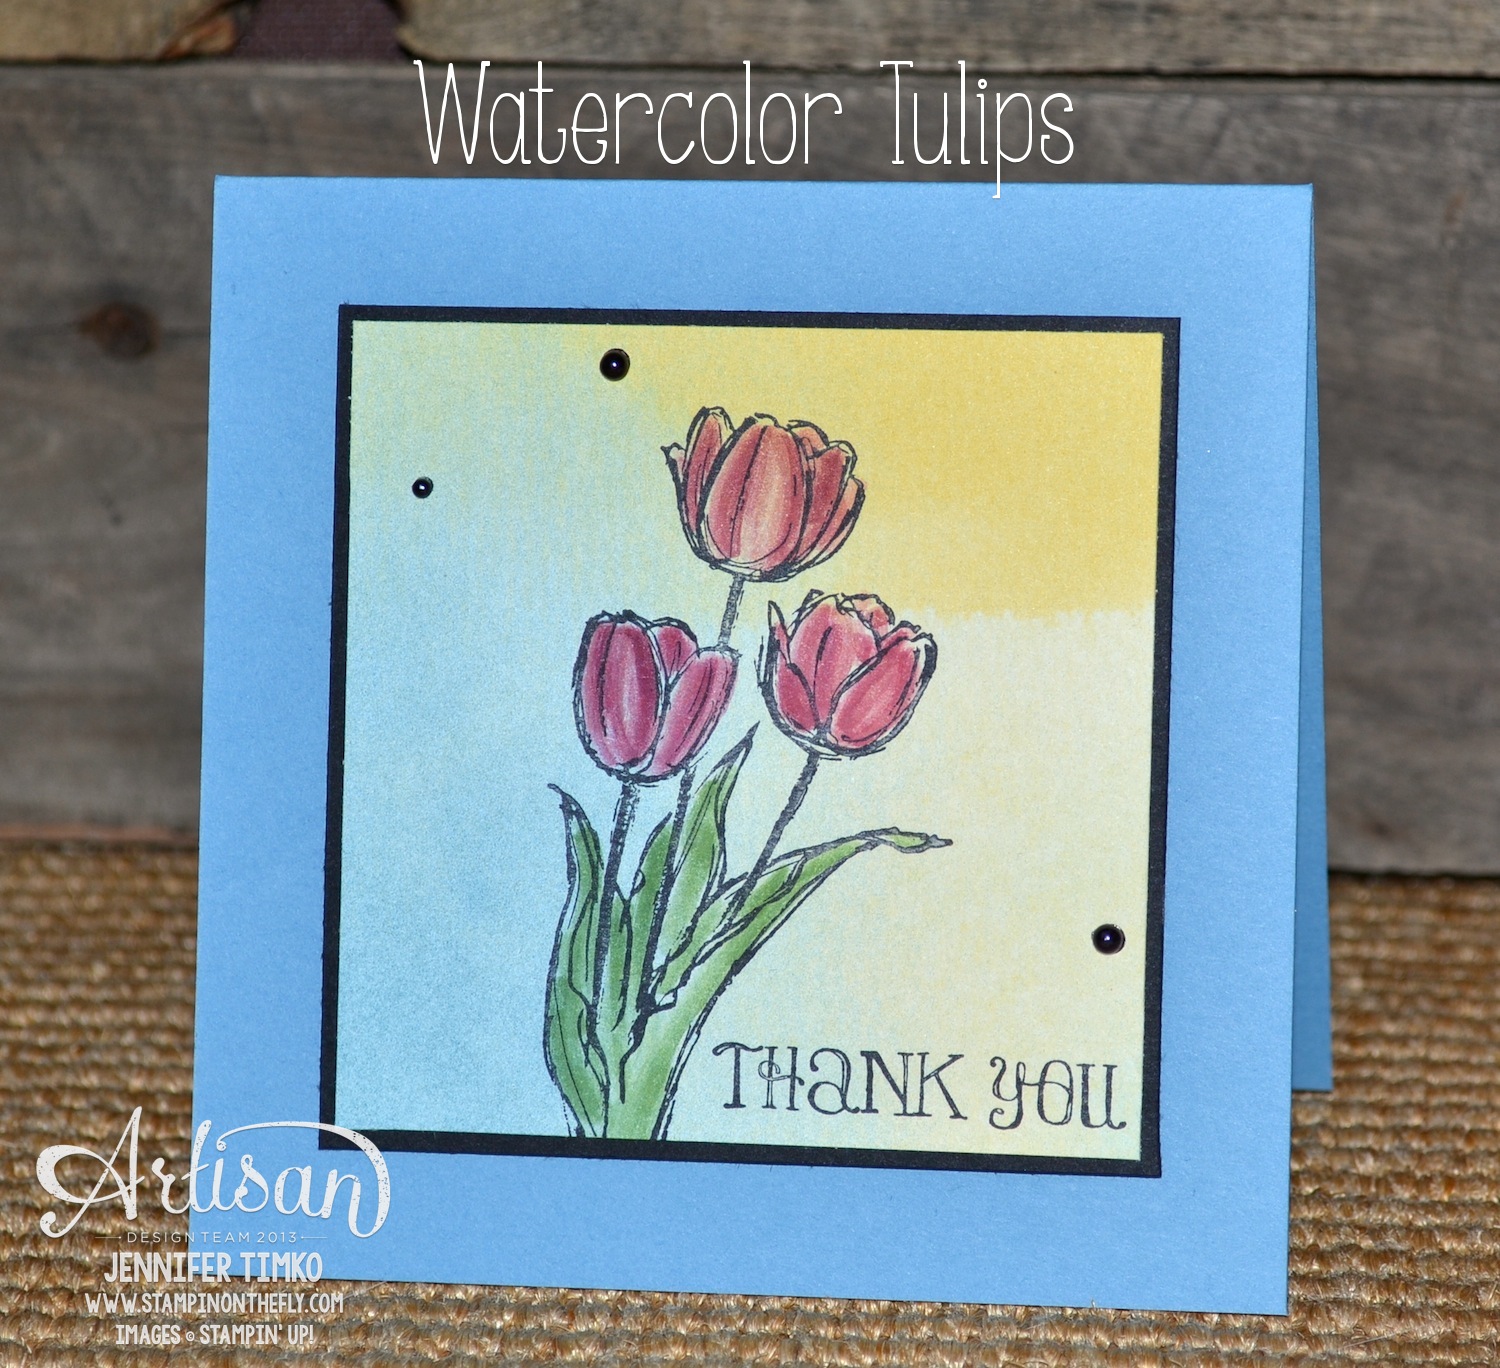
I mentioned that I was going to Stampin’ Up’s New Catalog Premier last night and oh what a fun event it was!! Nothing like the excitement of lots of stampers seeing lots of new products to motivate you! I got a new stamp set called Work of Art and of course I had to make something with it right away. With no other project to share, today is the perfect day to let you in on the sneak peek!
The set includes the three watermark stamps you see plus the sentiment. The splotches are from Gorgeous Grunge which has carried over into the new catalog. To create this I inked each stamp and stamped off once to give it a bit more of a watercolor look. I just grabbed ink pads from the Brights color family and started playing. There are so many ways to make a variation of this! After I got a combination I liked, I stamped the words in Basic Black and heat embossed with Clear Stampin’ Emboss Powder. I have seen cards like this made with stencils and watercolor markers lately but it is fun to be able to create this look with the simplicity of stamping. Hopefully this gives you an idea of how awesome the new catalog is. I can safely say the the month of May will be awesomely fun for the whole Artisan Design Team!!
Okay, off to go visit the awesome Mercedes Weber. I can’t wait for you to see what she has created! Make sure you hop around the whole loop to take a look at beautiful creations by the whole team…you’ll be happy you did!
Click HERE to purchase any of these wonderful Stampin’ Up products.
Stamps: Work of Art, Gorgeous Grunge; Ink: Pumpkin Pie, Rich Razzleberry, Daffodil Delight, Bermuda Bay, Basic Black; Accessories: Stamp-a-ma-jig, Clear Stampin’ Emboss Powder, Heat Tool
The Artisan Design Team’s April box of products is a celebration of the Occasions Catalog. This catalog really has something for everyone! Just like last week, we have a great variety for you. If you have come over from amazing Jeanna, welcome to the next stop. If you are starting here, just continue around using the next buttons until you get back to me.
This week has unofficially been designated “I Love Demonstrator Support Week”!! What is Demonstrator Support you ask? They are the team at Stampin’ Up that is there to fix, help and otherwise make right everything that demos mess up, can’t answer or simply need assistance on when running our SU businesses. They have the best customer support of any company I have ever seen and they are truly wonderful! I thought it would be fun to dedicate my Artisan project this week to them and all they do! Oh…and I sent a card from earlier this month too because nothing beats a handmade card to say thanks! So to anyone at Demo Support:
THANK YOU FOR ALL YOU DO!!!!
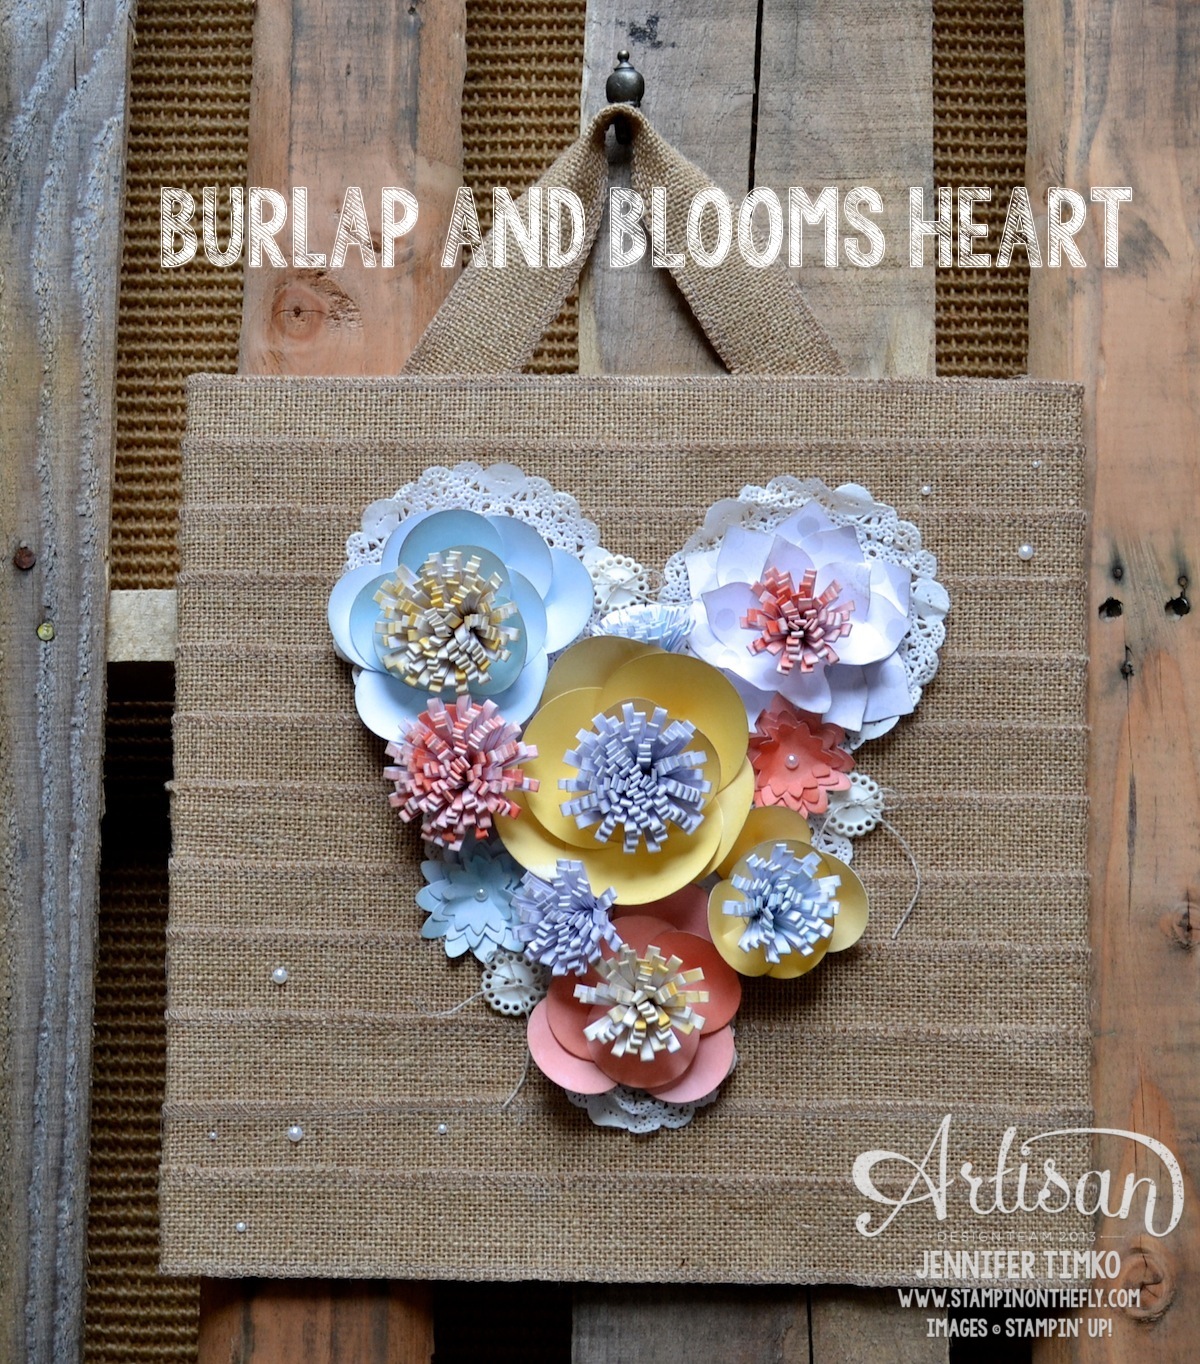
My project this week uses the Burlap and Blooms Simply Created Wreath Kit and Tea Lace Doilies. Now the kit makes a wonderful wreath (of course) but SU asked me to use it in a new way. Because I get to give one away (see below). Yippee!!! I wanted to stay true to using only the kit if possible (plus the doilies because I get to give those away too). Other than a 12″ x 12″ piece of cork board and some Basic Pearls, I managed to do just that. I used the Burlap Ribbon from the kit and cut it into pieces large enough to wrap to the back of the cork board. I hot glued them down in layers. Easy peasy. After putting flowers together from the kit, I started arranging them in shapes. As I played, the a-ha moment came and I created a heart. To help get the shape right I added some Tea Lace Doilies in the background. I sponged all of the flower edges and the doilies with Crumb Cake ink (those sponge daubers are retiring so make sure you get them now!). Then using the hot glue, I attached everything to the board. I tied some Linen Thread in the buttons from the kit and added them. Finally I “sprinkled” on some Basic Pearls. The Burlap Ribbon from the kit meant for hanging the wreath is used for the same purpose on my heart. This is a fun alternative for the kit and it takes no more work than making a wreath (which is pretty easy too). I hope you like this!
Now for the REALLY fun part. Stampin’ Up has created a giveaway that the whole Artisan Design Team gets to do. Each one of us will choose one winner and SU will send you our designated product. Mine is the Burlap and Blooms Wreath Kit and the Doilies! Use the Rafflecopter to help you enter as many times as possible (4)!!
1. NO PURCHASE IS NECESSARY TO ENTER OR WIN.
2. There are multiple ways to enter this blog giveaway: (1) leave a comment in the comments section of this blog post; and/or (2) share an image from this post via Instagram; and/or (3) pin an image from this post on Pinterest; and/or (4) like (or have liked) this post on facebook or my fanpage. Only one entry per person from each of these sites will be entered in the drawing. You can have up to 4 entries per Artisan site.
3. Entries must be received by April 28, 2014 at 11:59 pm MDT.
4. You must be at least 18 years of age to enter.
5. Valid only in the United States and Canada, except Quebec. Not valid where prohibited by law.
6. The winner will be selected by random drawing from the entries received. Odds of winning depend on the number of entries received.
7. A separate blog giveaway is being offered by each of the 10 members of the Stampin’ Up! 2013 Artisan Design Team. There will be one prizewinner per Artisan Design Team member, for a total of 10 prizewinners. The value of each prize is up to $27.00 US/$34.00 CA.
8. The winner of this blog giveaway will be announced on this blog on or before April 30, 2014. The winner will have three (3) days to provide his or her contact information and claim the prize (by May 3rd) or it will be awarded to another winner selected randomly from the entries. Please check back to see if you have won.
Okay, off to go visit the awesome Mercedes Weber. I can’t wait for you to see what she has created! Make sure you hop around the whole loop to take a look at beautiful creations by the whole team…you’ll be happy you did!
Click HERE to purchase any of these wonderful Stampin’ Up products.
Ink: Crumb Cake; Accessories: Tea Lace Paper Doilies, Basic Pearls, Linen Thread, Sponge Daubers, Hot Glue, Cork Board
The Artisan Design Team’s April box of products is a celebration of the Occasions Catalog. This catalog really has something for everyone! Just like last week, we have a great variety for you. If you have come over from amazing Jeanna, welcome to the next stop. If you are starting here, just continue around using the next buttons until you get back to me.
I am continuing on with my watercolor theme for the month with this latest card. I used the Watercolor Wonder DSP and chose a piece with a varied watercolored look. Then I stamped the tulips from Blessed Easter using Stazon Black ink. I colored them using my Blender Pen and the 2012-14 In Colors – Gumball Green, Primrose Petals and Raspberry Ripple. I added a sentiment from Lots of Thanks (what a great set!) and some Basic Pearls that I colored black using a permanent marker. I gave it a Basic Black frame and put it on a Marina Mist base.
I hope you like my card this week! I have had such fun showing you different ideas for watercoloring this month!! Last week I told you to expect a surprise. Well, I was a week off (that is what happens when you get really excited about something!!). But the whole team will be giving away blog candy. Expect all the specifics in next week’s hop and make sure you check out the SU Facebook Page on Friday for this month’s Artisan Showcase. This will be courtesy of Stampin’ Up so you KNOW it will be great!
Okay, off to go visit the awesome Mercedes Weber. I can’t wait for you to see what she has created! Make sure you hop around the whole loop to take a look at beautiful creations by the whole team…you’ll be happy you did!
Click HERE to purchase any of these wonderful Stampin’ Up products.
The Artisan Design Team’s April box of products is a celebration of the Occasions Catalog. This catalog really has something for everyone! Just like last week, we have a great variety for you. If you have come over from amazing Jeanna, welcome to the next stop. If you are starting here, just continue around using the next buttons until you get back to me.
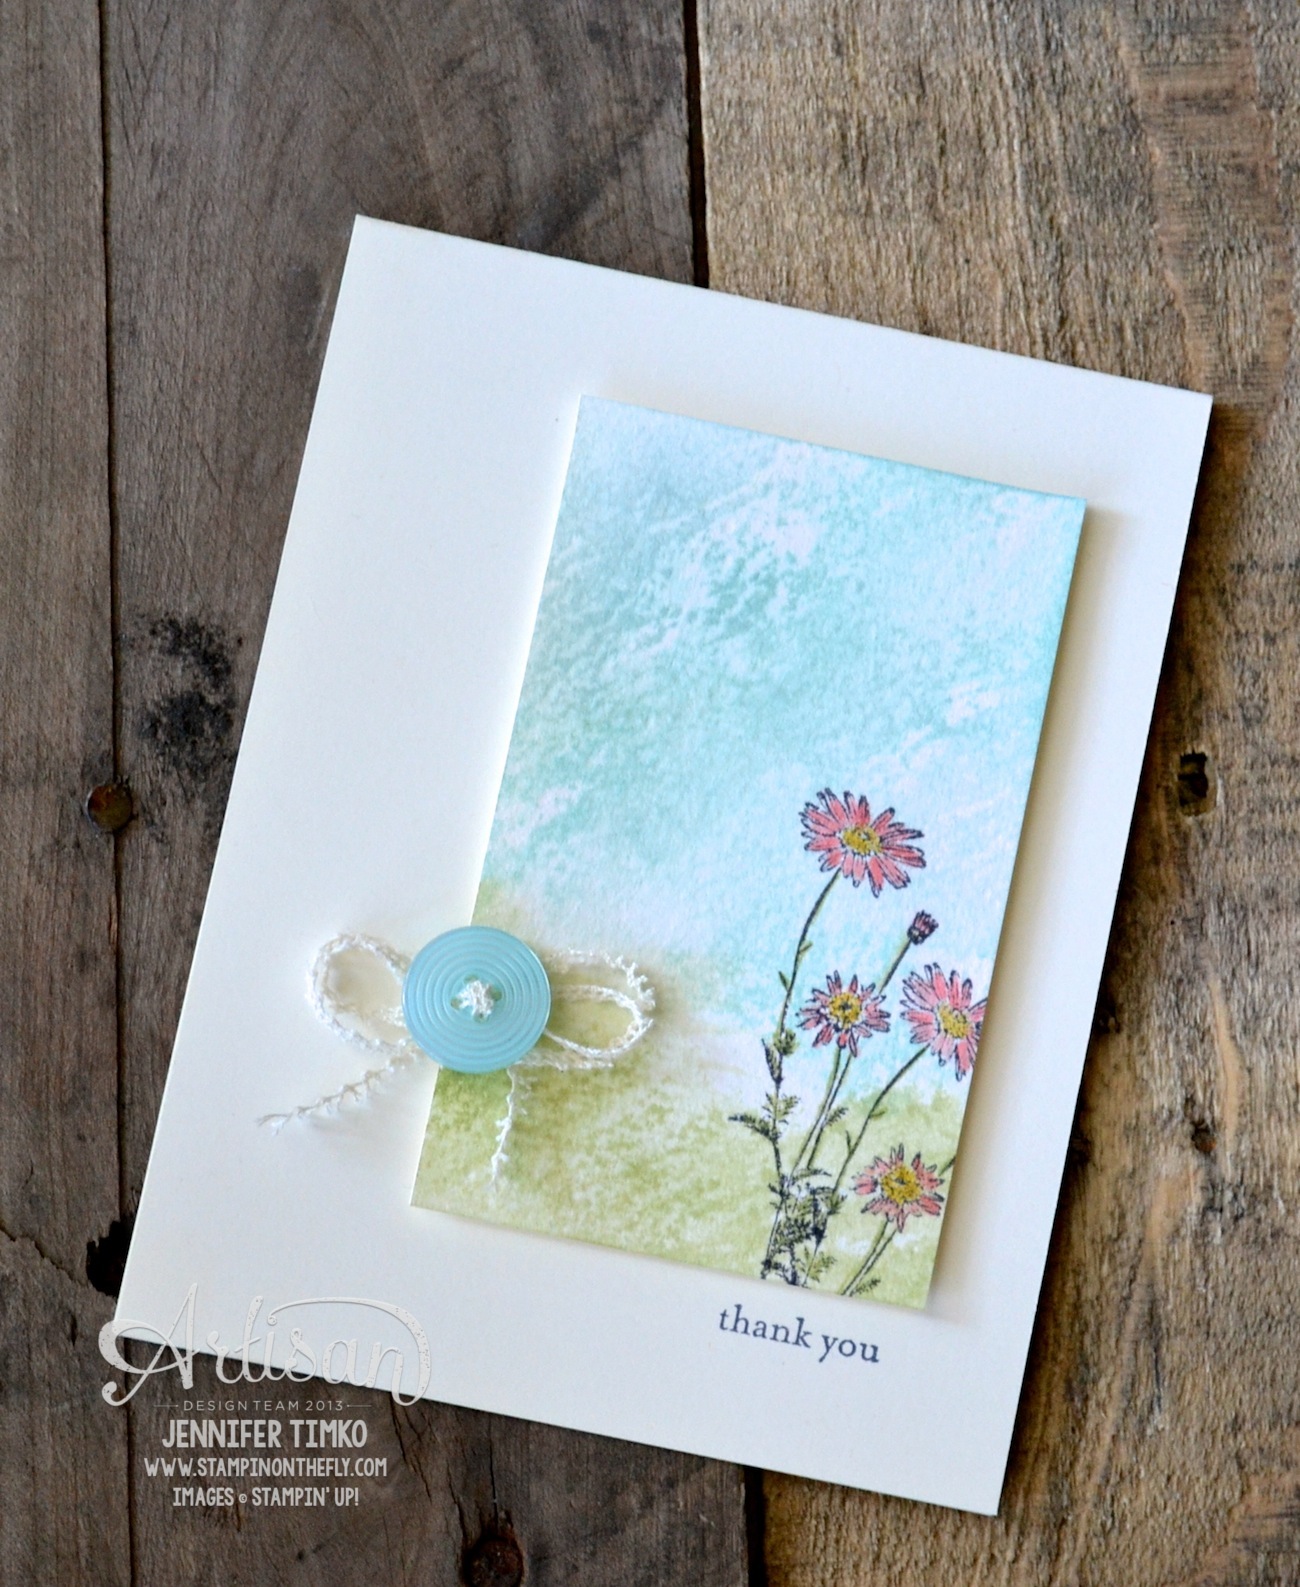
I continue to love this sweet little stamp set (Springtime Hello). I can’t get enough of it! So I figured I should share another way to use it. This time I created a background using my acrylic blocks that is really fun and creates this cool watercolor effect. Take your Stampin’ Write Marker and scribble on a block, spritz with water and drag it across the paper. Because the Watercolor paper isn’t smooth, the block kind of skips over sections and leaves it looking like this. I used both Soft Sky and Pool Party inks on the sky and Old Olive for the ground. Then I stamped on the flowers using my Basic Gray Classic Pad and colored the flowers using both a Blender Pen and direct marker to paper. Under the button, I cut off the edges of some Victoria Crochet Trim to create the bow underneath. The sentiment is from Teeny Tiny Wishes (an all-time great set!!).
I hope you like my card this week! I’m back tomorrow with the latest from Freshly Made Sketches! So glad you stopped by today. Next week, you really need to come again because the whole Artisan Design Team has a great surprise for you courtesy of Stampin’ Up!
Okay, off to go visit the awesome Mercedes Weber. I can’t wait for you to see what she has created! Make sure you hop around the whole loop to take a look at beautiful creations by the whole team…you’ll be happy you did!
Click HERE to purchase any of these wonderful Stampin’ Up products.
Stamp: Springtime Hello, Teeny Tiny Wishes; Ink: Basic Gray, Rich Razzleberry, Daffodil Delight, Basic Gray, Pool Party, Soft Sky, Old Olive; Paper: Watercolor, Very Vanilla; Accessories: Acrylic Blocks, Blender Pen, Subtles Buttons, Victoria Crochet Trim
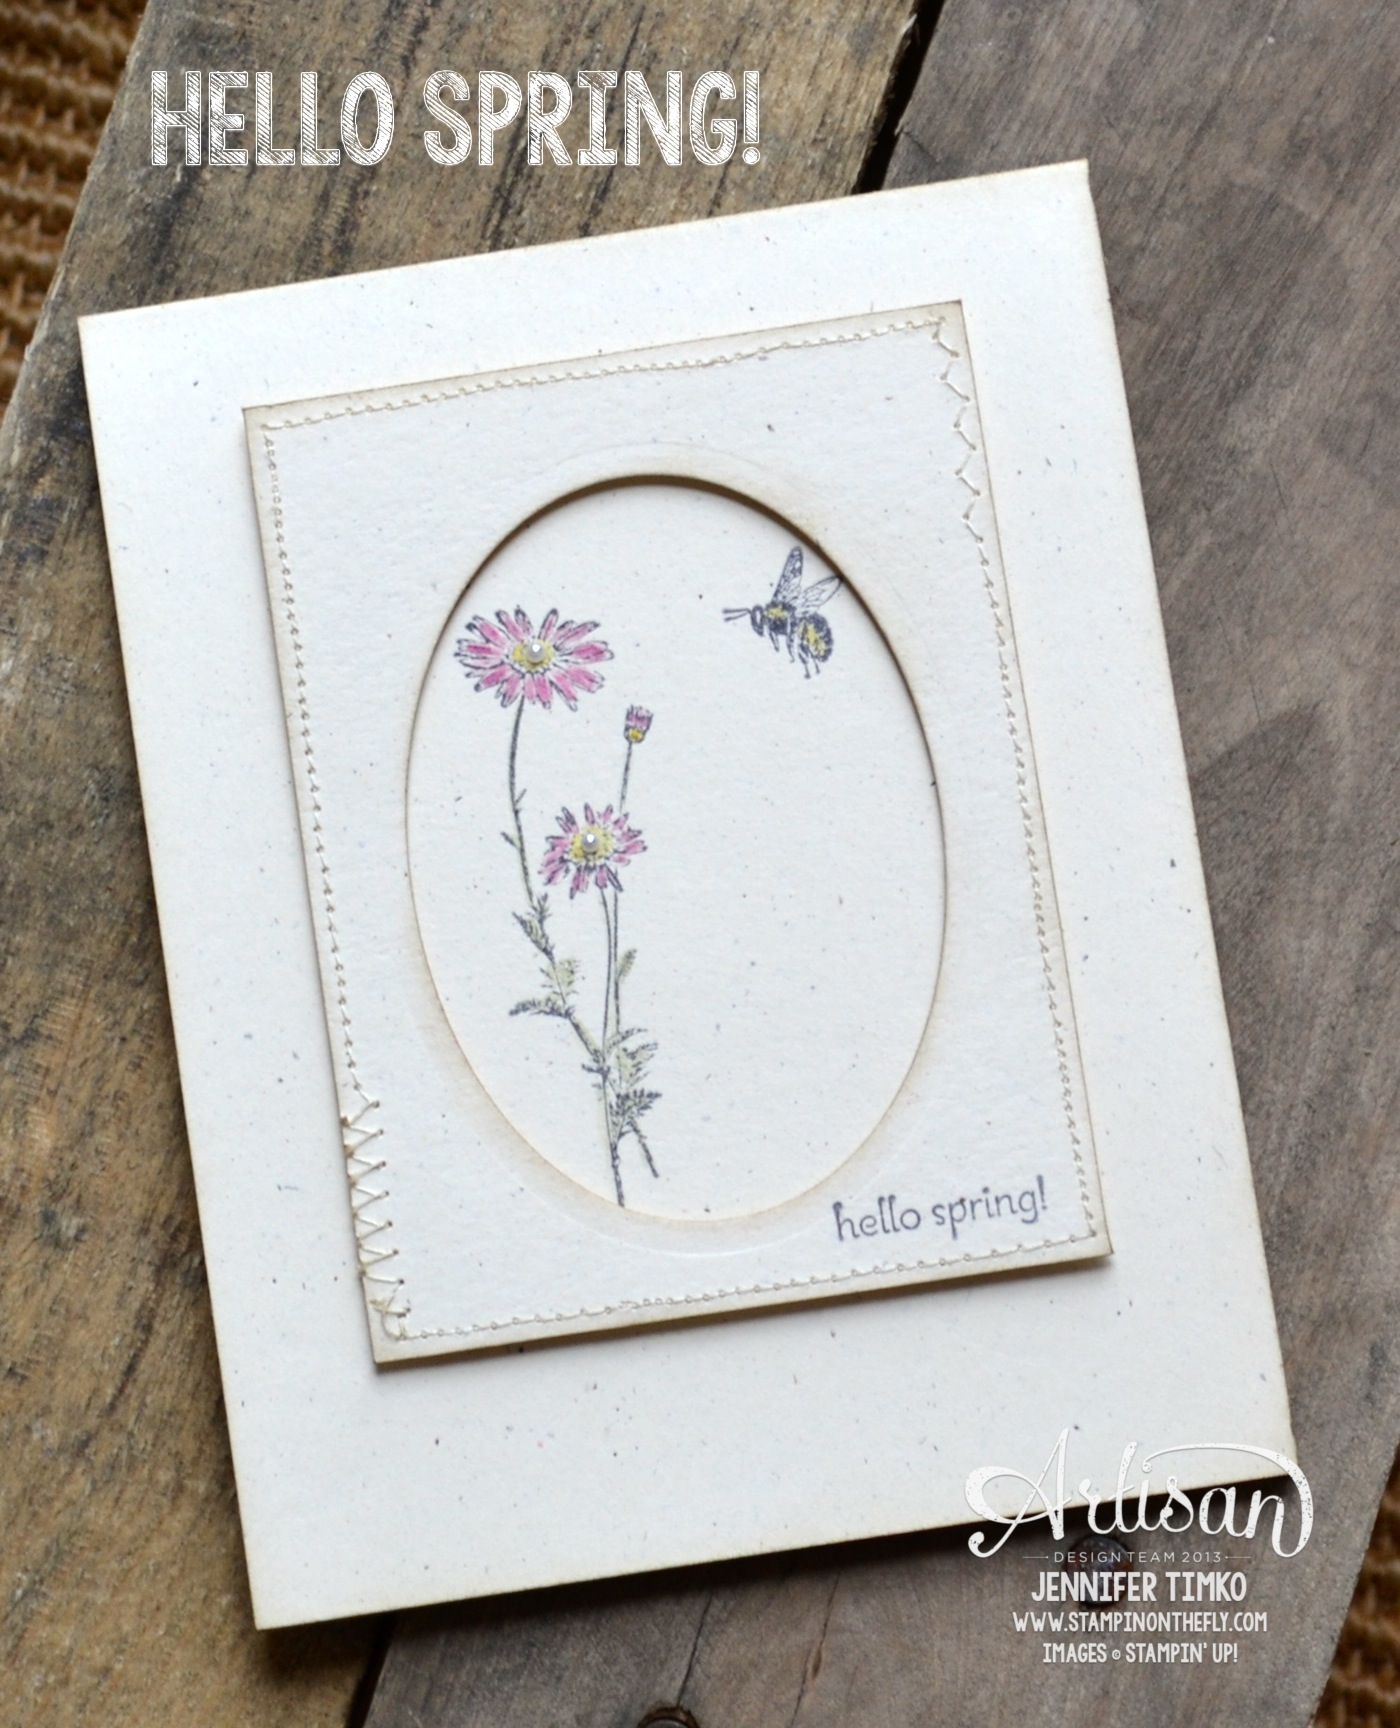
The Artisan Design Team’s April box of products is a celebration of the Occasions Catalog. This catalog really has something for everyone! I suspect you will see that in your hop this week. If you have come over from amazing Jeanna, welcome to the next stop. If you are starting here, just continue around using the next buttons until you get back to me.
I’m saying this very, very carefully but I think it is here for real. HELLO SPRING!!! So happy to see you!! Enough to dedicate a card to you!! The stamps in Springtime Hello are so delicate and pretty. I love them so much. I wanted to find a way to show them off and not have the pretty artwork get lost in the card. So I stamped the flower and bee using Basic Gray Ink onto Naturals Ivory paper. I used my Blender Pen to touch on Rich Razzleberry, Daffodil Delight and Pear Pizzazz. Then I created a frame using the Ovals Framelits and stitched around the edges to add a little something special. I stamped the sentiment in Basic Gray and then sponged Crumb Cake Ink on the frame layer inside and out. The stamped panel was cut to size to hide behind the frame and I attached the two with Dimensionals then attached the entire thing to my base. I added a couple of little pearls to the flower centers for a last pretty detail.
While the colors are muted on this, it feels just like my yard. All the browns are beginning to be dotted with color. And I could not be happier about it! I’m so glad you stopped in to visit today. I’ll be back with another Freshly Made Sketch tomorrow!!
Okay, off to go visit the awesome Mercedes Weber. I can’t wait for you to see what she has created! Make sure you hop around the whole loop to take a look at beautiful creations by the whole team…you’ll be happy you did!
Click HERE to purchase any of these wonderful Stampin’ Up products.
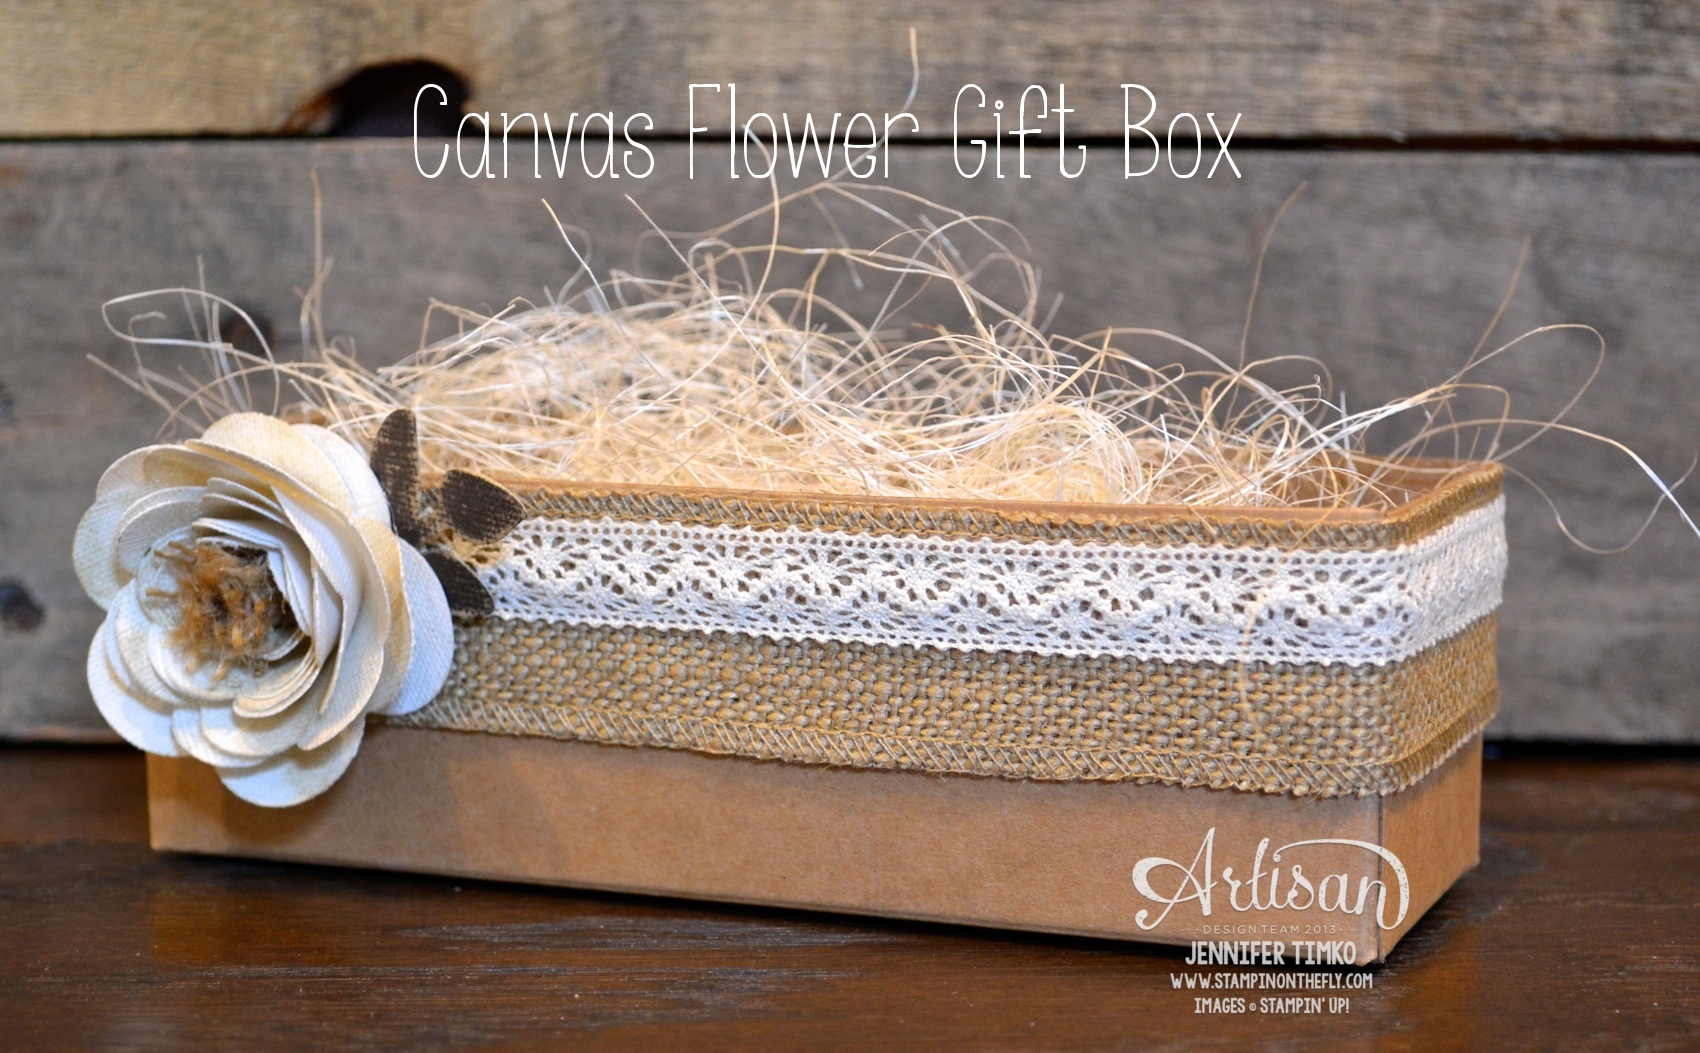
The Artisan Design Team’s March box of products is all about spring! While spring still seems to be elusive, it is here in my stamp room. Hopefully it will be in my yard soon too!! This is the last project with our April box and I have really loved this box! If you have come over from amazing Jeanna, welcome to the next stop. If you are starting here, just continue around using the next buttons until you get back to me.
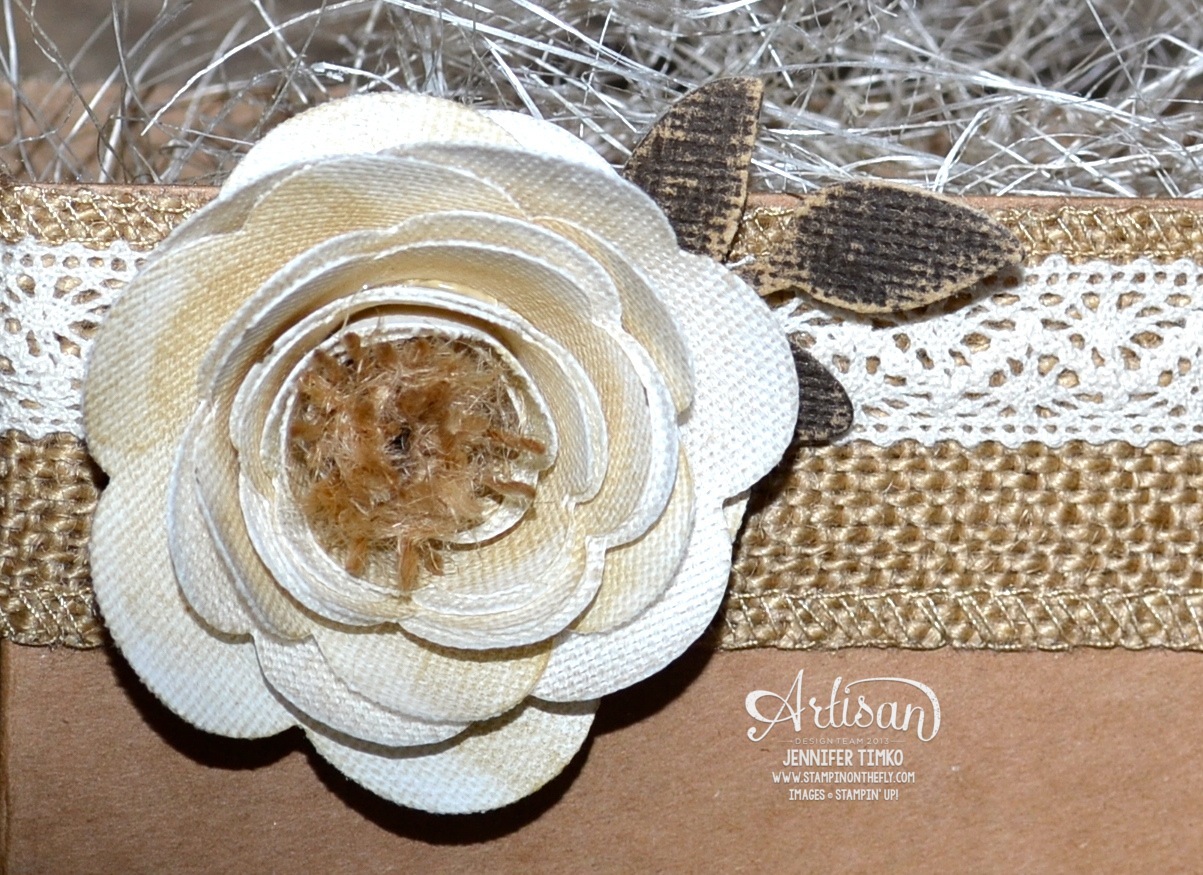
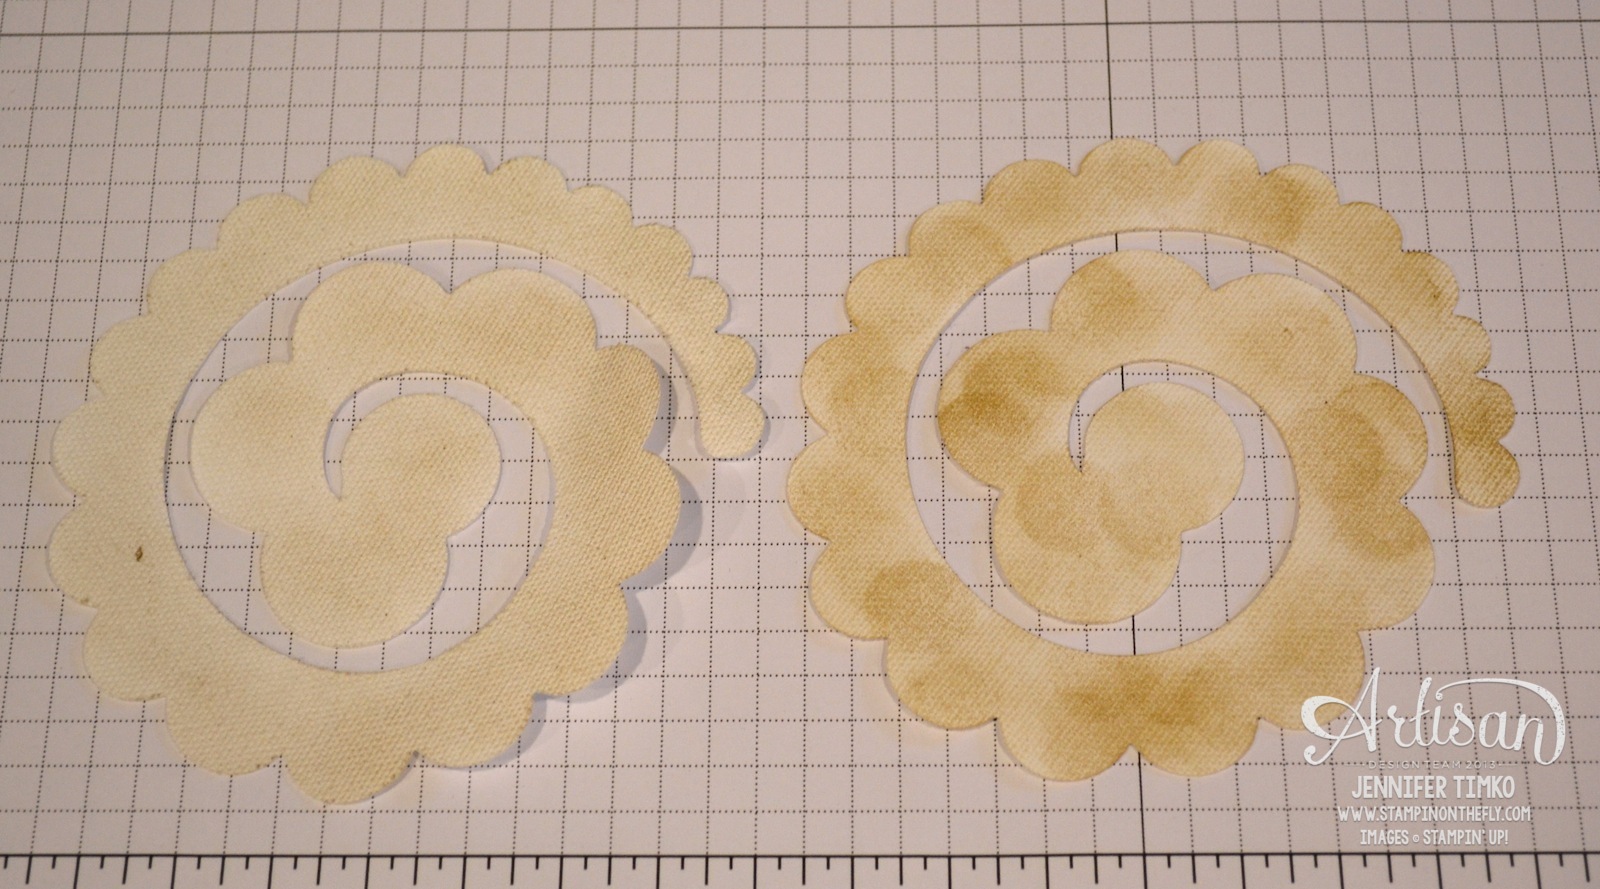
I needed a gift box for a hostess recently and I though the Spiral Flower Die would be perfect (again). Ok…I really am smitten with this die! So many different looks for your flowers! This time I used a Tag a Bag Gift Box as the base. I wrapped around a piece of Burlap Ribbon (I just love this ribbon) and then added on some Victoria’s Crochet Trim. Pretty together, don’t you think? Then I pulled out my Canvas Creations for the flower. I cut out two of them to create this one. Here is a close up:
I sponged them (see below) pretty quickly and then rolled the two together and hot glued them together. Then I took another small piece of Burlap Ribbon (about 1-1/2″) and cut it in half down the middle. This leaves you with two halves held together by the stitching. Set one aside for another flower (make two of these while you are at it because you WILL find a use for them). On the other, snip along the non-stitched side with the Fringe Scissors then roll up and glue in the center of your flower. I used the leaf framelit from Secret Garden Framelits on some Core’dinations Early Espresso and sanded it to get the distressed look. Hot glue all of these onto you box and fill.
Here is a picture of my sponging. I told you it was fast! I didn’t really take the time to make it neat since you just don’t see the sponge dauber marks when it gets rolled up. I put the lighter one in front, staggered just a little, when rolling. Using your Bone Folder to add a little curl first is helpful, just like when you are rolling paper.
I hope you have enjoyed our projects this month. The team has created some truly beautiful things. I just ooh and aah each week! Back in the morning with the latest from Freshly Made Sketches.
Okay, off to go visit the awesome Mercedes Weber. I can’t wait for you to see what she has created! Make sure you hop around the whole loop to take a look at beautiful creations by the whole team…you’ll be happy you did!
Click HERE to purchase any of these wonderful Stampin’ Up products.
Ink: Crumb Cake; Paper: Core’dinations Early Espresso; Accessories: Tag a Bag Gift Box, Big Shot, Secret Garden Framelits, Burlap Ribbon, Victoria Crochet Trim, Canvas Creations, Sponge Daubers, Fringe Scissors, Hot Glue
The Artisan Design Team’s March box of products is all about spring! As I type this, there are 8 inches of snow that just fell so I’m even more excited for you to see all that we have for you this week. Some of you may have already seen the projects since they are from Stampin’ Up’s Facebook Showcase posted last Friday. If you have come over from amazing Jeanna, welcome to the next stop. If you are starting here, just continue around using the next buttons until you get back to me.
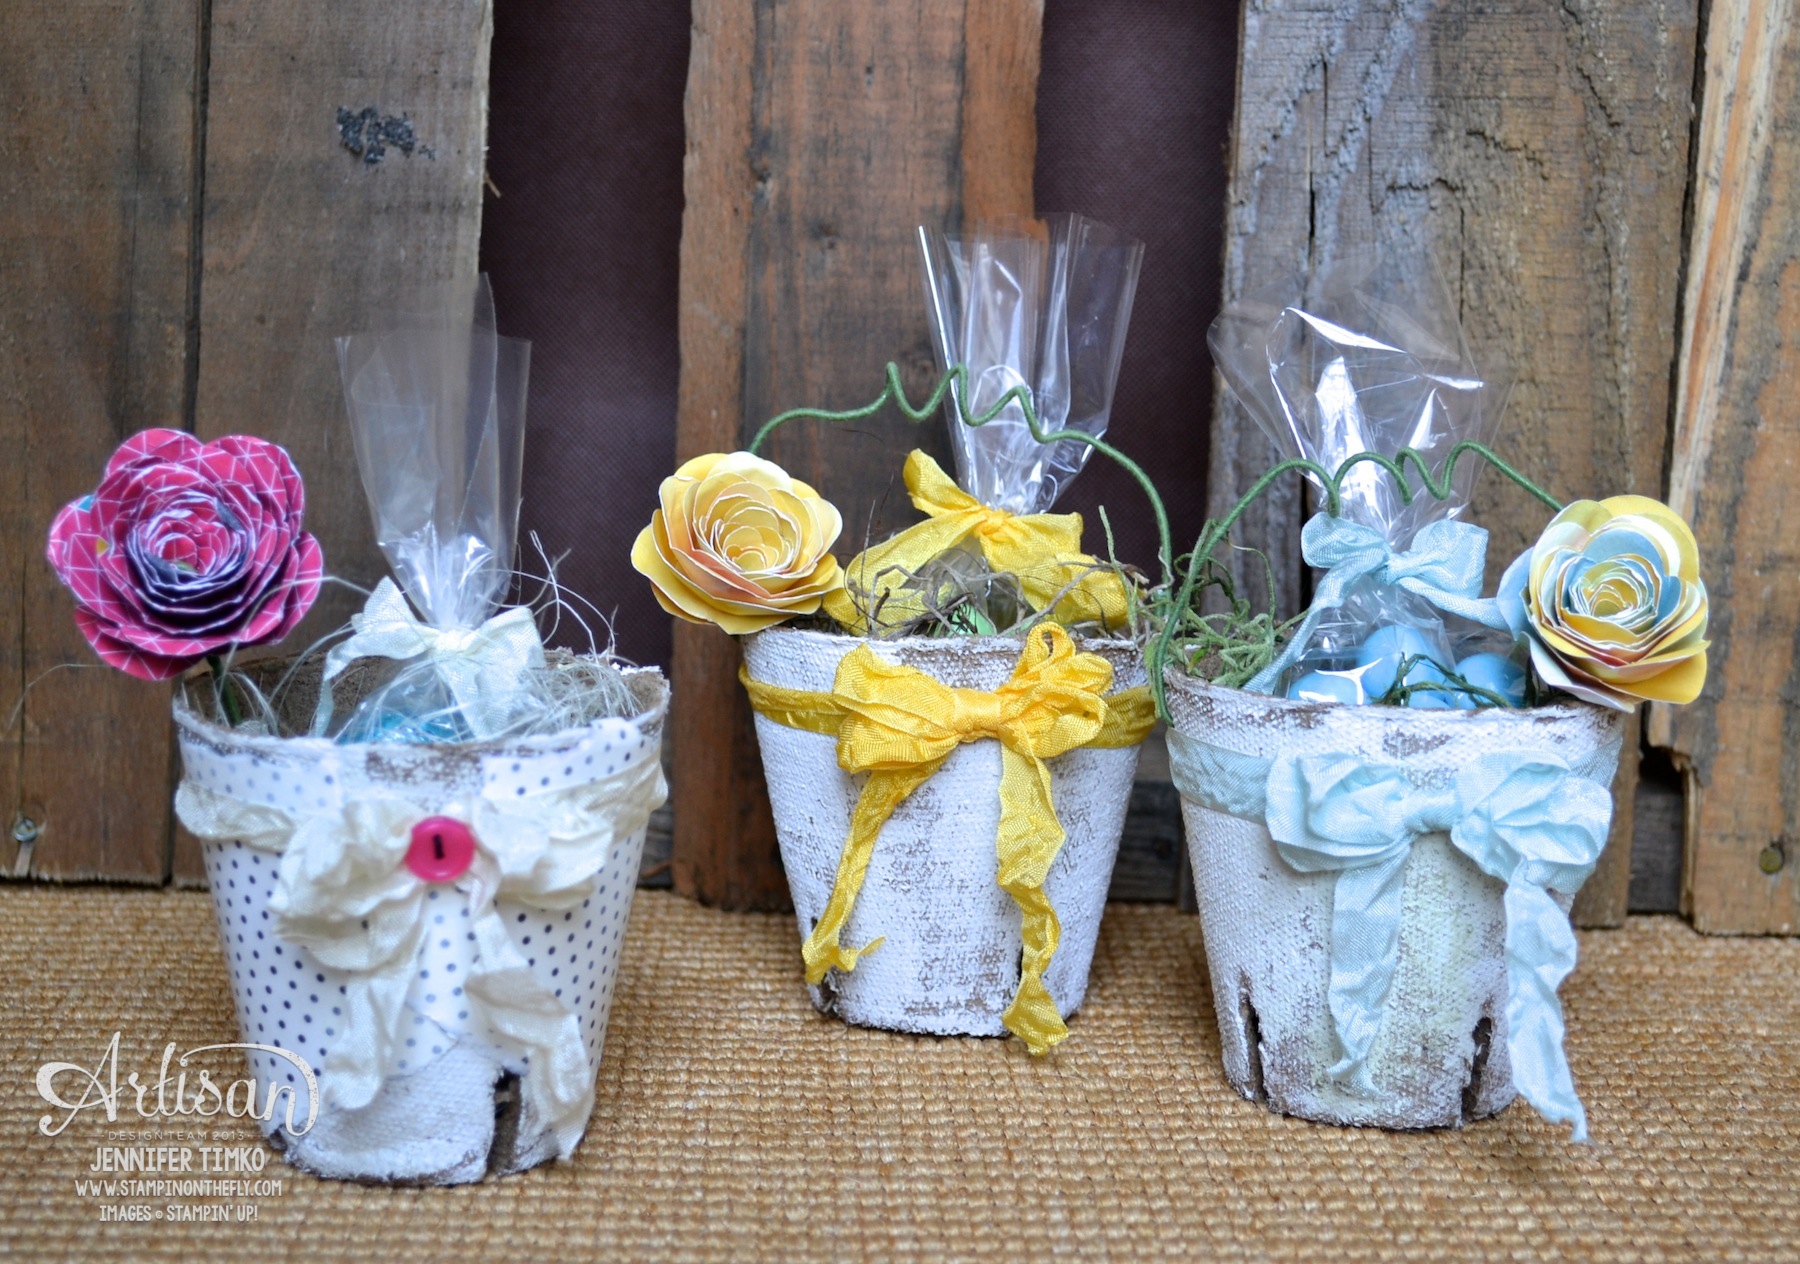
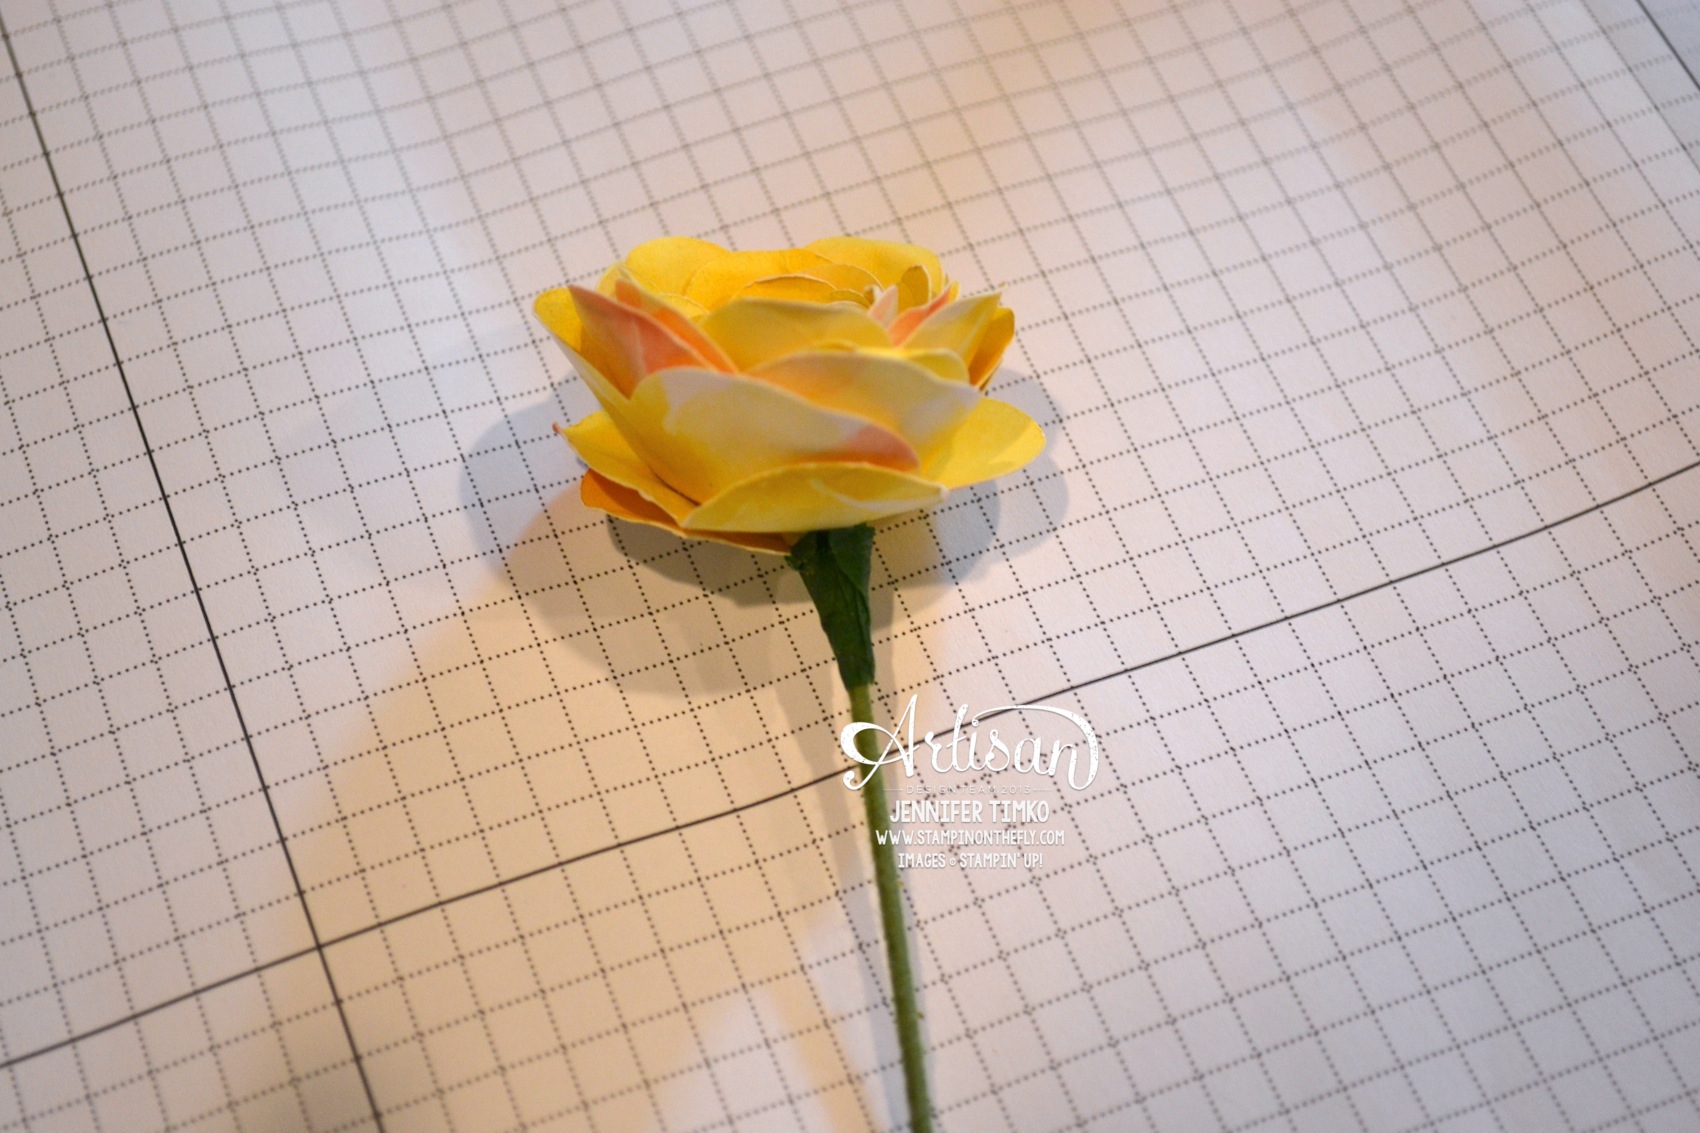
Spring is the time for baskets, don’t you think? Something about them just makes me happy. I thought it would be fun to show you this variety of little baskets made for my sons’ teachers. They are all made basically the same way but with slight variations. To start, get some little peat pots (you know, the ones for starting seeds). They are readily available right now at home stores. There are different shapes and sizes and they are super inexpensive. Get a few while you are there. You will want to make more! I took each of the three pots and painted them with Gesso. This is an acrylic surface prep and I think you could use acrylic paint instead if that is what you have. Paint it on haphazardly. You don’t want total coverage. Set it aside to dry.
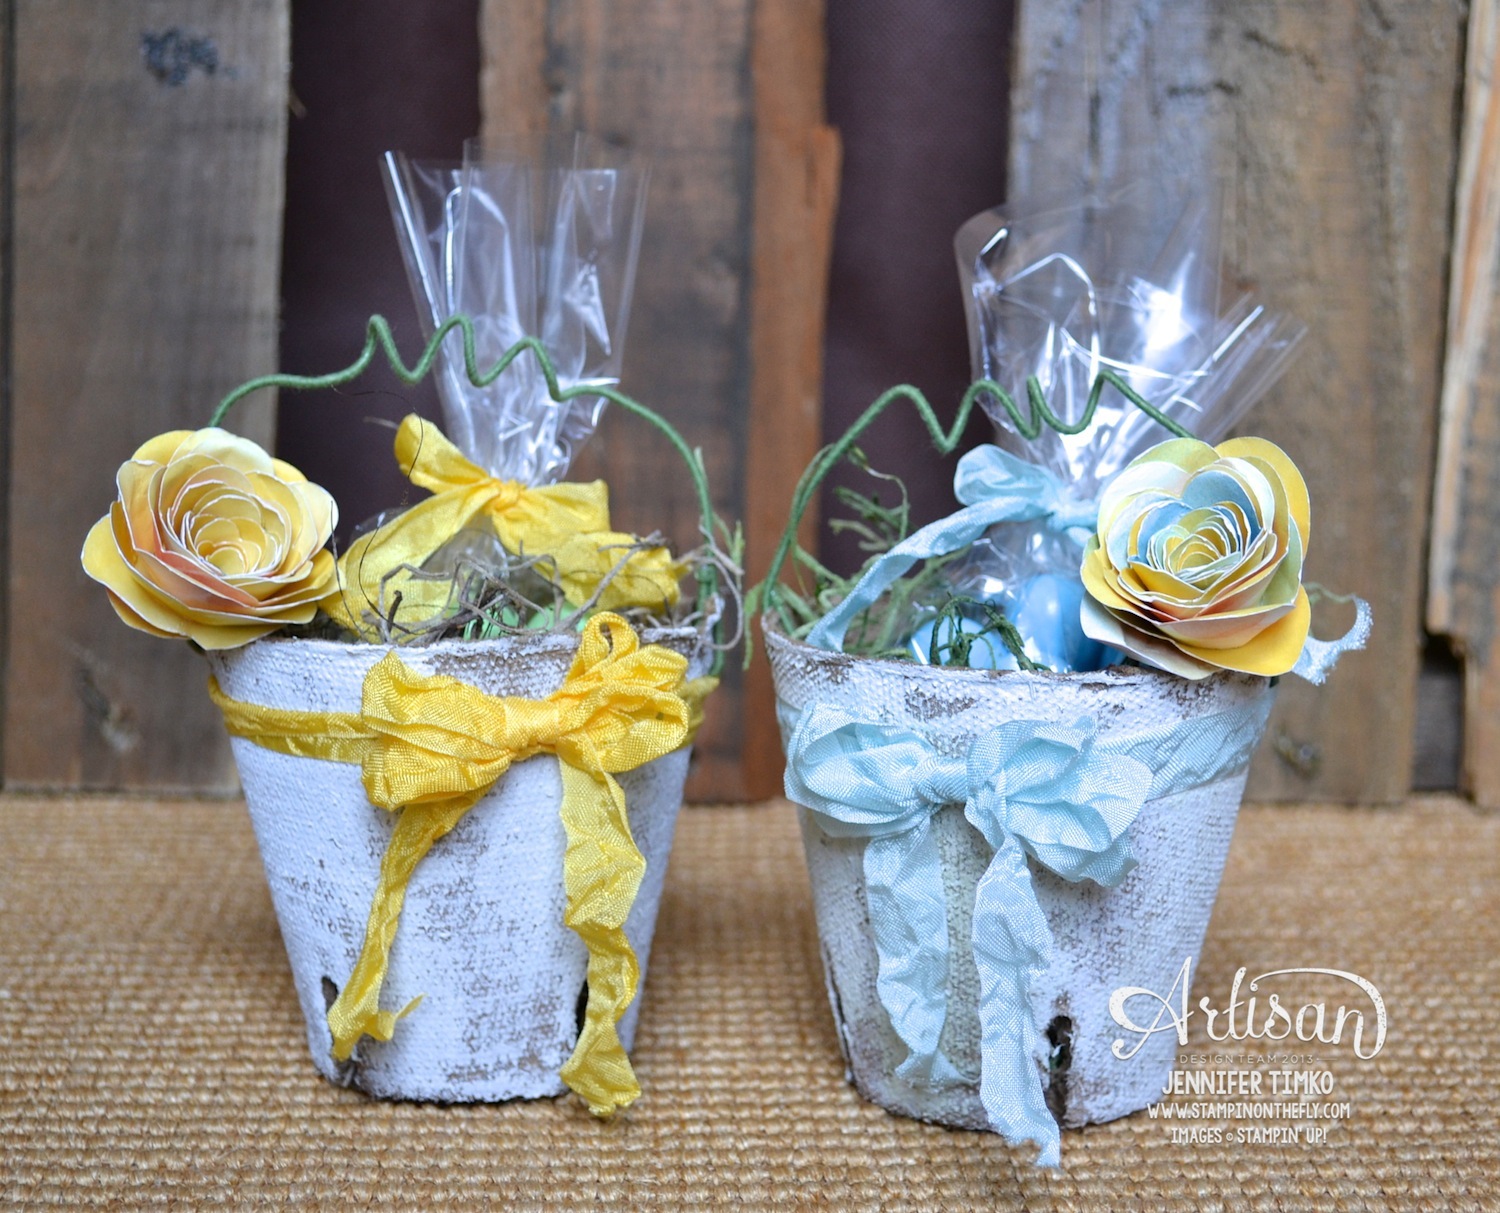
While you are waiting, take some floral wire and cut enough for a handle (be generous, you can trim extra later). In the middle, wrap the wire around a pencil to get the curves and then fold each side down to create the handle. With your Piercing Tool, poke a hole where you want the handle to attach. Made sure it isn’t too close to the edge since the pot is really soft. Bend the end of the handle to a 90 degree angle and put through the hole then bend it the rest of the way up to attach it completely. I used needle nosed pliers for this. Do the same for the other side taking care not to pull too hard on the already attached side. I spritzed Daffodil Delight Seam Binding with water then crumpled and let dry. I created the bow first and then wrapped around another piece of Seam Binding and attached at the front using hot glue. Then the bow was attached using hot glue. Yes…the bow is an illusion. It looks tied on but it isn’t. Most of my bows work this way since it is so much easier to tie the bow separately! I filled a 4″x6″ Cellophane Bag with candy treats and tied with more Seam Binding. Then I added filler and the bag and placed a flower on the side (details below).
For the blue basket, just a couple of changes. First, I sponged a little Old Olive ink over the Gesso to give a mossy look. Use a light hand! The ribbon is Soft Sky Seam Binding but otherwise the same technique.
I got a little more ambitious for the third basket. I tore a piece of Modern Medley DSP and attached it to the pot using Mod Podge. Once dry, I put on some more Gesso to tone the paper down a bit. I chose to leave off the handle and instead added a button to the bow before attaching. Very Vanilla Seam Binding was the ribbon of choice for this one.
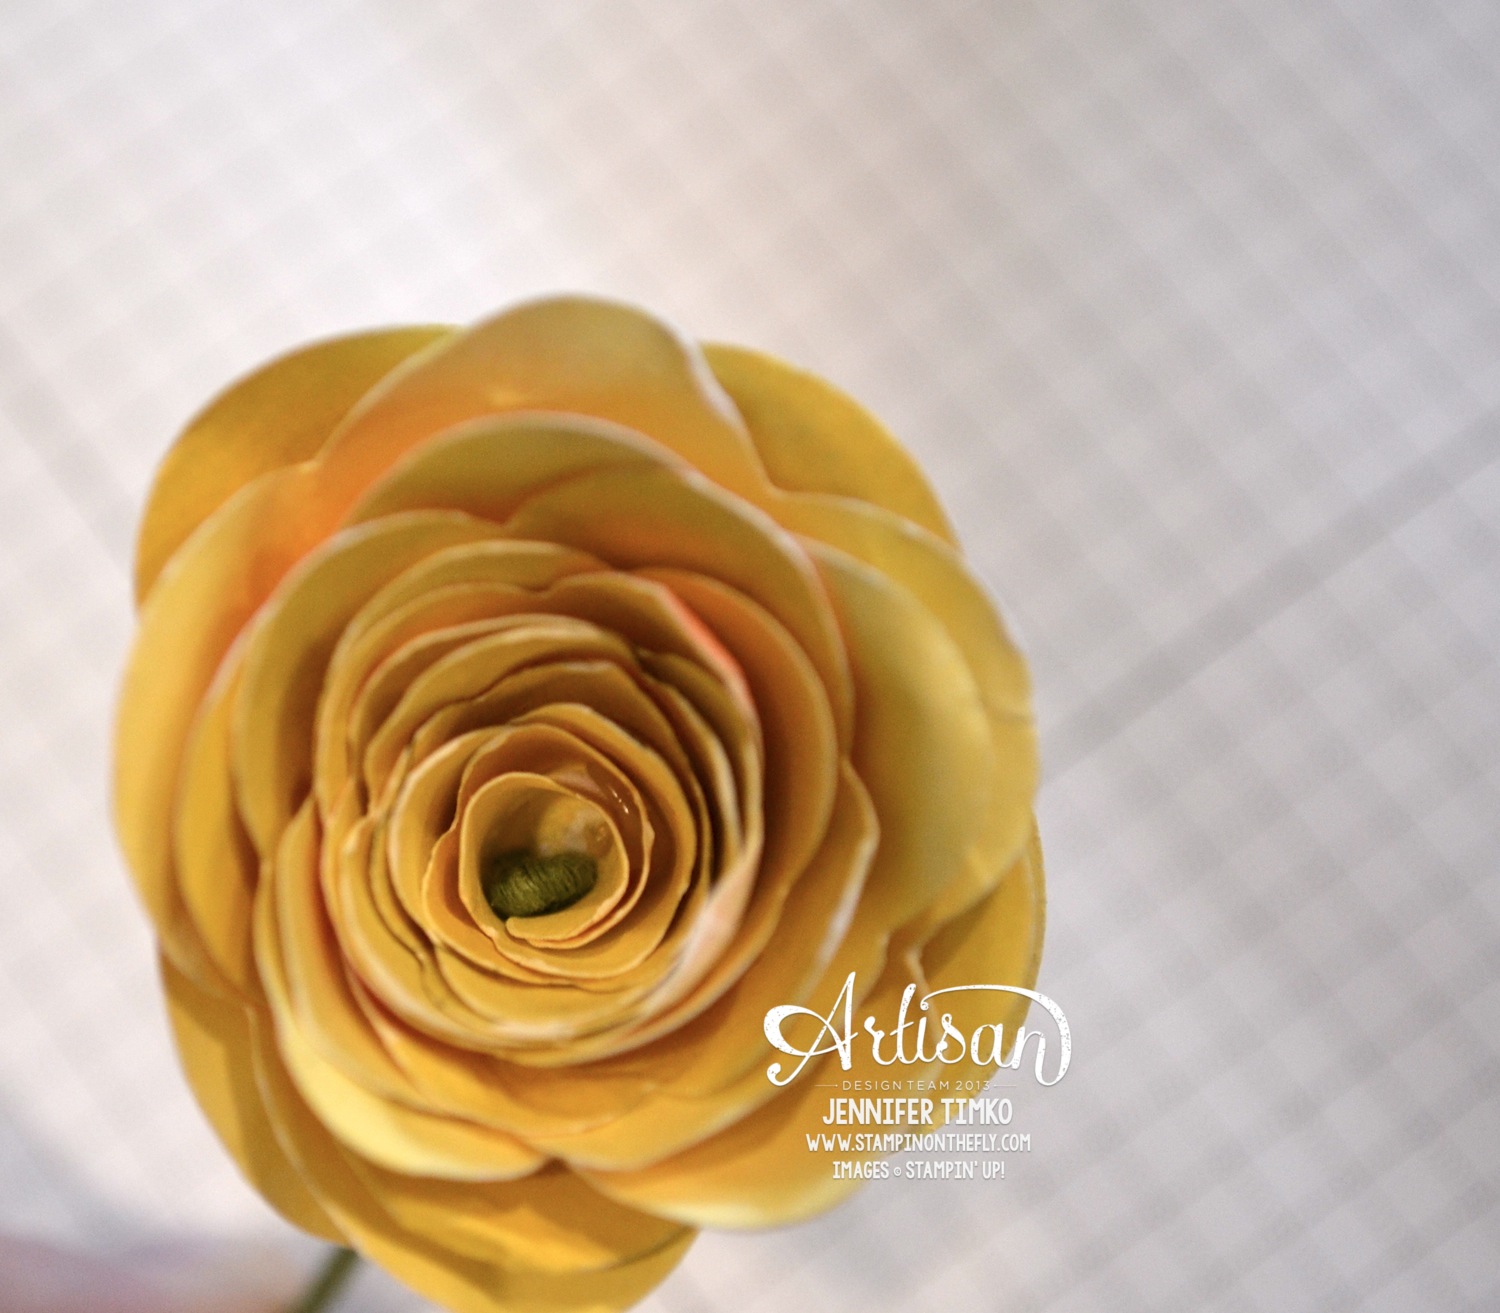
Ok…the flowers. These were really fun to do and pretty simple once you get the technique down. The Spiral Flower Die is your best buddy on this! Choose your DSP (I chose Watercolor Wonder for the first two and Kaleidescope for the third). Cut out two of the spirals flowers. Spritz them with water, crumple them, re-straighten them and then roll them up at the same time to give a fuller flower. Using your Silicone Craft Sheet as a base, add a dollop of hot glue to the bottom and secure them together.
Using your Piercing Tool, poke a small hole through the center of the flower. Take a piece of floral wire and bend the top down and “smoosh” it together to create a closed hook (kind of like a shepherd’s hook). Push the other end of the floral wire through the hole you made and pull until the hook creates your center.
Then using floral tape, wrap around from the base down about 1/2″ inch to create the flower’s sepal. This also keeps the flower from slipping back down the stem. Place the stem into the basket, trimming to the right length as needed with wire cutters.
I am pretty sure it takes almost as much time to write this as it did to make it. Really, it isn’t hard and the results are so worth it. These would be lovely as a spring party decoration or as favors for a spring shower. I hope like these as much as I do. I think this might be one of my favorite projects I have ever made!
Okay, off to go visit the awesome Mercedes Weber. I can’t wait for you to see what she has created! Make sure you hop around the whole loop to take a look at beautiful creations by the whole team…you’ll be happy you did!
Click HERE to purchase any of these wonderful Stampin’ Up products.
Ink: Old Olive; Paper: Watercolor Wonder DSP, Kaleidescope DSP, Modern Medley DSP; Accessories: Daffodil Delight Seam Binding, Soft Sky Seam Binding, Very Vanilla Seam Binding, Big Shot, Spiral Flower Die, 4″x6″ Cellophane Bags, Rose Red Button, Silicone Craft Sheet, Peat Pots, Floral Wire, Floral Tape, Gesso, Mod Podge, Hot Glue
Primary Sidebar
We use cookies on our website to give you the most relevant experience by remembering your preferences and repeat visits. By clicking “Accept”, you consent to the use of ALL the cookies.
This website uses cookies to improve your experience while you navigate through the website. Out of these, the cookies that are categorized as necessary are stored on your browser as they are essential for the working of basic functionalities of the website. We also use third-party cookies that help us analyze and understand how you use this website. These cookies will be stored in your browser only with your consent. You also have the option to opt-out of these cookies. But opting out of some of these cookies may affect your browsing experience.
Necessary cookies are absolutely essential for the website to function properly. This category only includes cookies that ensures basic functionalities and security features of the website. These cookies do not store any personal information.
Any cookies that may not be particularly necessary for the website to function and is used specifically to collect user personal data via analytics, ads, other embedded contents are termed as non-necessary cookies. It is mandatory to procure user consent prior to running these cookies on your website.