Skip to content

2013 Artisan Award Winner Blog Hop – Project 10

2013 Artisan Award Winner Blog Hop – Project 10 published on 17 Comments on 2013 Artisan Award Winner Blog Hop – Project 10

Blog Hop Button 13-011

Welcome to Day 10 of the 2013 Artisan Award Winner Blog Hop!!  I am so incredibly excited to FINALLY be able to share, in detail, the projects I created for my submission to the contest.  If you came over from Jeanna Bohanon’s blog, Stamp Time Somewhere, I know you have already been impressed by her amazing work.  If not, you can just start the hop here and follow around until you get back to me.

Pallet Art - Artisan

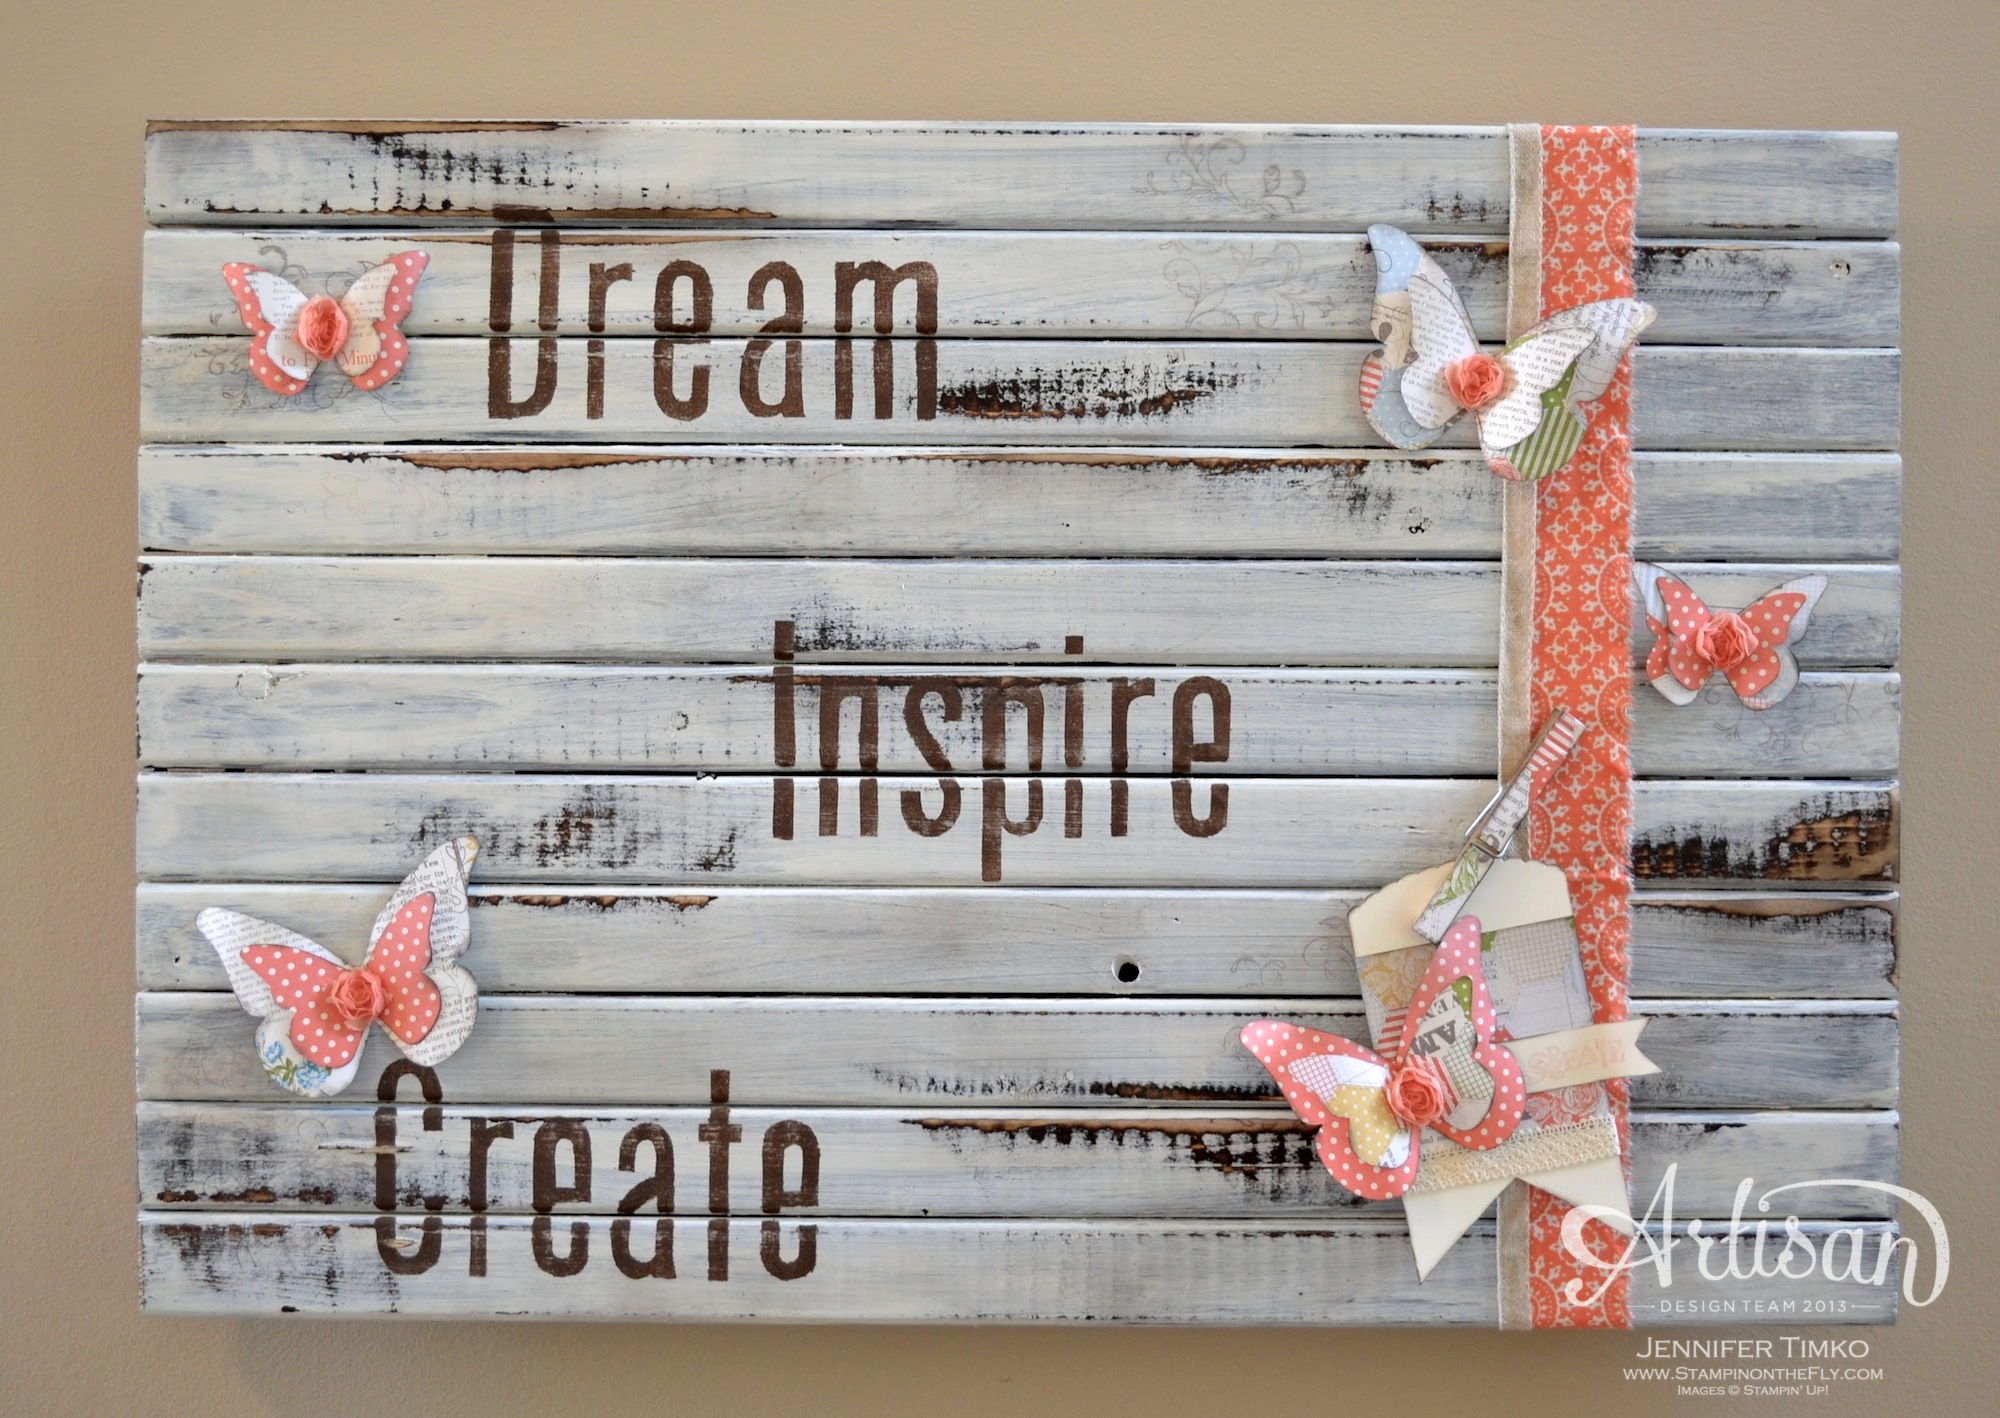
Here we are on the last day of this hop!  I saved my favorite item for today (you can click on the pictures to see more detail).  This pallet idea spun around in my brain for awhile before I finally just went for it.  For scale, this is 24″ x 18″.  I started with plain old wood strips from a home store and my husband helped me concoct this pallet.

Pallet plain

This is what is started off looking like.  First I stained it with a dark stain.  Then it was painted with an acrylic paint allowing some of the stain to show through.  Sanding was next to reveal some of the stain again and some of the wood.  Next up the lettering.  Here is my disclaimer.  If you have an e-cutter this would be much, much easier!!  I used letter punches in MDS to create the words I wanted to use.  I printed them out and then used an exacto knife to cut them out of contact paper.  The contact paper was my stencil.  This took a while.  Again, with an e-cutter and the SVG files of MDS…super easy.  I sponged on paint over the contact paper.  Once it was dry, I used my Stampin’ Sanding Block to distress them a bit.  Then I stamped randomly with the flourish from Creative Elements using Early Espresso Ink.  I sealed it all with a spray sealant.

Pallet Tag Closeup
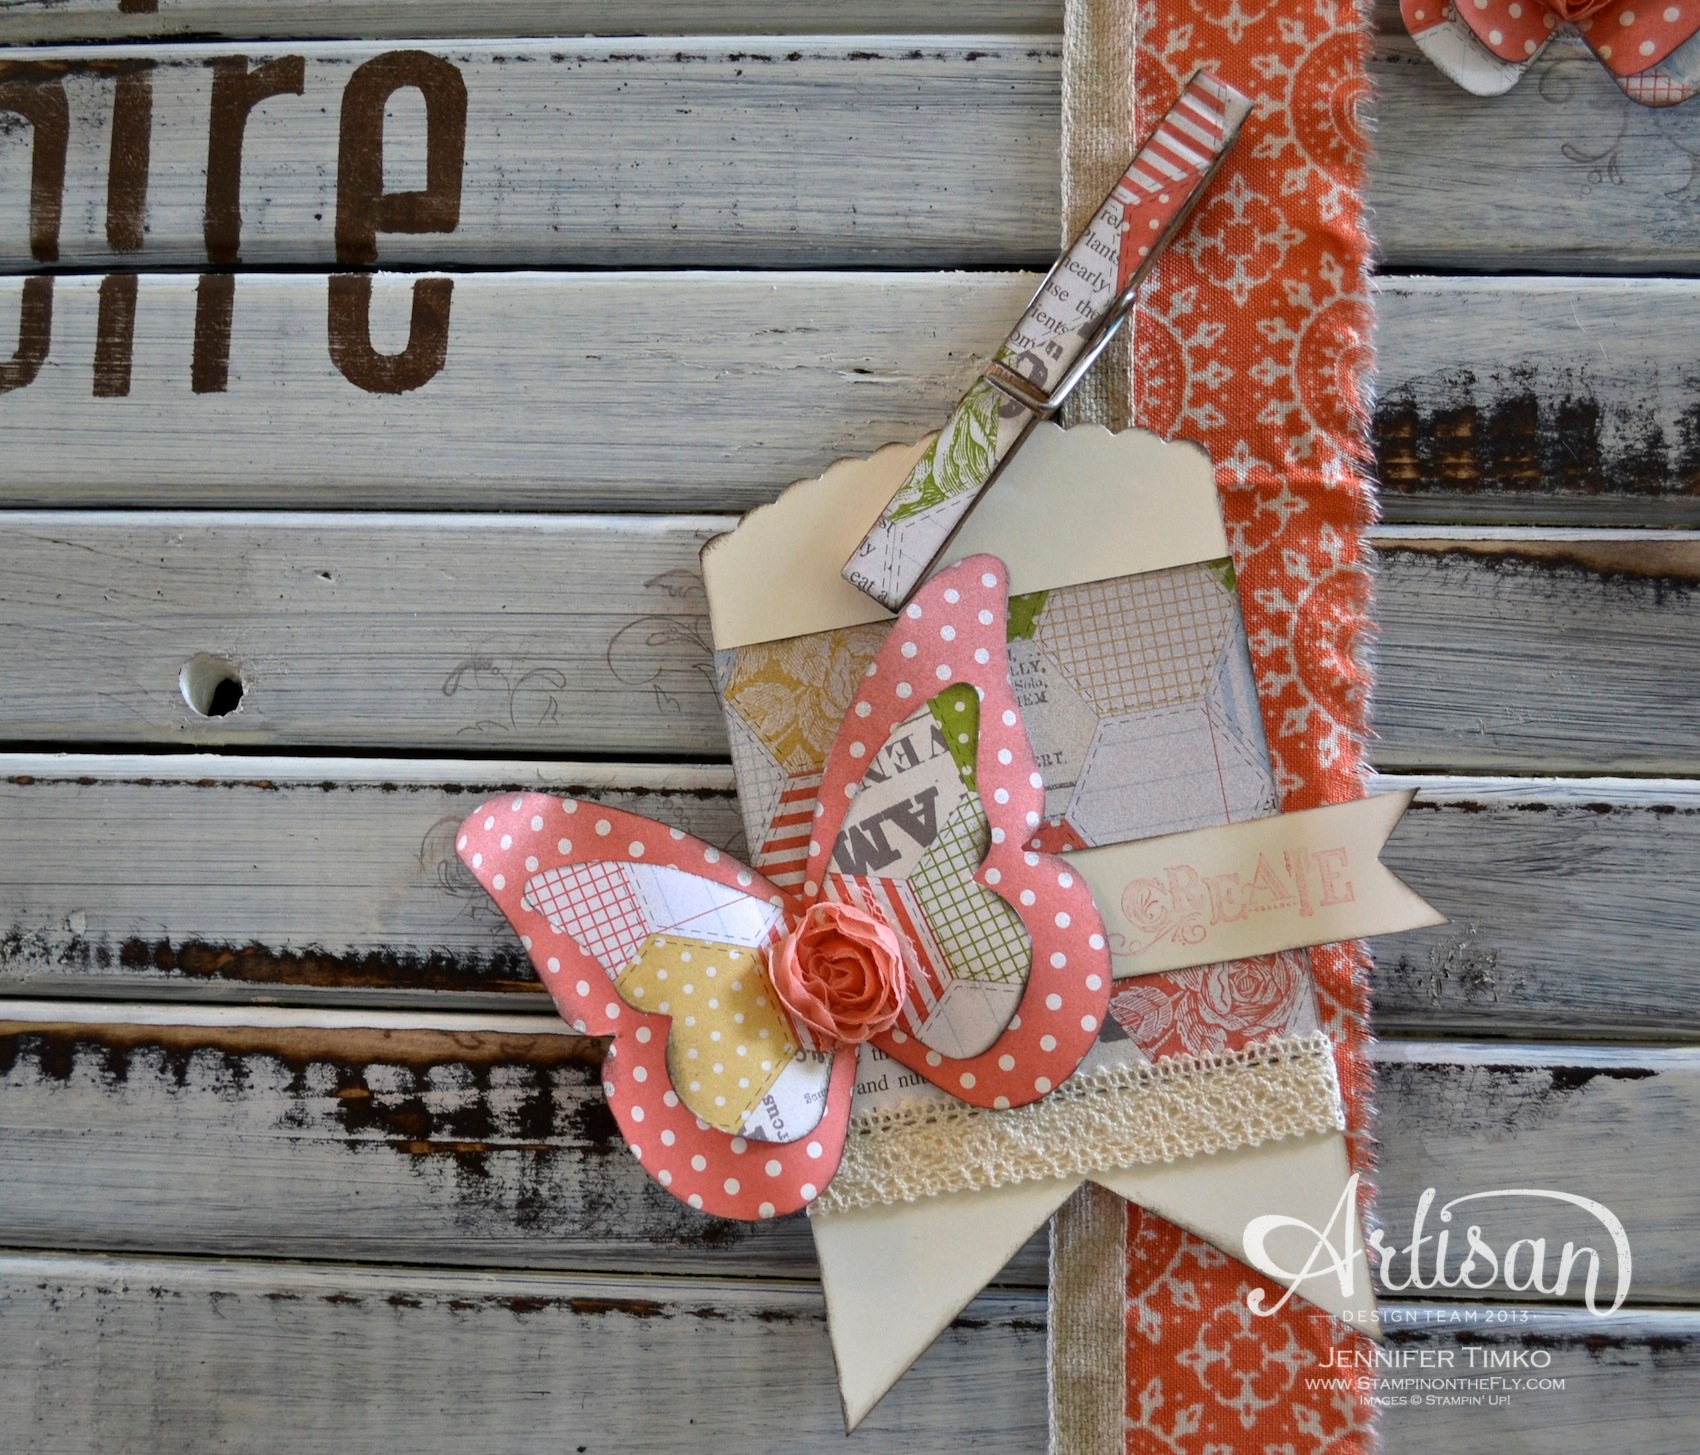
Next up was the final decoration.  I used my Beautiful Butterflies Die to create a forest of butterflies out of the Tea for Two DSP and started playing around with them to find what worked.  I sponged them and formed them so that they would have dimension and attached them with hot glue.  The balance was still a bit off so I added a strip of the Tea for Two Fabric that I tore (I liked the shabby edge) and some Naturals 7/16″ Ribbon.  Finally I added the tag attached with a decorated clothespin.  The tag top was created with the largest Ovals Framelit.

I hope you have enjoyed seeing these projects as much as I have enjoyed sharing them.  Thank you for the kind comments you have left for me.  I really appreciate them!  Starting on August 13th, the whole team will be back for our first Artisan Wednesday Wow hop.  Every Wednesday we will be here to provide inspiration!

Now on to see the amazing Mercedes Weber of Creations by Mercedes!!

Thanks for stopping in today.  See you soon!

Blog Hop Button 13-013Blog Hop Button 13-012

Stamp:  Creative Elements; Paper:  Very Vanilla, Tea for Two DSP; Ink:  Early Espresso, Calypso Coral; Accessories:  Big Shot, Beautiful Butterflies Die, Tea for Two fabric (ret), Victoria Crochet Lace, Flower Trim (ret), Naturals Ribbon, My Digital Studio, Stampin’ Sanding Block, Clothespin, Wood, Crystal Effects (as glue), hot glue

Blog signature 2013-001


2013 Artisan Award Winner Blog Hop – Project 9

2013 Artisan Award Winner Blog Hop – Project 9 published on 4 Comments on 2013 Artisan Award Winner Blog Hop – Project 9

Blog Hop Button 13-011

Welcome to Day 9 of the 2013 Artisan Award Winner Blog Hop!!  I am so incredibly excited to FINALLY be able to share, in detail, the projects I created for my submission to the contest.  If you came over from Jeanna Bohanon’s blog, Stamp Time Somewhere, I know you have already been impressed by her amazing work.  If not, you can just start the hop here and follow around until you get back to me.

Nathan page

This is the last of my scrapbook page entries to show you but it was the first I worked on.  I love this picture of my youngest son…love it!!  It was taken by a dear friend and talented photographer Jud McCrehin when I wanted some pictures of my boys to give to my husband for Christmas.  This one captures the spirit of my little one perfectly!  The page is completely MDS except for some Vintage Trinkets but I wanted it to have a traditional feel.  I printed the base page (just the elongated hexagons, the stitching and the journaling) and then had all the elements printed separately so that I could cut them out.  I popped up some of the hexagons and added the layers after sponging them.

Nathan Closeup


The detail on the frame is the part that made me the happiest.  I cut out the frame and the picture separately (the stitching on the frame is digital), then layered them and popped them both on Dimensionals.  You can see how many layers there are in this closeup.  You can click the picture to see it in even more detail.

For the hexagons, I created my own punch by elongating the current digital hexagon punch.  The paper fills are a combination of existing products and my own creations.  The green is a color I created to color that pattern using the tools in MDS.  I needed one that was a little darker (I called it the Midnight Muse of greens) and love the richness it gives.  The grays in the journaling are color matched to the grayscale of the picture to make it look perfect.  Just like with the soccer page from a few days ago, I printed doubles of everything so I have one of these for me as well.  Creating this page proved to me that your creativity is truly the only limit with MDS!

I’m sure you have noticed that the projects are getting better and better every day so click right over Mercedes Weber of Creations by Mercedes.  She will wow you again!

Thanks for stopping in today.  See you tomorrow!

Blog Hop Button 13-013Blog Hop Button 13-012

My Digital Studio:  Hip and Handsome Overlays, Downtown Grunge, Life Celebrated, Lemonade Stand (Sale-a-bration), You’re My Sunshine, Delight in the Day, A Split Second, Enjoying Everything, Hexagon Punch, Flag Punch,

Blog signature 2013-001


2013 Artisan Award Winner Blog Hop – Project 8

2013 Artisan Award Winner Blog Hop – Project 8 published on 8 Comments on 2013 Artisan Award Winner Blog Hop – Project 8

Blog Hop Button 13-011

Welcome to Day 8 of the 2013 Artisan Award Winner Blog Hop!!  I am so incredibly excited to FINALLY be able to share, in detail, the projects I created for my submission to the contest.  If you came over from Jeanna Bohanon’s blog, Stamp Time Somewhere, I know you have already been impressed by her amazing work.  If not, you can just start the hop here and follow around until you get back to me.

Invitation - Closed


Today is the last of the cards I submitted and I saved my favorite.  I wanted to make a pocket card invitation but one that had a fresh look to it.  I have created a pocket similar to this before and thought it would be really fun to change it up and use the Tea for Two DSP (it is retired now but there is an updated version called Afternoon Picnic that is a must have!).  So I used my Simply Scored Scoring Tool to make this interesting fold on the pocket.  The back print is attached to a piece of Naturals Ivory so that the back is plain.  Then I stitched around the edges with mom’s trusty machine.  I popped out some flowers from the Fun Flowers Bigz Die, spritzed them with water then curved the centers over my bottle of Multipurpose Glue (that green top is just the right size).  While still damp I used a Bone Folder to curl the petals.  The center flower is from Boho Blossoms and then I attached a Vintage Faceted Button center tied with Linen Thread.

Invitation - Open


Now for the inside.  This is the part that you didn’t get to see on the board at Convention. I love this part!  I printed up the invitation on Very Vanilla.  I used the RGB codes from My Digital Studio to match Soft Suede.  Then I stamped it with Oh, Hello and sponged.  The Vanilla layer is attached to a Naturals Ivory layer and stitched again.  Some Natural 7/16″ Trim is sewn in as the pull tab and another button finishes it.  By the way, as I debated what to put on the invitation, I had no idea what name to use.  The first one that came to mind is Kate (my cat) so Katie the cat is apparently going to have a pretty upscale party!

Now on with the hop! No surprise that Mercedes Weber of Creations by Mercedes has another fabulous project to show you.

Thanks for stopping in today.  See you tomorrow!

Blog Hop Button 13-013Blog Hop Button 13-012

Stamp:  Oh, Hello; Paper:  Tea for Two DSP, Natural Ivory, Very Vanilla; Ink:  Soft Suede, Calypso Coral; Accessories:  Big Shot, Fun Flowers Die, Simply Scored Scoring Tool, Vintage Facted Buttons, Linen Thread, Naturals Ribbon, Crystal Effects, Dimensionals, sewing machine

Blog signature 2013-001


2013 Artisan Award Winner Blog Hop – Project 7

2013 Artisan Award Winner Blog Hop – Project 7 published on 10 Comments on 2013 Artisan Award Winner Blog Hop – Project 7

Blog Hop Button 13-011

Welcome to Day 7 of the 2013 Artisan Award Winner Blog Hop!!  I am so incredibly excited to FINALLY be able to share, in detail, the projects I created for my submission to the contest.  If you came over from Jeanna Bohanon’s blog, Stamp Time Somewhere, I know you have already been impressed by her amazing work.  If not, you can just start the hop here and follow around until you get back to me.

Jacob Soccer PageSo My Digital Studio is pretty much awesome!  I have never been much of a scrapbooker.  Something about the pages have intimidated me.  The feeling they need to be perfect maybe??  In any case, MDS has solved that for me.  I don’t like it, hit undo (one of my favorite buttons).  I need a new color, change it.  The DSP I have isn’t working for me (hard to believe since there is so much!!), make my own!  I did a little of that on this.  The Chevron DSP’s in Tangerine Tango and Midnight Muse were actually papers that were recolored, resized then saved as my own DSP to put in here.  Cooh, huh?  I had so much fun playing with this page that it was hard to stop!  I had two of them printed (another awesome feature of MDS) so even after I sent this one off, I still have one for me!  The only thing not MDS on this are buttons.  I think this page captures my oldest son perfectly and he really loves it!  On a personal note, while I was at Convention he asked if all the “stamping people” loved the pictures of him and his brother and asked if they are famous now.  Of course I said yes!!

Ok, time to move on with the hop because you are going to love today’s project from Mercedes Weber of Creations by Mercedes.

Thanks for stopping in today.  See you tomorrow!

Blog Hop Button 13-013Blog Hop Button 13-012

My Digital Studio:  Delight in the Day, Made from Scratch, Hip and Handsome Overlays, Whisper White Patterns, Chevron Punch, Flag Punch, Square Punch; Buttons:  Brights, Regals and Sale-a-bration; White Baker’s Twine

Blog signature 2013-001


2013 Artisan Award Winner Blog Hop – Project 6

2013 Artisan Award Winner Blog Hop – Project 6 published on 8 Comments on 2013 Artisan Award Winner Blog Hop – Project 6

Blog Hop Button 13-011

Welcome to Day 6 of the 2013 Artisan Award Winner Blog Hop!!  I am so incredibly excited to FINALLY be able to share, in detail, the projects I created for my submission to the contest.  If you came over from Jeanna Bohanon’s blog, Stamp Time Somewhere, I know you have already been impressed by her amazing work.  If not, you can just start the hop here and follow around until you get back to me.

MonogramI thought I’d change it up today and share a 3-d project with you.  I have to admit that these were the category that intimidated me the most.  But when Stampin’ Up announced the new Epic Day Washi Tape I knew EXACTLY what I wanted to do!  Monograms are so big right now and I just could not wait to washi tape one!  I found this paper mache “S” at a hobby store (for Stampin’ Up since they were the recipient) that seemed just perfect.  I just started laying the tape and until the patten was finished and then trimmed the edges with an exacto knife.  There were still some rough edges so I used the Sanding Block to clean them up.  To add to the durability, I put on a couple of coats of Modge Podge.  The frame is a shadow box with the glass removed and the background is a piece of Epic Day DSP.  I did absolutely nothing to that paper since I thought is was already perfect!  To decorate the letter, I created a ribbon flower by circling the Basic Black/Basic Gray Wide Ribbon (retired) on a Jumbo Sticky Round.  The center of the flower is a Vintage Faceted Button with a Large Basic Pearl Center.  To hang it, I created a bow attached to another piece of the ribbon.

Because of space limitations at Convention, this piece was sitting on a shelf so you could not see the hangar.  My picture has the bow a bit askew but it was taken on mailing day and I was trying to meet the deadline.  This project is really fun and makable!  I’m hoping to do a version in a local class.

Now, on to the beautiful work of Mercedes Weber of Creations by Mercedes.

Thanks for stopping in today.  See you tomorrow!

Blog Hop Button 13-013Blog Hop Button 13-012

Paper:  Epic Day DSP; Accessories:  Paper Mache Letter, Epic Day Washi Tape, Basic Black/Basic Gray Wide Ribbon (ret), Vintage Faceted Buttons, Large Basic Pearls, Jumbo Sticky Round, Sanding Block, Shadow Box, Crystal Effects (as glue), Modge Podge

Blog signature 2013-001


2013 Artisan Award Winner Blog Hop – Project 5

2013 Artisan Award Winner Blog Hop – Project 5 published on 8 Comments on 2013 Artisan Award Winner Blog Hop – Project 5

Blog Hop Button 13-011

Welcome to Day 5 of the 2013 Artisan Award Winner Blog Hop!!  I am so incredibly excited to FINALLY be able to share, in detail, the projects I created for my submission to the contest.  If you came over from Jeanna Bohanon’s blog, Stamp Time Somewhere, I know you have already been impressed by her amazing work.  If not, you can just start the hop here and follow around until you get back to me.

Poppies - ClosedThis card was the one that started it all.  Back in February I was pondering entering the contest when I sat down to make this.  After I was done, I thought that maybe it was possible.  This card is right in my happy zone using one of my favorite color palettes, Crumb Cake and, well, anything.  In this case, Rose Red.  Pleasant Poppies is just one of those stamps that always seems beautiful.  I love spotlighting and it works so well with this stamp.  So I started stamping.  I won’t tell you how many times it took me to get the watercolored panel exactly like I wanted it but suffice it to say, it didn’t happen on the first try.  Once I had it colored, I added some stitching around the two stamped panels.  I have always loved the look of sewing on a card and was finally brave enough to do it here.  My mom is a quilter and she handed down a wonderful Bernina machine to me.  While I can guarantee that it is under-utilized, it certainly did a good job.  Thanks mom!  I added a bow created with Rose Red Seam Binding (again, the tails were a bit shorter after I trimmed them right before mailing).  While I don’t have a picture of the inside, there is a panel stamped with the same grouping of flowers that is colored.

I’m glad you have been joining me on each day of the hop since I am having such fun sharing.  Now, on to the beautiful work of Mercedes Weber of Creations by Mercedes.

Thanks for stopping in today.  See you tomorrow!

Blog Hop Button 13-013Blog Hop Button 13-012

Stamp:  Pleasant Poppies; Paper:  Crumb Cake, Rose Red, Watercolor; Ink:  Pink Pirouette, Regal Rose (ret), Rose Red, Lucky Limeade (ret), Stazon Black; Accessories:  Stamp-a-ma-jig, Sewing Machine, Rose Red Seam Binding, Neutrals Button (this style retired), Linen Thread

Blog signature 2013-001


2013 Artisan Award Winner Blog Hop – Project 4

2013 Artisan Award Winner Blog Hop – Project 4 published on 11 Comments on 2013 Artisan Award Winner Blog Hop – Project 4

Blog Hop Button 13-011

Welcome to Day 4 of the 2013 Artisan Award Winner Blog Hop!!  I am so incredibly excited to FINALLY be able to share, in detail, the projects I created for my submission to the contest.  If you came over from Jeanna Bohanon’s blog, Stamp Time Somewhere, I know you have already been impressed by her amazing work.  If not, you can just start the hop here and follow around until you get back to me.

Wedding pageI’m going to change it up a bit today and share a scrapbook page with you.  This was the only traditional page I created.  No digital here.  I am not a big scrapbooker but for me it always starts with the picture.  I have a larger version of this picture in my home and took it to the local camera shop to get smaller copies.  When they asked it I wanted it taken back to true black and white, I almost gasped.  Nooo!!  The aging on the picture is simply perfect and I wanted the copy to be exactly the same colors.  They did an awesome job!  This page is 8″x 8″ with a base of Soft Suede.  I took a layer of Naturals Ivory card stock and distressed, sponged and stamped it with Daydream Medallions.  I chose elements that looked like my mom’s dress and flowers to complement the picture.  The lace from the Artisan Embellishment Kit (retired) and the gorgeous Flower Trim (retired) seemed perfect.  I used a little of the First Edition DSP (retired) and a shabby bow cinched with an Antique Brad.  I must thank LeAnne Pugliese for showing me how to make these bows a while ago.  I’ve been hooked ever since!  Since every scrapbook page required journaling, I wrote a little on the page.  That was the hardest part…I was so afraid of messing it up with my sloppy writing!  This page make me so happy (and my mom likes it too)!!

As every day goes on I’m more and more in awe of the projects.  Now, on to the beautiful work of Mercedes Weber of Creations by Mercedes.

Thanks for stopping in today.  See you tomorrow!

Blog Hop Button 13-013Blog Hop Button 13-012

Stamp:  Daydream Medallions; Paper:  Naturals Ivory, Soft Suede, First Edition DSP (retired); Ink:  Crumb Cake, Soft Suede Marker; Accessories:  Flower Trim (retired), Artisan Embellishment Kit (retired), Very Vanilla Seam Binding, Antique Brad, Sponge Daubers, Stampin’ Distress Tool

Blog signature 2013-001


2013 Artisan Award Winner Blog Hop – Project 3

2013 Artisan Award Winner Blog Hop – Project 3 published on 9 Comments on 2013 Artisan Award Winner Blog Hop – Project 3

Blog Hop Button 13-011

Welcome to Day 3 of the 2013 Artisan Award Winner Blog Hop!!  I am so incredibly excited to FINALLY be able to share, in detail, the projects I created for my submission to the contest.  If you came over from Jeanna Bohanon’s blog, Stamp Time Somewhere, I know you have already been impressed by her amazing work.  If not, you can just start the hop here and follow around until you get back to me.

BirthdayToday’s card was the last one I finished.  I really wanted to use some things from the new catalog so I had to wait for the demonstrator pre-order to become available.  I thought that the colors in the Gingham Garden DSP were so perfect for a fun birthday card.  The cake from Make a Wish just called out to be layered and fussy cut so I went with it.  I inked up each layer with Melon Mambo, Daffodil Delight and Marina Mist, respectively, and cut them out. Then I ink them up again and stamped the whole cake on the card stock.  Each layer is popped up with slightly different dimension using a combination of Dimensionals and Glue Dots.  The sentiment is from the same set and the buttons in the coordinating colors (Rose Red instead of Melon Mambo but it is a good “go with”).  The middle layer is actually a strip of the Gingham Garden Washi Tape layered onto a piece of Whisper White cut to the same width.  The tape is somewhat transparent and I didn’t want any of the patterns showing through.

I hope you have been enjoying the hop so far.  I know that I have been simply wow’d by everyone’s projects.  Now, on to the beautiful work of Mercedes Weber of Creations by Mercedes.

Thanks for stopping in today.  See you tomorrow!

Blog Hop Button 13-013Blog Hop Button 13-012

Stamp:  Make a Wish; Paper:  Gingham Garden DSP, Whisper White, Melon Mambo; Ink:  Melon Mambo, Daffodil Delight, Marina Mist; Accessories:  Buttons (retired), White Baker’s Twins, Gingham Garden Washi Tape

Blog signature 2013-001


2013 Artisan Award Winner Blog Hop – Project 2

2013 Artisan Award Winner Blog Hop – Project 2 published on 13 Comments on 2013 Artisan Award Winner Blog Hop – Project 2

Blog Hop Button 13-011

Welcome to Day 2 of the 2013 Artisan Award Winner Blog Hop!!  I am so excited to FINALLY be able to share, in detail, the projects for my submission to the contest.  If you came over from Jeanna Bohanon’s blog, Stamp Time Somewhere, I know you have already been impressed by her amazing work.  That flag is a WOW!!   If not, you can just start the hop here and follow around until you get back to me.

ChevronsToday’s card was my take on the chevron trend that has been so hot!  Conveniently, Stampin’ Up has wonderful products to help you stay right with the latest!  So Jennifer, you ask, what is that chevron stamp on the bottom of the panel??!!  Well, it is the  Chevron Embossing Folder, of course!  *smile*  When I first inked it up, I expected to see fat chevrons just like it embosses but this is what I got.  Oh happy day!!!  Even better than I had hoped!!  I love the slightly splattered look it gives, don’t you?  All I did was brayer on the Rich Razzleberry ink and stamp (the inside is stamped the same way).  The I inked up the chevron oval from Oh, Hello and cut out a fat banner from it (did the same for the thin banner up top).  The thought bubble from Designer Typeset (photopolymer stamp) seemed to go with this look perfectly and I just added a sentiment from the retired Up, Up and Way (I love that font!).  I embossed a small piece of Whisper White with the embossing folder and added it to the top chevron banner, attaching it with an arrow clip.  Now a little layering.  The Stitched Grosgrain Ribbon was attached with a staple and I looped another staple through a Razzleberry button from Sale-a-bration.  A little splattering of ink with the retired splatter tool and done.

Chevron from boardEven though the picture quality isn’t great, I wanted to share this version from my board at Convention.  Notice the length of the ribbon.  This is the version I sent in.  I had left every ribbon a bit long when I first used them and trimmed them as I was putting them in the box to mail.  The shorter ribbon makes the card balance better.  Also, you can see a bit of the stamped portion of the inside.  There is no sentiment since I felt a “miss you” card would be one where the sender would want room to write.

Make sure you come back again tomorrow since the whole team will be sharing more of their winning entries.  Now, on to the beautiful work of Mercedes Weber of Creations by Mercedes.  I promise it will add a little sunshine to your day!

Thanks for stopping in today.  See you tomorrow!

Blog Hop Button 13-013Blog Hop Button 13-012

Stamps:  Designer Typeset, Oh Hello; Paper:  Whisper White, Rich Razzleberry; Ink:  Rich Razzleberry; Accessories:  Chevron Embossing Folder, Big Shot, Hung Up Cute Clips, Razzleberry 1/4″ Stitched Grosgrain Ribbon, Button (SAB), Staples, Dimensionals, Brayer

Blog signature 2013-001


2013 Artisan Award Winner Blog Hop – Project 1

2013 Artisan Award Winner Blog Hop – Project 1 published on 16 Comments on 2013 Artisan Award Winner Blog Hop – Project 1

Blog Hop Button 13-011

Welcome to Day 1 of the 2013 Artisan Award Winner Blog Hop!!  I am so incredibly excited to FINALLY be able to share, in detail, the projects I created for my submission to the contest.  If you came over from Jeanna Bohanon’s blog, Stamp Time Somewhere, I know you have already been impressed by her amazing work.  If not, you can just start the hop here and follow around until you get back to me.

Airplane - Closed1I thought it appropriate to start with this card since it really is one that reflects how I feel about Stampin’ Up!  I loved the idea of a negative image cloud and since we don’t have a punch for this, I simply used a few to get what I wanted.  I started with a Word Window Punch and then used my 1″ and 1/2″ Circle Punches to finish it off.  All the prints on this are from Polka Dot Parade DSP (still current in this catalog!).  I made a little paper airplane and attached it with my friend Crystal Effects…truly the right glue when you want something that can stand up!  I love this sentiment from Up, Up and Away but I needed it in a slightly larger size and in a straight line.  MDS to the rescue!!  The best part is that, while the stamp set is retired, the MDS stamp will stay current.  A bow tied up with a Basic Black button and some White Baker’s Twine finished it off on the front.

Airplane - OpenOn each of my card submissions I finished the inside in a way that I hoped added to the finished look of the card.  On this one, I just used some more DSP, mimicked the layout and added a sentiment from Teeny Tiny Wishes.

Make sure you come back for the next 10 days since the whole team will be sharing all of their winning entries.  Now, on to the beautiful work of Mercedes Weber of Creations by Mercedes.

Thanks for stopping in today.  See you tomorrow!

Blog Hop Button 13-013Blog Hop Button 13-012


Stamps:  Teeny Tiny Wishes, Up, Up and Away (MDS); Paper:  Polka Dot Parade DSP, Daffodil Delight, Basic Black, Whisper White; Accessories:  My Digital Studio, Daffodil Delight Seam Binding, Neutrals Buttons (this version retired), White Baker’s Twine, Dimensionals, Punches – Word Window, 1″ and 1/2″ Circle

Blog signature 2013-001


Primary Sidebar