Skip to content

Artisan Wednesday Wow – Spring Treat Baskets

Artisan Wednesday Wow – Spring Treat Baskets published on 9 Comments on Artisan Wednesday Wow – Spring Treat Baskets

1798346_10203389041834613_393122815_n

The Artisan Design Team’s March box of products is all about spring!  As I type this, there are 8 inches of snow that just fell so I’m even more excited for you to see all that we have for you this week.  Some of you may have already seen the projects since they are from Stampin’ Up’s Facebook Showcase posted last Friday.  If you have come over from amazing Jeanna, welcome to the next stop.  If you are starting here, just continue around using the next buttons until you get back to me.

Mar FB - Easter Flower Peat Pots
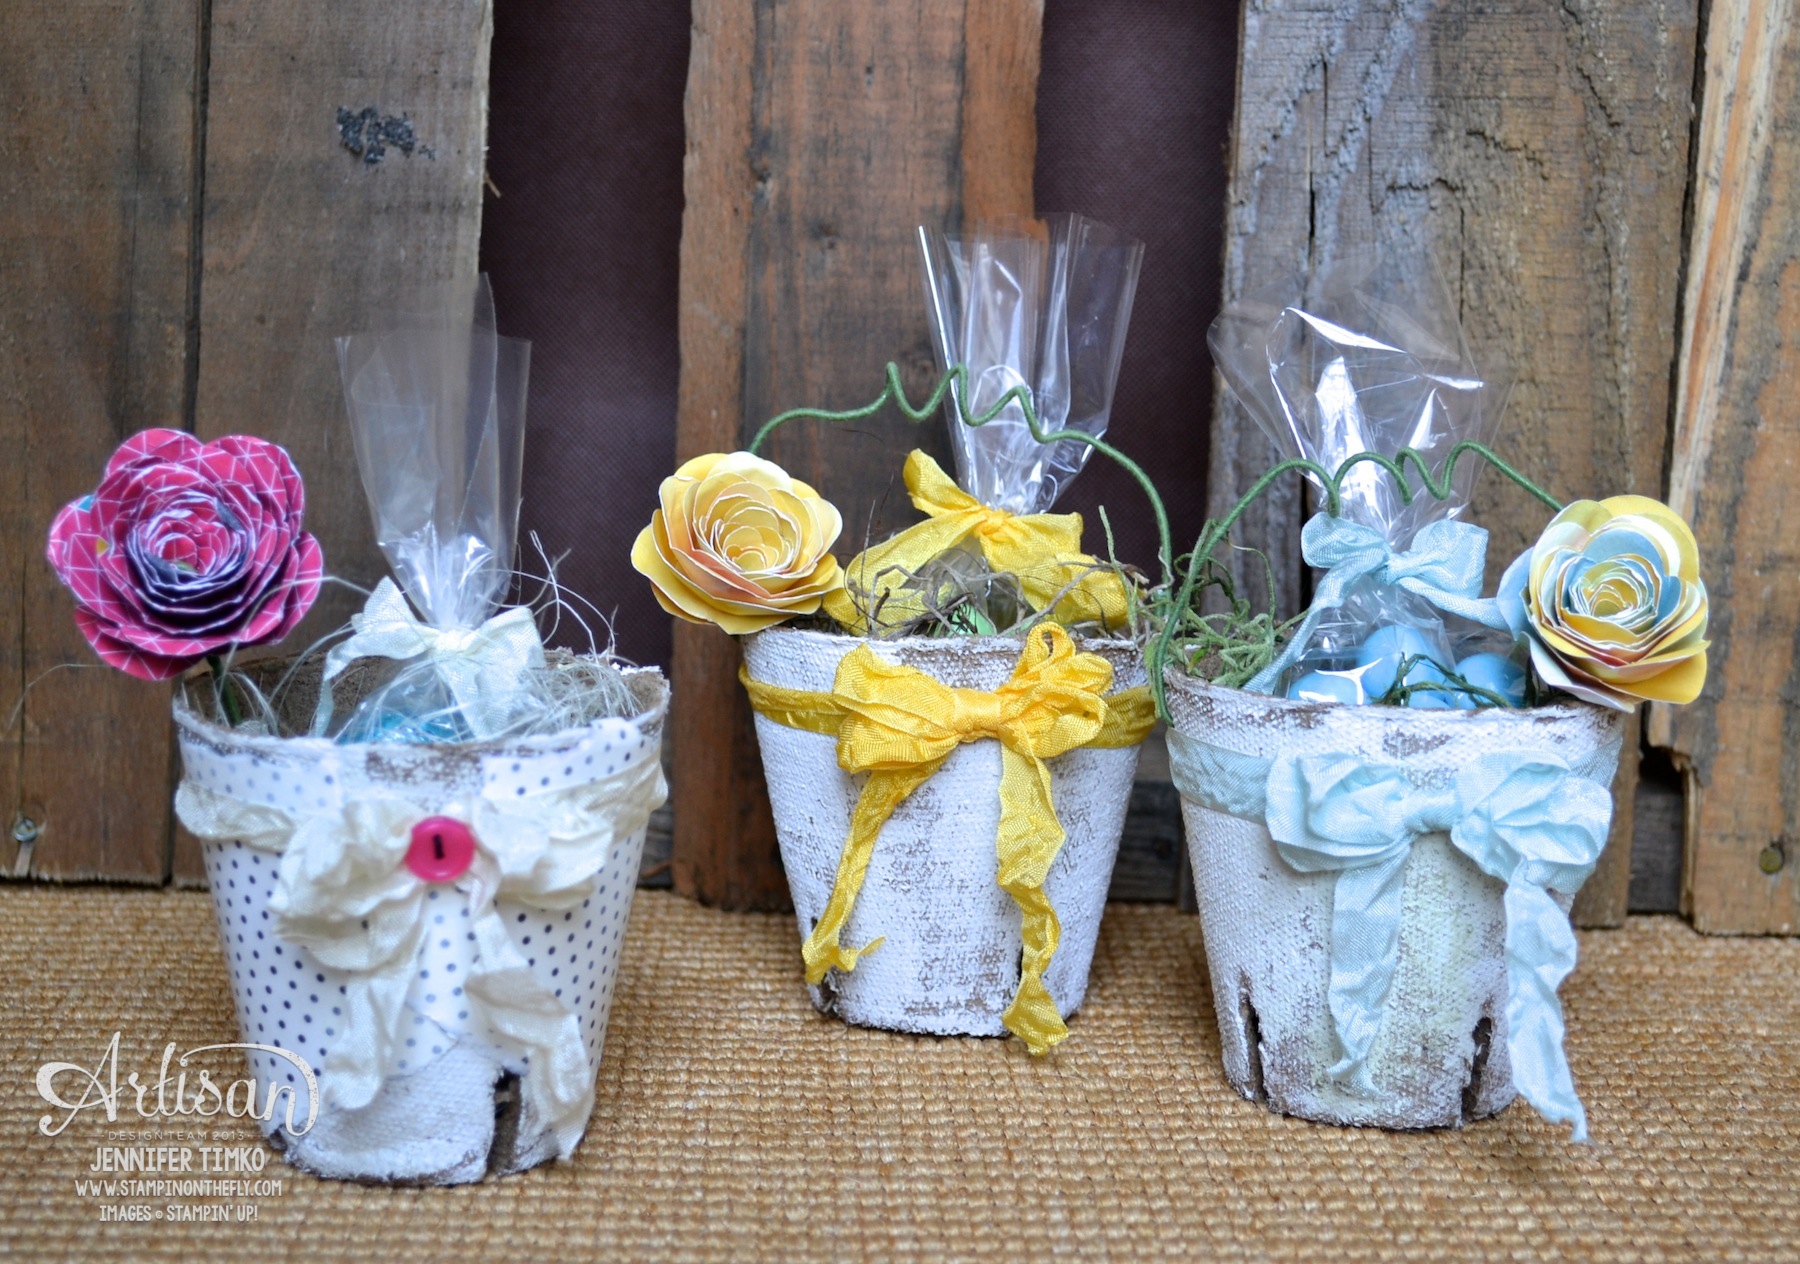
Spring is the time for baskets, don’t you think?  Something about them just makes me happy.  I thought it would be fun to show you this variety of little baskets made for my sons’ teachers.  They are all made basically the same way but with slight variations.  To start, get some little peat pots (you know, the ones for starting seeds).  They are readily available right now at home stores.  There are different shapes and sizes and they are super inexpensive.  Get a few while you are there.  You will want to make more!  I took each of the three pots and painted them with Gesso.  This is an acrylic surface prep and I think you could use acrylic paint instead if that is what you have.  Paint it on haphazardly.  You don’t want total coverage.  Set it aside to dry.

Mar FB - Blue and Yellow Peat Pots
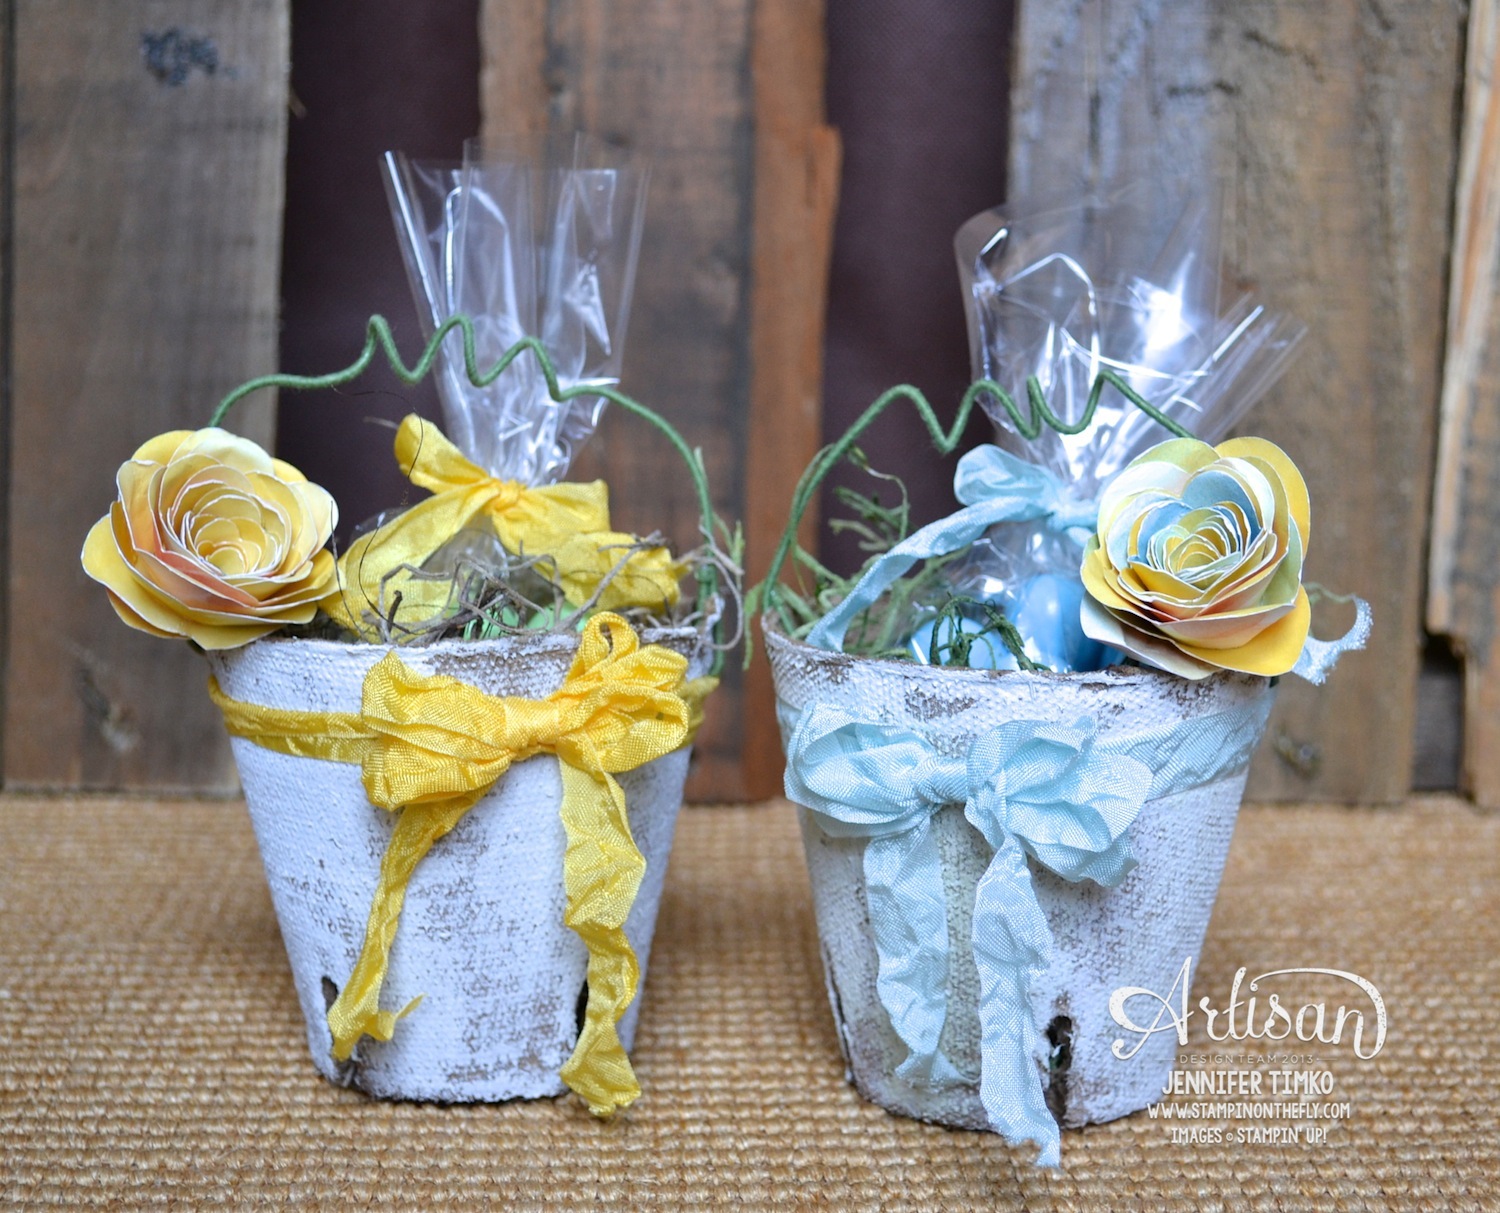
While you are waiting, take some floral wire and cut enough for a handle (be generous, you can trim extra later).  In the middle, wrap the wire around a pencil to get the curves and then fold each side down to create the handle.  With your Piercing Tool, poke a hole where you want the handle to attach. Made sure it isn’t too close to the edge since the pot is really soft.  Bend the end of the handle to a 90 degree angle and put through the hole then bend it the rest of the way up to attach it completely.  I used needle nosed pliers for this.  Do the same for the other side taking care not to pull too hard on the already attached side.  I spritzed Daffodil Delight Seam Binding with water then crumpled and let dry.  I created the bow first and then wrapped around another piece of Seam Binding and attached at the front using hot glue. Then the bow was attached using hot glue.  Yes…the bow is an illusion.  It looks tied on but it isn’t.  Most of my bows work this way since it is so much easier to tie the bow separately!  I filled a 4″x6″ Cellophane Bag with candy treats and tied with more Seam Binding.  Then I added filler and the bag and placed a flower on the side (details below).

For the blue basket, just a couple of changes.  First, I sponged a little Old Olive ink over the Gesso to give a mossy look.  Use a light hand!  The ribbon is Soft Sky Seam Binding but otherwise the same technique.

Mar FB - Pink Rose Peat Pot

 I got a little more ambitious for the third basket.  I tore a piece of Modern Medley DSP and attached it to the pot using Mod Podge.  Once dry, I put on some more Gesso to tone the paper down a bit.  I chose to leave off the handle and instead added a button to the bow before attaching.  Very Vanilla Seam Binding was the ribbon of choice for this one.

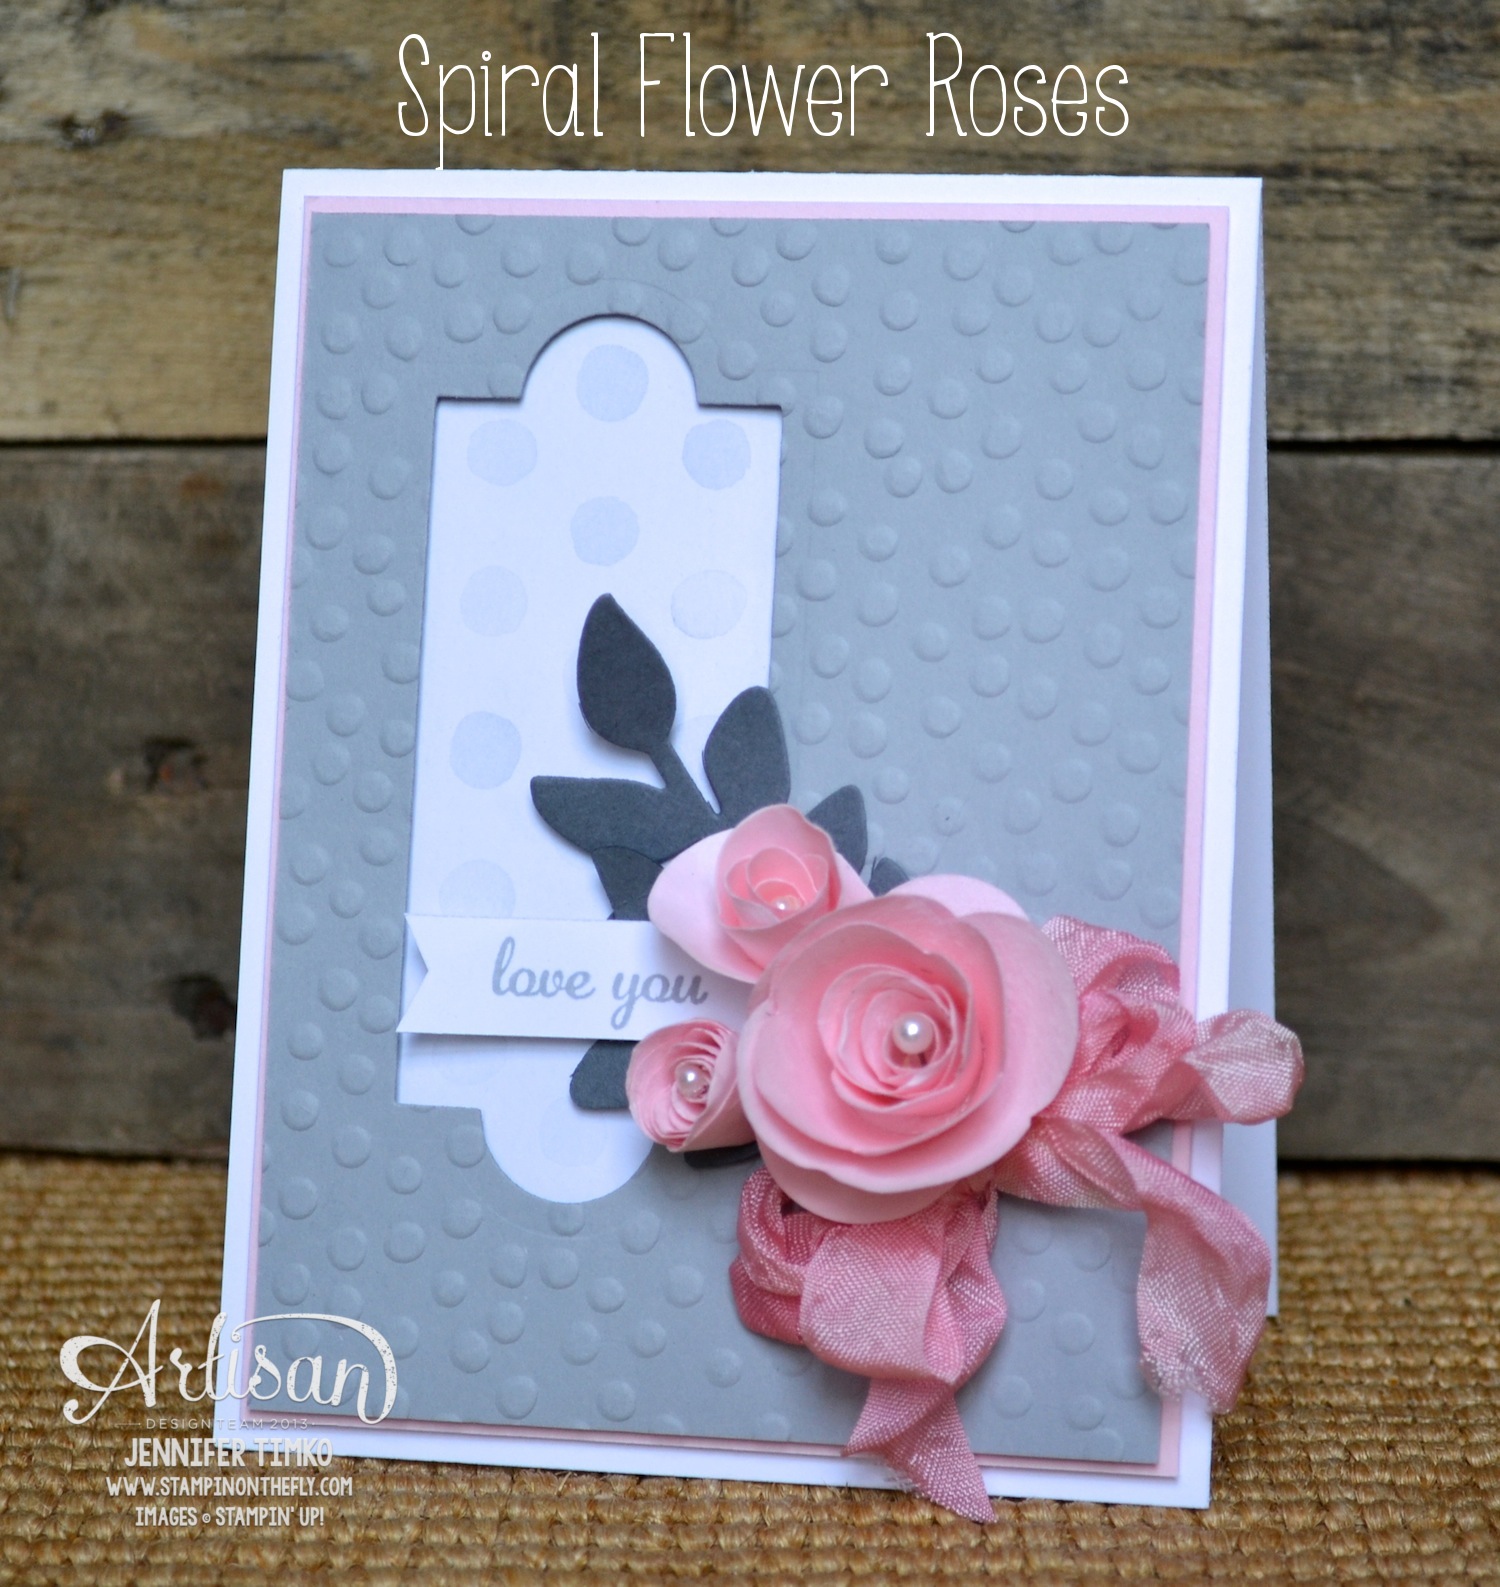
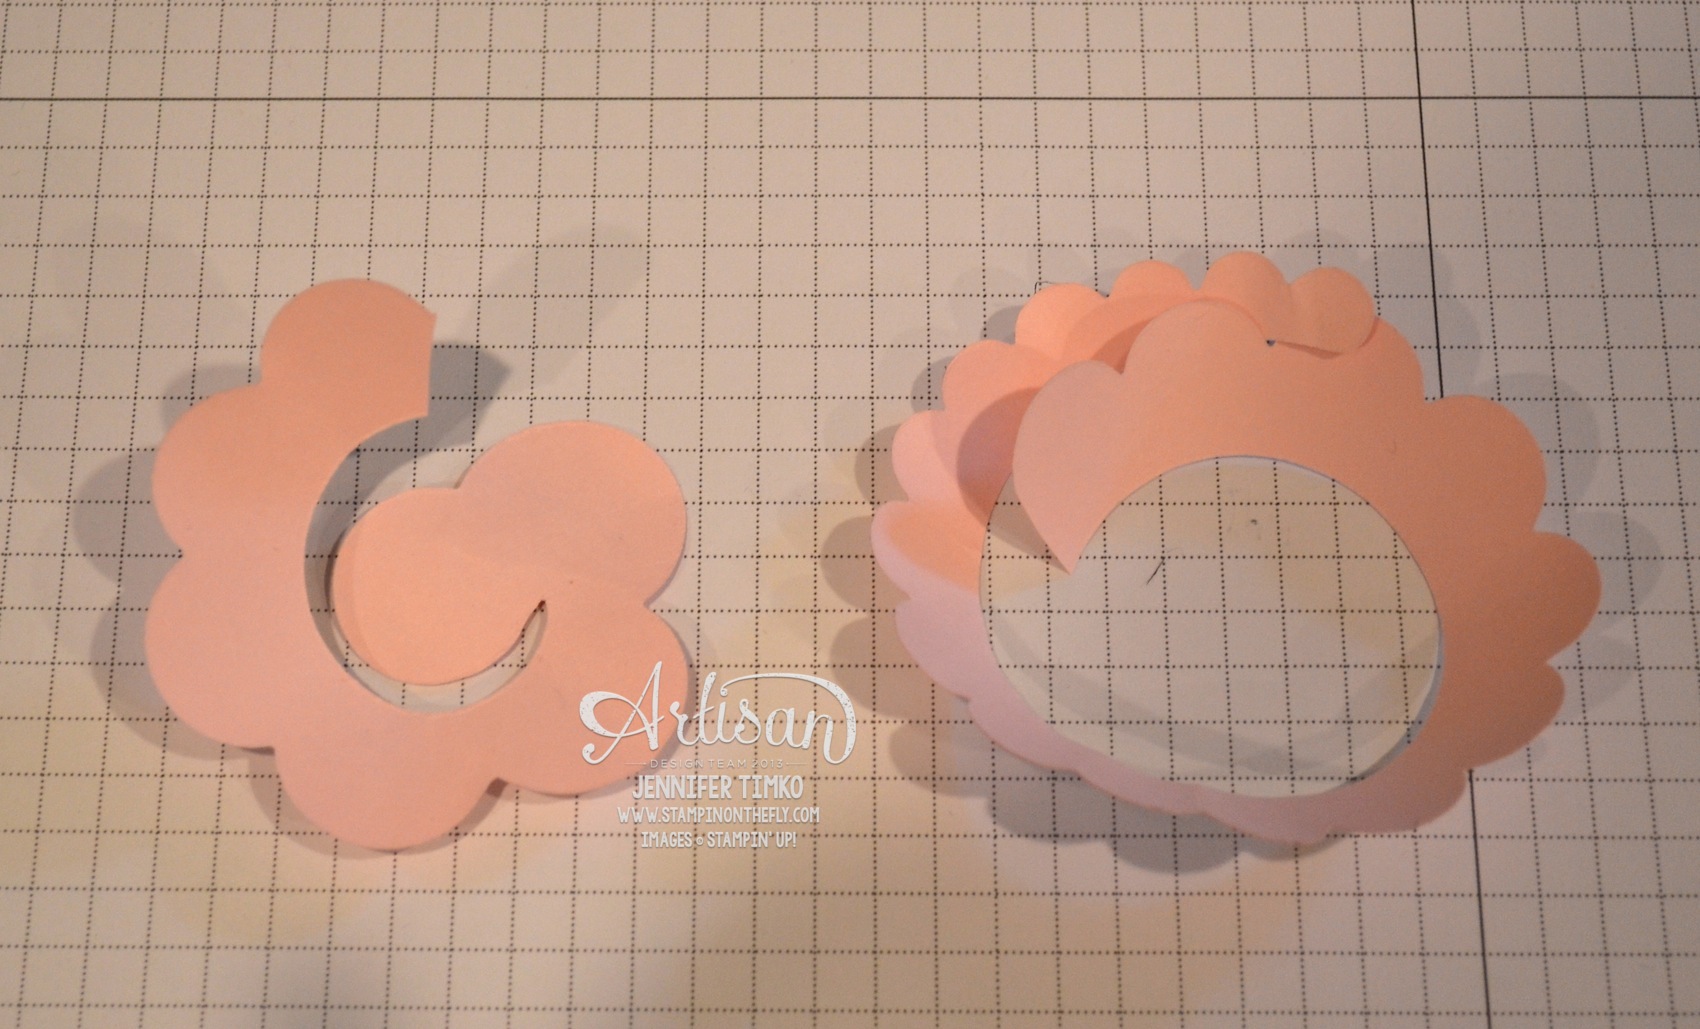
Ok…the flowers.  These were really fun to do and pretty simple once you get the technique down.  The Spiral Flower Die is your best buddy on this!  Choose your DSP (I chose Watercolor Wonder for the first two and Kaleidescope for the third).  Cut out two of the spirals flowers.  Spritz them with water, crumple them, re-straighten them and then roll them up at the same time to give a fuller flower.  Using your Silicone Craft Sheet as a base, add a dollop of hot glue to the bottom and secure them together.

AWW Mar - Flower How to 1

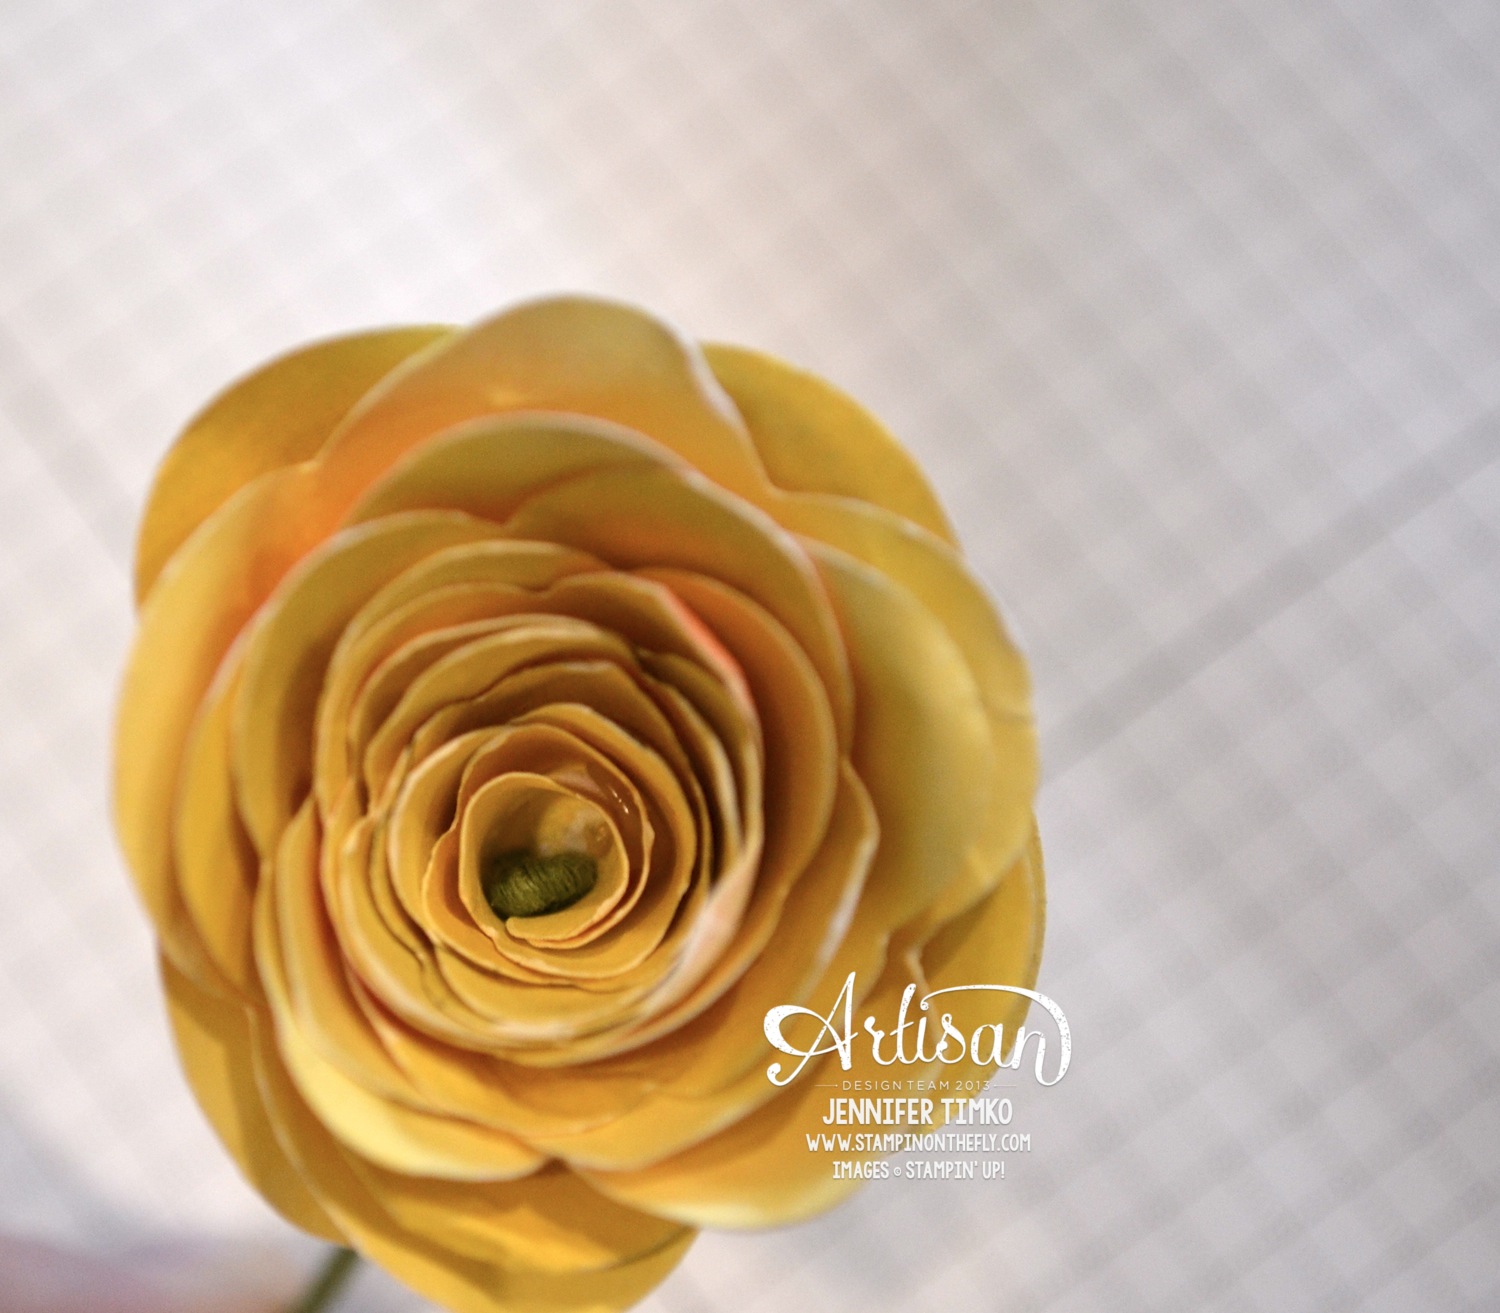
Using your Piercing Tool, poke a small hole through the center of the flower.  Take a piece of floral wire and bend the top down and “smoosh” it together to create a closed hook (kind of like a shepherd’s hook).  Push the other end of the floral wire through the hole you made and pull until the hook creates your center.

AWW Mar - Flower How To 2

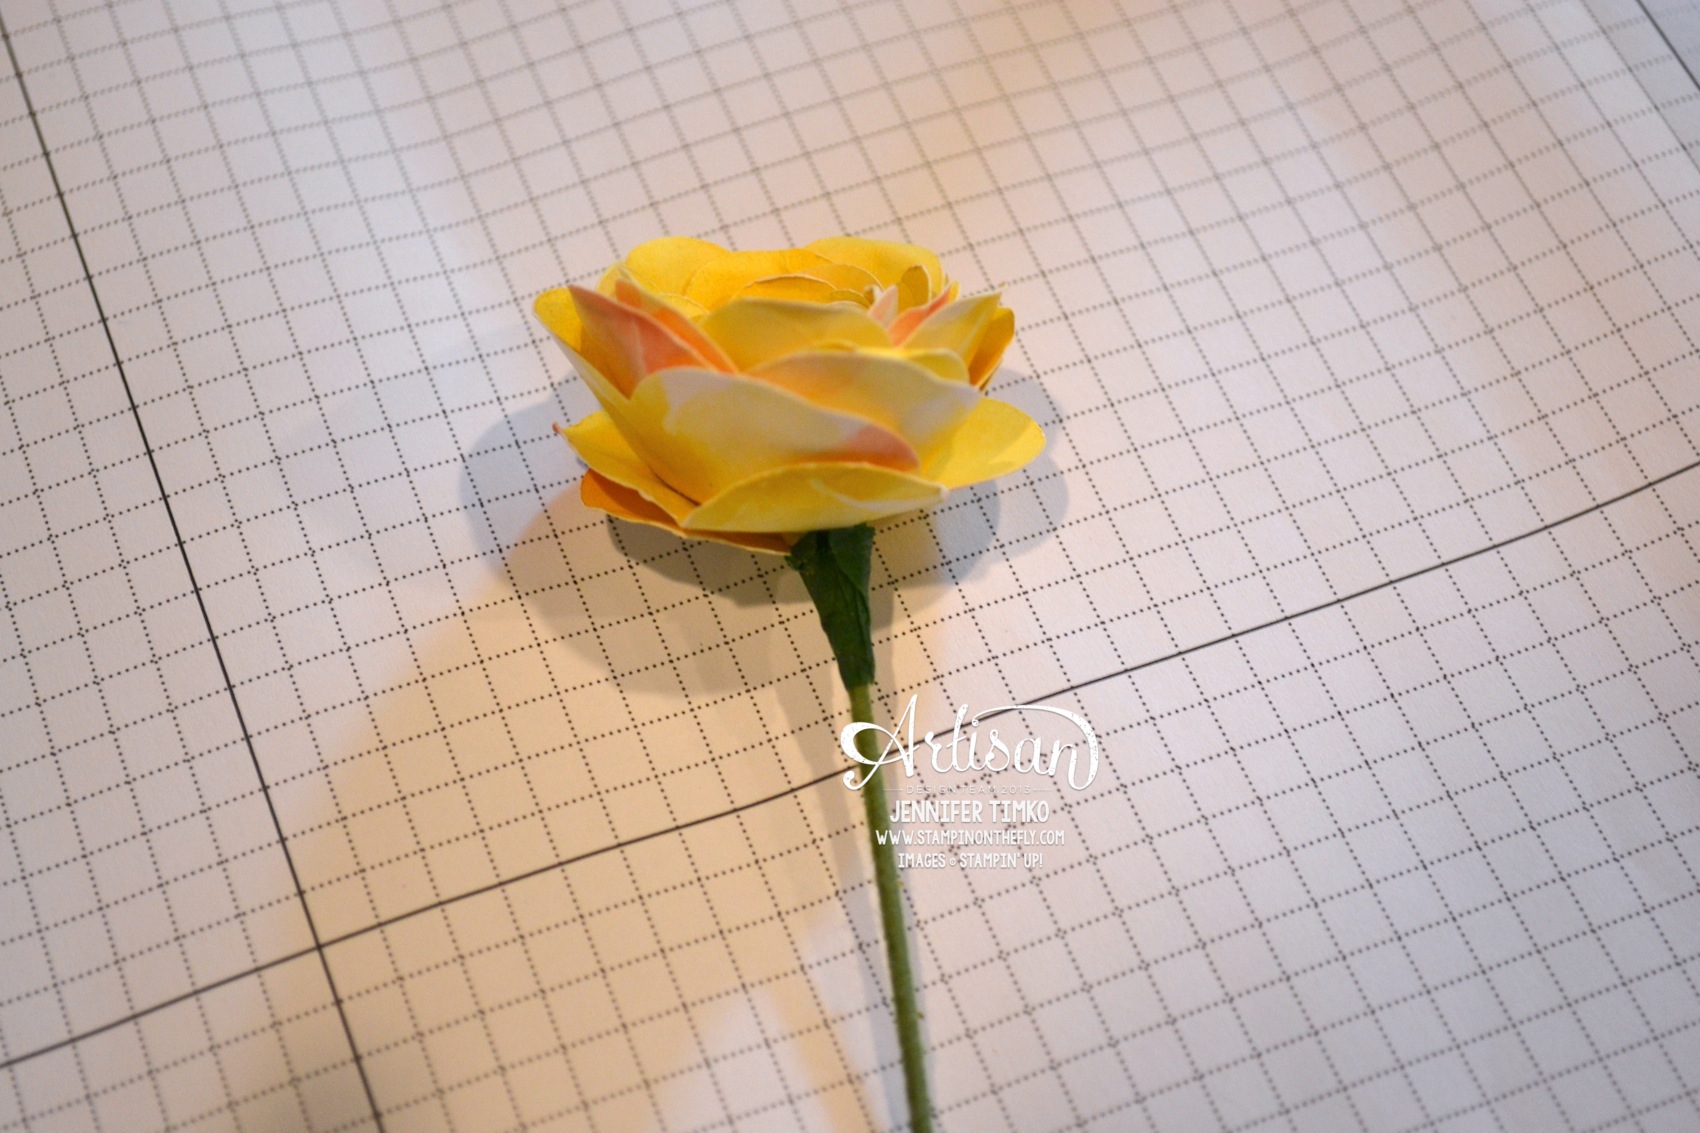
Then using floral tape, wrap around from the base down about 1/2″ inch to create the flower’s sepal.  This also keeps the flower from slipping back down the stem.  Place the stem into the basket, trimming to the right length as needed with wire cutters.

I am pretty sure it takes almost as much time to write this as it did to make it.  Really, it isn’t hard and the results are so worth it.  These would be lovely as a spring party decoration or as favors for a spring shower.  I hope like these as much as I do.  I think this might be one of my favorite projects I have ever made!

Okay, off to go visit the awesome Mercedes Weber.  I can’t wait for you to see what she has created!  Make sure you hop around the whole loop to take a look at beautiful creations by the whole team…you’ll be happy you did!

1896949_10203389042314625_169081012_n

Click HERE to purchase any of these wonderful Stampin’ Up products.

Ink:  Old Olive; Paper:  Watercolor Wonder DSP, Kaleidescope DSP, Modern Medley DSP; Accessories:  Daffodil Delight Seam Binding, Soft Sky Seam Binding, Very Vanilla Seam Binding, Big Shot, Spiral Flower Die, 4″x6″ Cellophane Bags, Rose Red Button, Silicone Craft Sheet, Peat Pots, Floral Wire, Floral Tape, Gesso, Mod Podge, Hot Glue

Blog Signature 2014-001


Soft Sky Watercolor – Taking a step up

Soft Sky Watercolor – Taking a step up published on No Comments on Soft Sky Watercolor – Taking a step up

I held a workshop this week and thought it would be fun to show you the cards we made.  Recently, fellow Artisan Design Team Member Mercedes Weber showed a series of stepped up cards and I thought it was a great idea to show at a workshop.  So I created a series of cards using Watercolor Wonder to demonstrate the versatility of the set.

Soft Sky WatercolorThe mid-level card for the set is the one we actually made at the workshop.  I just love that little watercolor “smudge” behind the flower.  It makes it so that you really don’t have to color the flower further.  I used the Scalloped Tag Topper Punch and the corner rounder from the Envelope Punch Board to create the tag.  I inked the watercolor stamp with Soft Sky then stamped it off to make it even softer.  The flower is stamped in Basic Gray.  The sentiment comes from the hostess set Express Yourself and is stamped onto a 1/2″ strip of Whisper White.  I cut the banner ends using the Sale-a-bration Banner Punch (just slip in one end and then the other).  I tied on some Soft Sky Seam Binding with Linen Thread to top the tag.  All popped up on Dimensionals with a little more corner rounding and finished with some Basic Pearls.

Soft Sky Watercolor - Stepped Up

Then I went about creating the really stepped up version.  I had fun with this one!  I stamped an additional flower and colored it using Soft Sky and So Saffron Ink and my Blender Pen.  I touched on a little Pool Party on the lines to add more dimension to the coloring.  I cut it out and put it up on a Dimensional for some extra wow.  The Soft Sky panel was embossed with the Decorative Dots Embossing Folder.  Then I distressed all the layers with my Stampin’ Distress Tool.  I distressed the Seam Binding too and tied a bow out of the Linen Thread.  The card isn’t really harder but it takes more time and more tools.

Soft Sky Watercolor Series

And that is really what the series of cards was intended to show (you can see the most basic version in the background above).  When stampers come to classes, we demos like to pull out the stops — well, at least I do.  But you can take the same card and either simplify or take it up a notch depending on how long you have to stamp and how many products you have available.  All of these cards will be equally appreciated by the recipient and that is what REALLY matters!

I hope you like these as much as my workshop stampers did.  I also used the stepped up version for a swap at the event last weekend.

Another week has flown by and I hope yours has been good.  I just keep thinking that spring is right around the corner and that makes me smile!  Soccer tournament this weekend (the early harbinger of spring, right?) and maybe some more flying.  Thanks so much for stopping in today.  I’ll see you next week!

Click HERE to purchase wonderful Stampin’ Up products.

Stamps:  Watercolor Wonder, Express Yourself; Paper:  Soft Sky, Crumb Cake, Whisper White; Ink:  Soft Sky, Basic Gray, So Saffron, Pool Party; Accessories:  Big Shot, Decorative Dots EF, Scalloped Tag Topper Punch, Envelope Punch Board, Banner Punch, Soft Sky Seam Binding, Linen Thread, Basic Pearls, Blender Pen, Distress Tool, Dimensionals

Blog Signature 2014-001

Freshly Made Sketches #127

Freshly Made Sketches #127 published on 10 Comments on Freshly Made Sketches #127

FMS Final 127-001


Another Wednesday already?? Well, it really is one of my favorite days of the week!  I am lucky enough to be the hostess for this week’s sketch and I hope that you like this one.  I have a confession to make.  I was struggling and playing with sketches (none of which I liked) when I went searching for inspiration.  Do you do that??  It didn’t take me long to find it because it was in a swap I did at last year’s Stampin’ Up Convention.  We did a swap with all of the Artisan Design Team Finalists (yes….that was an incredible swap) and Concept Artist Melody Hyde joined in.  Melody works at the SU Home Office creating the inspiration for catalogs, Stampin’ Success (the demo magazine) and SU Corporate Blog posts. (Julie shows a picture of Melody’s design here – it was used for a Founder’s Circle project)

FMS127 - How Old

I thought that the vertical Word Bubble Framelit and coordinating stamp from Just Sayin’ would perfect for the sketch. Combining them with the bright and happy Kaleidescope DSP give this a fun and modern feel.  Rounding the corners is an easy way to add character to your card with no actual work.  It is particularly easy when you used the Envelope Punch Board’s rounder punch.  I cut the Strawberry Slush print to the same size as the front of a Whisper White Note Card then used the corner rounder to round all the corners on both.  Not surprisingly, the rounder matches the corners on the Word Bubble Framelit.  LOVE that!  I did the same to the Bermuda Bay print then started popping everything up on Dimensionals.  The stamp uses Stazon Black Ink.  A few buttons tied with Baker’s Twine (from the Tag a Bag Accessory Kit) and I’m done.  Admittedly, you have to find someone with the right sense of humor about birthdays for this one, but it just makes me chuckle.  Perfect for “significant” birthdays especially.

The team has done some wonderful work with this one and you are going to love what they created.  Hope you enjoy playing along too!

See you on Friday with a post showing a fun series of stepped up cards.  Until then, I’m so glad you stopped by.  See you soon!

Click HERE to purchase wonderful Stampin’ Up products.

Stamp:  Just Sayin’; Paper:  Kaleidescope DSP, Whisper White, Whisper White Note Cards and Envelopes; Ink:  Stazon Black; Accessories:  Big Shot, Word Bubbles Framelits, Buttons, Tag a Bag Accessory Kit (for the Baker’s Twine), Dimensionals

Blog Signature 2014-001

Artisan Wednesday Wow – Petite Vellum Petals

Artisan Wednesday Wow – Petite Vellum Petals published on 15 Comments on Artisan Wednesday Wow – Petite Vellum Petals

1798346_10203389041834613_393122815_n

The Artisan Design Team’s March box of products is all about spring!  I admit it.  I have full on spring fever.  After last week’s beautiful projects, I can’t even wait to see what everyone has to show you this week.  If you have come over from amazing Jeanna, welcome to the next stop.  If you are starting here, just continue around using the next buttons until you get back to me.

AWW Mar - Vellum Petite Flowers

On Saturday I had the privilege of presenting at the Northern Virginia Stampin’ Up Style Regional Event.  This event was coordinated by Rose-Ellen Eastman with the assistance of Michelle Suit (both such amazing stampers!).  Over 50 Stampin’ Up demonstrators got together to share ideas and creativity.  Such a fun day!!  Events like this are another of the many reasons to be a Stampin’ Up demonstrator!  When Rose-Ellen asked me to be a presenter I have to admit that I got really nervous.  What to make?  I immediately decided that I wanted it to be a “makable wow”.  Meaning that it would have wow features but still had to be easy enough for new stampers to make.  While the product list is a little longer for this than I originally intended, the card is definitely one that can be made by any level of stamper.

Spring to me says soft colors and a soft look to cards.  Naturally Subtles colors and vellum came to mind.  I cut my base from Whisper White.  Then I cut a panel of Whisper White and one of White Vellum to exactly the same size.  They are 3-3/4″ x 5″.  I cut another panel out of White Vellum to 2″ x 4-3/4″ then set that one aside for a bit.  Using a left over scrap of White Vellum, I stamped the flower from Petite Petals five times using Versamark ink and then heat embossed with Whisper White Stampin’ Emboss Powder.  I pulled the 2″ wide panel back out and scored, using the Simply Scored Scoring Tool, at 1/2″ and 4-1/4″.  Then I stamped the sentiment from Regarding Dahlias in Versamark ink and embossed with Whisper White Embossing Powder.  Now for the fun part!  Using my sponge dauber and Pool Party ink, I started applying ink to the back side of the flowers to create a pop of color.  I used the #1 setting on my Stampin’ Heat Tool (it is the low setting) to set the ink.  Since vellum is basically plastic, the ink just doesn’t absorb into it.  The heat allows the ink to dry faster so you can proceed on with the card without waiting (because I have no patience!).  Take the sponge dauber and apply ink to the back of the 2″ panel too.  Because it doesn’t dry quickly, you have time to apply the ink in a way that makes you happy.  You are going for a soft, watercolor-y look so don’t worry about really even application.  Use the heat tool on that panel too to help the ink dry when you are ready.

You have all the parts now, just how to put it together?  Concealing the adhesive is always the hardest part of using vellum for me.  I used quite a few Glue Dots for this one, all selectively placed.  Cut five pieces of Whisper White Baker’s Twine about 5″.  Attach the top of the twine to the vellum using Glue Dots (place the Glue Dots where you want the flowers to go).  Once you have all the stem tops on, punch out the flowers you stamped with the Petite Petals Punch and attach them on to the same Glue Dots you put down.  After they are all attached place three Glue Dots behind the vellum panel (on the back side of three flowers) and attach the vellum layer to the Whisper White layer of the same size.  Run your adhesive on the bottom of the back side of the Whisper White panel and secure the other ends of the stems behind the layer.  Now for the horizontal layer.  You scored the edges to help you wrap that panel around to the back of the design layer.  Using more Glue Dots, attach the panel securing from behind.  Take that whole panel and attach to the card base using Dimensionals.  Top off the flowers with Basic Pearls and you are done!  So soft and pretty, don’t you think?!  And no adhesive in sight!

AWW Mar - Razzleberry PetalsOh, and if you are not in the mood for Subtles?  How about a Brights version instead?  I made one in Rich Razzleberry to show as well!  (You can click on it to see it larger) Now can you see a whole pack of these made in pretty spring colors?  Yep…me too!  It is on my list to finish up!

I’ll be back tomorrow with the latest from Freshly Made Sketches and then later in the week with a set of cards I am using for a workshop this week.  More pretty spring things to show!

AWW Mar - Vellum petals

Okay, off to go visit the awesome Mercedes Weber.  I can’t wait for you to see what she has created!  Make sure you hop around the whole loop to take a look at beautiful creations by the whole team…you’ll be happy you did!

1896949_10203389042314625_169081012_n

Click HERE to purchase any of these wonderful Stampin’ Up products.

Stamps:  Petite Petals, Regarding Dahlias; Ink:  Pool Party, Rich Razzleberry, Versamark; Paper:  Whisper White, White Vellum Card Stock; Accessories:  Stampin’ Heat Tool, Whisper White Stampin’ Emboss Powder, Sponge Daubers, Petite Petals Punch, Basic Pearls, Glue Dots, Dimensionals, Whisper White Baker’s Twine

Blog Signature 2014-001


Banner Blast – Hi

Banner Blast – Hi published on No Comments on Banner Blast – Hi

 So when I saw Banner Blast and the cute matching punch, I knew they had to come to my stamp room right away!  I was so happy when I got them to create projects for Leadership.

Banner Blast - Hi

I thought it would be fun to combine the prints in the stamp with the prints in the Gingham Garden DSP (from the main catalog).  They seem like a natural combination don’t they?  I stamped in the colors from the DSP — Daffodil Delight, Island Indigo and Melon Mambo – and punched out some DSP with the punch too.  I lined them all up and put a little Melon Mambo strip on time wrapped with Baker’s Twine.  This is perfect for a quick and easy note or thank you!

I have been making stuff all week so a bit short on the post.  Looking forward to presenting tomorrow at the Northern Virginia Regional Styled Event hosted by the lovely Rose-Ellen Eastman.  I’ll be sharing that card with you next week!  Hope your weekend is wonderful.  Thanks for stopping in today!

The rest of the team is showing their Leadership Display Board projects as well so make sure you take a look!

Here is the rest of the Artisan Design Team:


Click HERE to purchase wonderful Stampin’ Up products.

Blog Signature 2014-001


Freshly Made Sketches #126

Freshly Made Sketches #126 published on 9 Comments on Freshly Made Sketches #126

FMS Final 126-001

Now just look at what Amy O’Neill has created for us at Freshly Made Sketches this week!! These fun off kilter panels add so much personality and will give lots of room for creativity.

FMS126 - Fresh Print Flower

I am continuing on with my spring theme.  Because I am done with winter.  Two more days of lost school for my boys this week and another disruption to the family mojo.  Even the boys are ready for a full week of school…and that is saying something.  *smile*  There is nothing like fun colors and happy prints to brighten the mood a bit so I pulled out the Fresh Prints Paper Pack and started playing.  Aren’t these great?  Because they are slightly larger than card size, the pieces were easy to use for this layout too.  I simply positioned them how I wanted, glued the two prints together, then put little pencil tick marks where I wanted to cut.  I chose another of the prints for this flower from the Fun Flowers Die.  I popped out two, one in the print and one in Real Red, and then another little flower using the new Petite Flower Punch.  The Stitched Grosgrain in Real Red was an easy go-to for the crossing piece of the sketch.  I topped off the flower with a Vintage Faceted Button and some Cherry Cobbler Baker’s Twine (it coordinates perfectly).  The sentiment is from Gifts of Kindness.

Well, the boys are going back to school today (with a delay) and hopefully, hopefully we’ll get back to a real routine soon.  They certainly have had fun sledding this year and even I have to admit it is really pretty when it first falls.  But the vortex is now welcome to stay in the polar areas!

I am also really excited for this weekend.  The lovely Rose-Ellen Eastman has put together an event for area demonstrators.  We will share ideas and inspiration.  I will be presenting a technique card that you will get to see next week.  Wish me luck…I’m a little nervous but I know I’ll be surrounded by lots of lovely stampers!

Hoping to be back Friday with another project from Leadership.  Until then, so glad you stopped in.  If you are needing a little more spring, make sure you take a look at my Artisan card in the previous post!

Click HERE to purchase wonderful Stampin’ Up products.

Stamp:  Gifts of Kindness; Paper:  Fresh Prints Paper Pack, Whisper White; Ink:  Real Red; Accessories:  Big Shot, Fun Flowers Die, Real Red Stitched Grosgrain, Vintage Faceted Button, Cherry Cobbler Seam Binding, Crystal Effects (as glue)

Blog Signature 2014-001

Artisan Wednesday Wow – Spiral Flower Roses

Artisan Wednesday Wow – Spiral Flower Roses published on 6 Comments on Artisan Wednesday Wow – Spiral Flower Roses

1798346_10203389041834613_393122815_n

The Artisan Design Team’s March box of products is all about spring!  Thank goodness because I could use a little spring.  I can’t even wait to see what everyone has to show you this week.  If you have come over from amazing Jeanna, welcome to the next stop.  If you are starting here, just continue around using the next buttons until you get back to me.

AWW Mar - Spiral Flower Love

When Jeanna was designing this month’s hop buttons (cute, aren’t they?) she must have been inspired by some of the same things I was.  I just had to play with the Spiral Flower Die as soon as I got it and I love it!  I have seen a number of ways to use it and thought I should create one of my own.  I wanted a card with three flowers of different sizes but how to do that?  Pretty simple actually.  I made the largest flower with the full spiral from the die.  Then I cut a second and cut it into two pieces to create the other two flowers (see below).  To lighten up the card stock a little for easier rolling, I “sueded” the paper first.  Before cutting (trust me…I tried it after and it is much harder), take a piece of card stock and distress it with your bone folder or over a counter top edge.  By rolling one way and then the other, the paper will start to separate and you can pull the layers apart.  Then just cut with your Big Shot and the die.  I used Pink Pirouette Card Stock and paired it with Smoky Slate.  The little window is cut using the Apothecary Accents Framelits and then the layer was embossed with the Sale-a-bration Decorative Dots Embossing Folder.  The DSP in the window is from Watercolor Wonder DSP.  I cut some leaves out of Basic Gray card stock with the Secret Garden Framelits.  It was still missing something so I wanted to add a shabby bow.  But which color?  I decided on pink but there isn’t one….so I made it.  It is super easy.  Add a few drops of Rose Red Reinker to some water and drop in Very Vanilla Seam Binding.  Let soak for a bit and then let dry.  If the color isn’t strong enough you can re-soak or add a little more ink to the water.  This color happened on my first try and it is a perfect match.  YEA!  I tied the bow and attached it with hot glue (the flowers use the hot glue too).  The sentiment comes from the hostess set Express Yourself and I thought this would be pretty for a Mother’s Day card or a special birthday.  Finally the pearls.  The little flowers have Basic Pearls attached and for the larger one, I used a pearl topped straight pin that I clipped with wire cutters (hot glued down to the center).

AWW Mar - Small flower tutorial


You can see to the left how I cut my spiral.  It doesn’t have to be precise, just adjust the size as needed.  You see the bit of curl on them?  That is because I gently curled them with my Bone Folder (much like curling ribbon).  That helps them roll easier.

I’ll be back tomorrow with the latest from Freshly Made Sketches and then later in the week with more Leadership Display projects.  Sorry I missed the project on Monday.  Snow days are seriously getting in the way of my blogging time, lol!

Okay, off to go visit the awesome Mercedes Weber.  I can’t wait for you to see what she has created!  Make sure you hop around the whole loop to take a look at beautiful creations by the whole team…you’ll be happy you did!

1896949_10203389042314625_169081012_n

Click HERE to purchase any of these wonderful Stampin’ Up products.

Stamps:  Express Yourself; Ink:  Smoky Slate; Paper:  Watercolor Wonder DSP, Pink Pirouette, Smoky Slate, Whisper White; Accessories:  Big Shot, Spiral Flower Die, Apothecary Accents Framelits, Secret Garden Framelits, Very Vanilla Seam Binding, Basic Pearls, Hot Glue, Pins, Dimensionals

Blog Signature 2014-001


You’re Lovely – A “Lovely” Bag

You’re Lovely – A “Lovely” Bag published on No Comments on You’re Lovely – A “Lovely” Bag

I don’t know about you but I love fun bags.  I particularly love them when I can make them out of Stampin’ Up’s amazing designer series papers!  My project for today does just that!

You're Lovely - A Lovely Bag

The focus is on the oh-so-pretty stamp set You’re Lovely (a Sale-a-bration offering) but the bag provides just the right base for it.  First the bag:

  1. Start with 8-1/2″ x 11″ pieces of DSP
  2. On the long side, score at 2-1/4″, 3-3/4″, 7-3/4″ and 9-1/4″
  3. On the short side, score at 1/2″ and 2″
  4. Below 2″ score line, add additional score on long side at 3-1/4″ and 8-1/2″
  5. Cut out rectangles as shown below
  6. Cut along score lines as shown below
  7. Fold bag together and secure with Sticky Strip

You're Lovely - Bag Tutorial

If you need more specifics, I used this video by Mercedes Weber to assist me so I really recommend you take a look.  She did the hard work on the measurements!!

To decorate the bag, I stamped the image using a few different colors.  First, Island Indigo, then Basic Gray and finally Pear Pizzazz.  I hand cut the Island Indigo Layer.  I used the 1-3/4″ Circle Punch for the center and colors direct to paper on those images with Pear Pizzazz and So Saffron Markers.  Then I cut the “Lovely” out using my Paper Cutter.  The Mini Clothespin is from the Tag a Bag Accessory Kit and I just colored the outsides with my Island Indigo Marker.  Cute way to make the little pin match, don’t you think?  I put a Doily underneath to add some more fun detail.

Hope you like this one!  Glad you were able to stop in today.  I’ll be back on Monday with another project from Leadership!  See you then!

The rest of the team is showing their Leadership Display Board projects as well so make sure you take a look!

Here is the rest of the Artisan Design Team:


Click HERE to purchase wonderful Stampin’ Up products.

Blog Signature 2014-001


You’re Lovely – Lovely with a bow on top

You’re Lovely – Lovely with a bow on top published on No Comments on You’re Lovely – Lovely with a bow on top

Just a quick post today to share another card from Leadership.

You're Lovely - Lovely with a bow

The set You’re Lovely is, well, lovely!  What a wonderful choice for Sale-a-bration!  I thought I’d make a bit of a shabby chic card for one of the examples.  I cut out the oval using the Oval Framelit (Naturals Ivory card stock) and distressed all the edges with the Stampin’ Distress Tool and Crumb Cake ink. I inked the words and some of the images using my Stampin’ Write Markers in Calypso Coral, Pool Party and Wild Wasabi.  When you stamp on the Natural Ivory, the image will not be as crisp but that was the look I intended.  I added a shabby bow made from the Pool Party Seam Binding and topped it off with a Very Vintage button.

I hope to be back tomorrow with a cool bag but it may be Monday if United calls me to fly.  Until then, so glad you stopped in!!

The rest of the team is showing their Leadership Display Board projects as well so make sure you take a look!

Here is the rest of the Artisan Design Team:


Click HERE to purchase wonderful Stampin’ Up products.

Blog Signature 2014-001


Freshly Made Sketches #125

Freshly Made Sketches #125 published on 9 Comments on Freshly Made Sketches #125

FMS Final 125-001

Narelle has an awesome new sketch for us this week at Freshly Made Sketches.  This classic look has all kinds of possibilities!  I opted to keep really true to the sketch and keep it pretty simple.

FMS125 - Spiral Flower Thanks

As soon as I saw the sketch, I thought flower.  Because it is snowing again and I’m ready for flowers.  But which flower?  I had not played with the new Spiral Flower Die so it seemed like a good time to pull it out.  The Watercolor Wonder DSP is a new obsession and it seemed perfect to combine them.  I chose on of the watercolor-y pages with multiple colors (great explanation, right?) for the flower.  Ran that through the Big Shot and all the work is done pretty much.  I used my Bone Folder to add a little curl to the cut out and then rolled it up and attached it together with hot glue.  I rolled it a little loose and the center seemed too empty.  So, I cut a strip of 1/2″ Tangerine Tango about 5″ long and cut with the Fringe Scissors.  Rolled it up and hot glued it to the center.  I chose this polka dot pattern to match and pretty much done.  The sentiment is from Four You (wow, what a useful set).  While the flower makes it unmailable, it is perfect for a hand-delivered thank you, don’t you think?

The team has some fabulous interpretations again this week and you will be certain to love playing along with this one.  Can’t wait to see you in the gallery!

Back tomorrow with some more projects from Leadership.  Until then, thanks so much for stopping by!  See you soon!

Stamp:  Four You; Paper:  Whisper White, Tangerine Tango, Watercolor Wonder DSP; Ink:  Tangerine Tango; Accessories:  Big Shot, Spiral Flower Die, Dimensionals, Hot Glue, Silicone Craft Sheet

Click HERE to purchase wonderful Stampin’ Up products.

Blog Signature 2014-001

Primary Sidebar