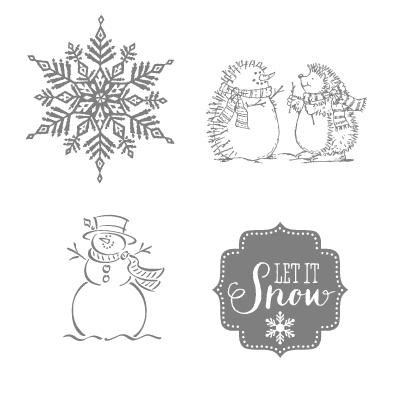
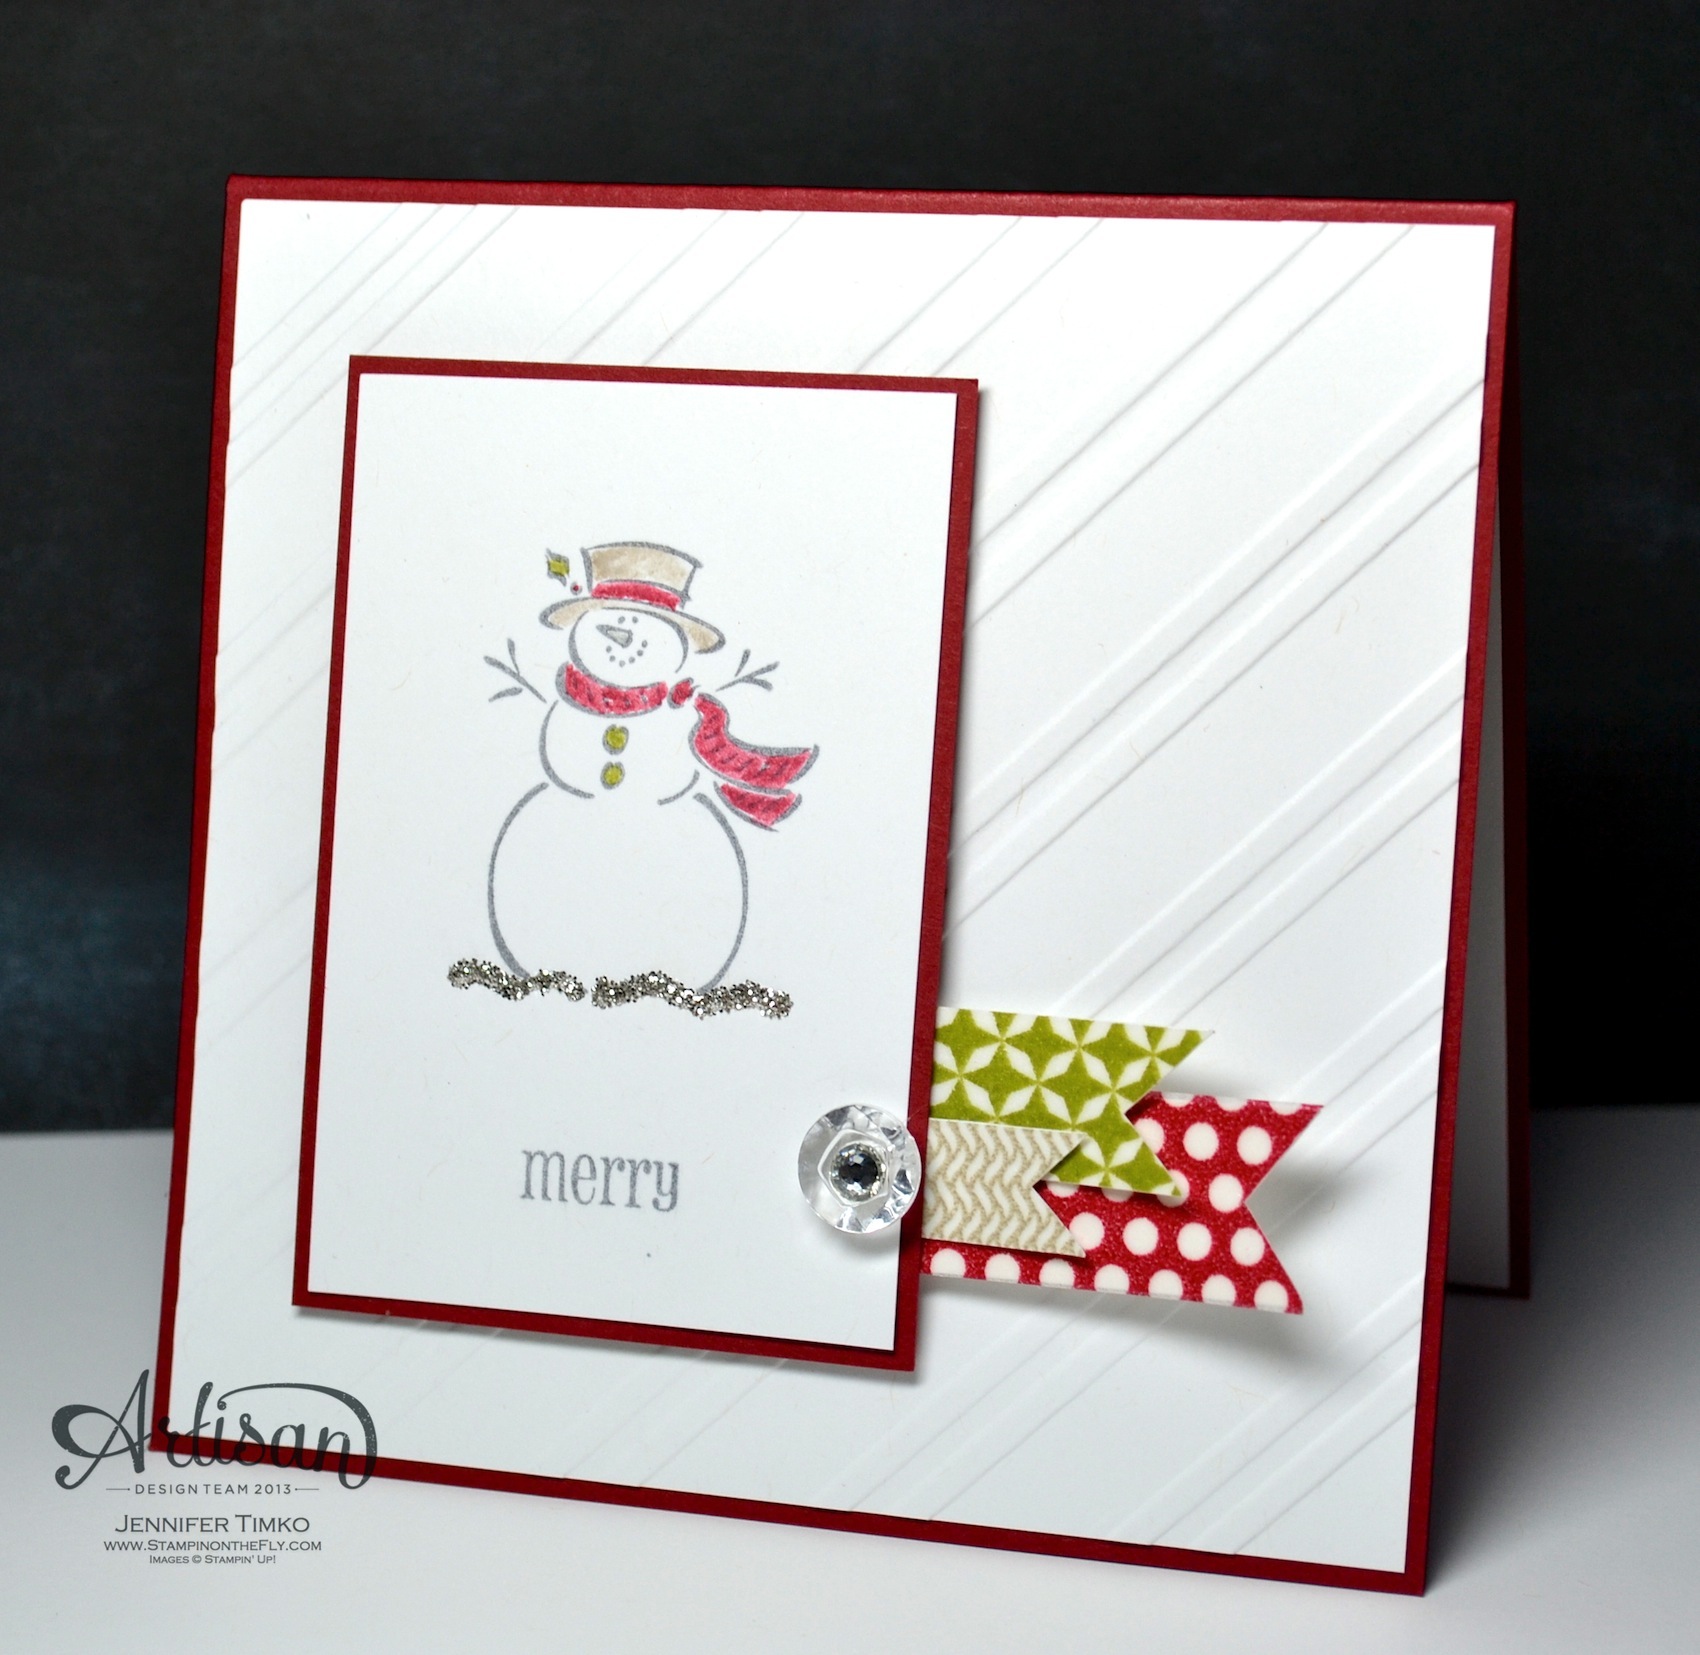
As a member of the Artisan Design Team for Stampin’ Up, I get some amazing privileges! Today I get to show you one. I was lucky enough to receive the new Best of Snow stamp set prior to its release and create some projects for the SU Blog.
Of course, I could hardly wait to share the pictures of the set and the cards! So here they are:
All of the specifics are over at the Stampin’ Up Blog but I’m glad I get to share here too!
Here is a picture of the whole set:
Best of Snow – Clear Mount Stamp Set Item #134387
Price: $14.95
Thanks for letting share my fun with you! I will be back next week with the latest from the whole Artisan Design Team and our new November box! Until then, I appreciate you stopping by. Have a great weekend!
I told you I had another post for today. A little late getting it up but I have been working on a project for November. Suffice it to say that there is lots of glitter and I may be wearing it for days, lol!
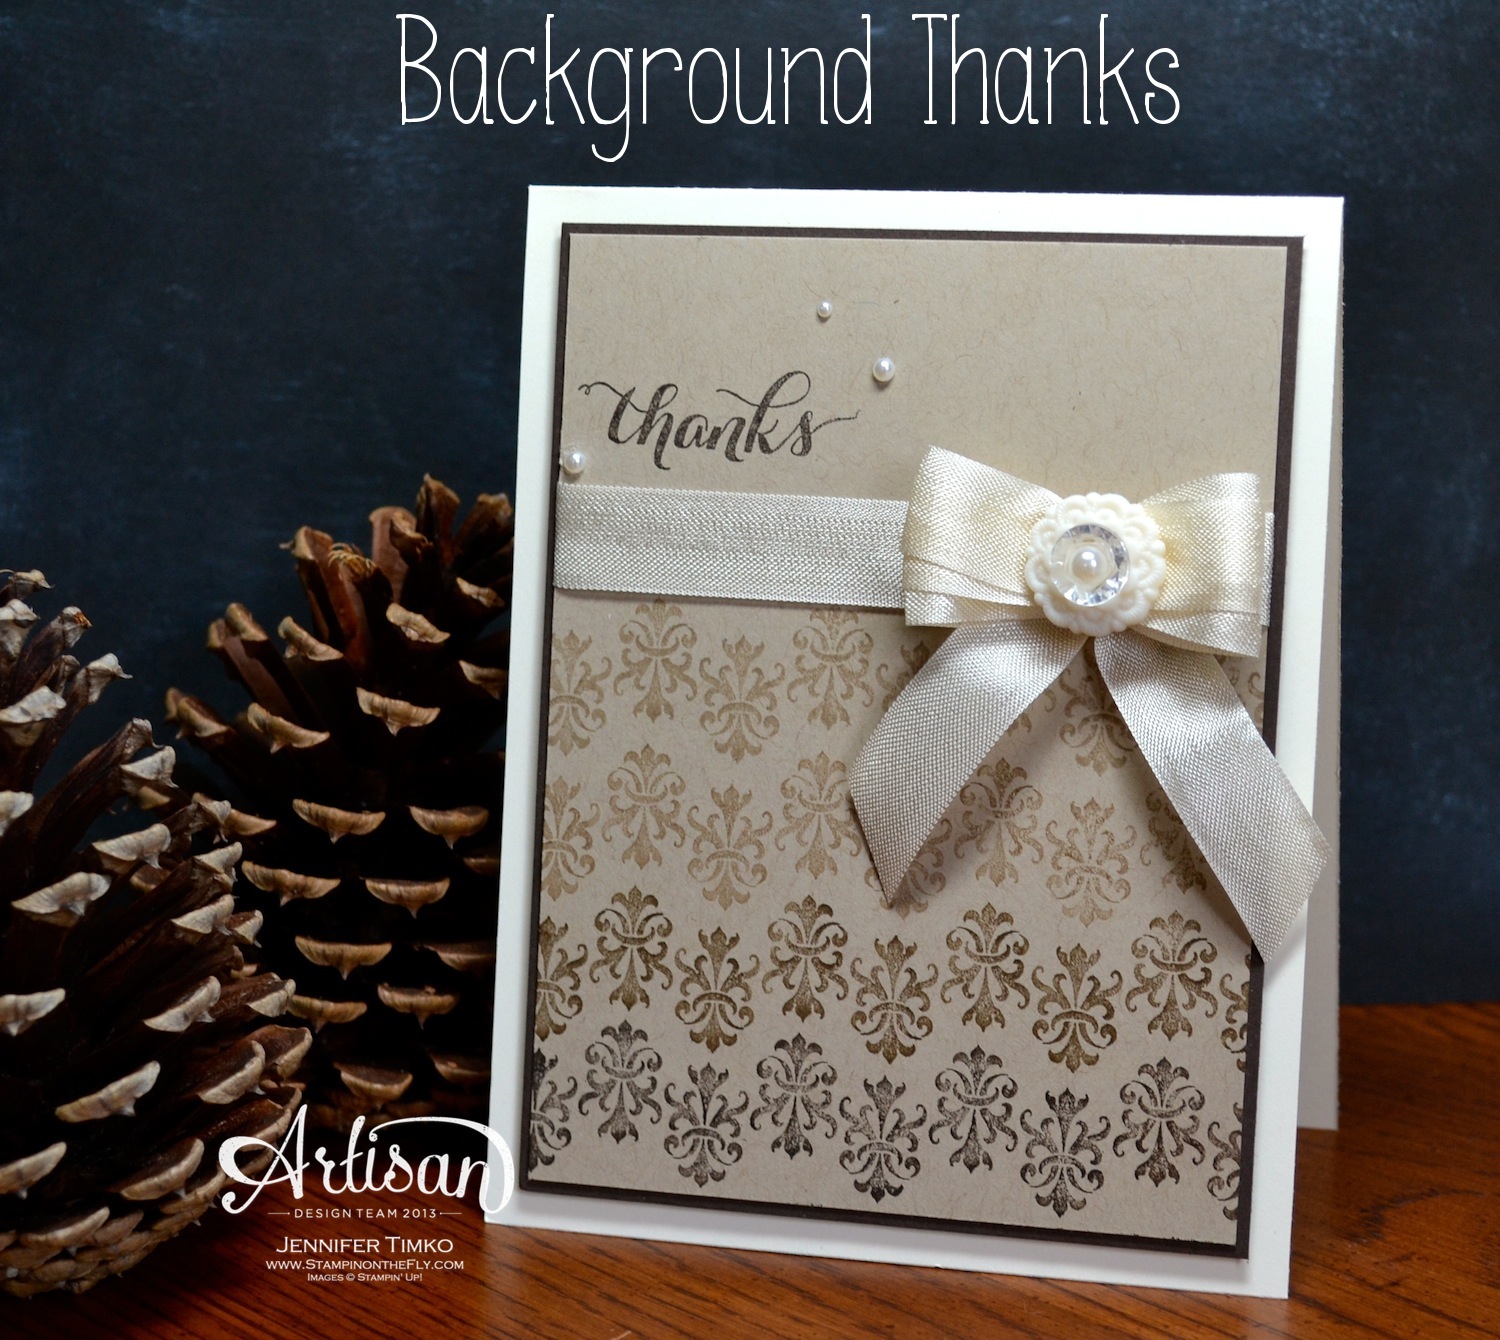
I had created this card for the 5th week of October for the Artisan Design Team. Once Stampin’ Up asked us to create projects with the Pop & Place Tags, this was the one that was replaced. Sooooo….I thought I should bring it out anyways. I used this cool stamp set called Background Builders and tried my hand at an ombre effect. Using Early Espresso, Baked Brown Sugar, Soft Suede and Crumb Cake inks to go up the card. I strongly recommend using a Stamp-a-ma-jig for this one. I’m pretty sure it is one of the tools that I cannot be without when crafting! Another Thank You was used for the sentiment. It is one of the latest photopolymer sets and it is going to be a go-to for me. I added in a bow tied with Very Vanilla Seam Binding and added a Very Vintage Designer Button topped with a Vintage Faceted Button. Some Basic Pearls finished it off.
Now I have a great surprise to show you tomorrow. Hint: Keep an eye on the Stampin’ Up customer blog during the day. I get to introduce a new product over there! What??!! You didn’t know about that blog? Well, go take some time to look around. There is lots of inspiration! I’ll post here too but only after that one goes live.
So glad you dropped in today. I hope your Halloween is safe and happy! I can’t wait for my boys to get all dressed up tonight! See you soon!
Stamps: Background Builders, Another Thank You; Paper: Crumb Cake, Early Espresso, Very Vanilla; Ink: Early Espresso, Baked Brown Sugar, Soft Suede, Crumb Cake; Accessories: Very Vanilla Seam Binding, Very Vintage Designer Button, Vintage Faceted Button, Basic Pearls, Dimensionals, Stamp-a-ma-jig
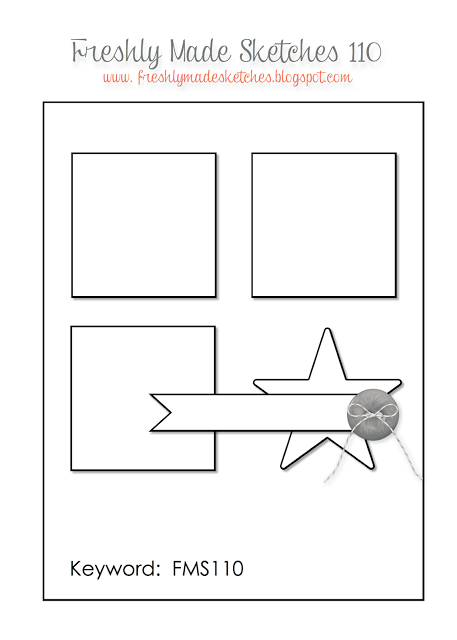
Freshly Made Sketches has the most wonderful challenge for you this week! Just take a look at this awesome sketch by Rita Wright. Great isn’t it? At first I had to think hard about what to use but I started to see lots of possibilities.
Butterflies are what came to mind and I decided to go with it (even though I had snowflakes out on my table). I pulled out the Epic Day DSP and punched out 4 of the big butterflies with my Elegant Butterfly Punch and then chose a different print for the Bitty Butterfly Punch. I layered them with Pool Party buttons and some Linen Thread and then put them on a Crumb Cake layer that was stamped with the Dictionary stamp. The sentiment is from Teeny Tiny Wishes (it is still one of my favorite sets ever) stamped onto some more of the DSP. I attached the butterflies and buttons using Crystal Effects and used the same to fix them to the card. It is great and dries really fast! Finally the stamped layer and Pool Party frame were popped up on Dimensionals.
I hope you like this one and can’t wait to see all the interpretations in the gallery this week. Thanks, Rita, for a good challenge! I needed something to push me a little!
I will be back tomorrow with another card (I know….three in a row??!!). Starting to catch up a bit but still miles to go on some stamping projects. *smile* I’m so glad you stopped by today. See you again tomorrow!
Stamps: Teeny Tiny Wishes, Dictionary; Paper: Epic Day DSP, Crumb Cake, Pool Party; Ink: Soft Suede; Accessories: Elegant Butterfly and Bitty Butterfly Punches, Linen Thread, Crystal Effects, Dimensionals
Stampin’ Up’s Artisan Design Team is bringing you a bonus hop this week. Since there are 5 Wednesdays in October, we are showing you projects made with the new Pop & Place Holiday Gift Tags and Stamps. If you have come over from amazing Jeanna, welcome to the next stop. If you are starting here, just continue around using the next buttons until you get back to me.
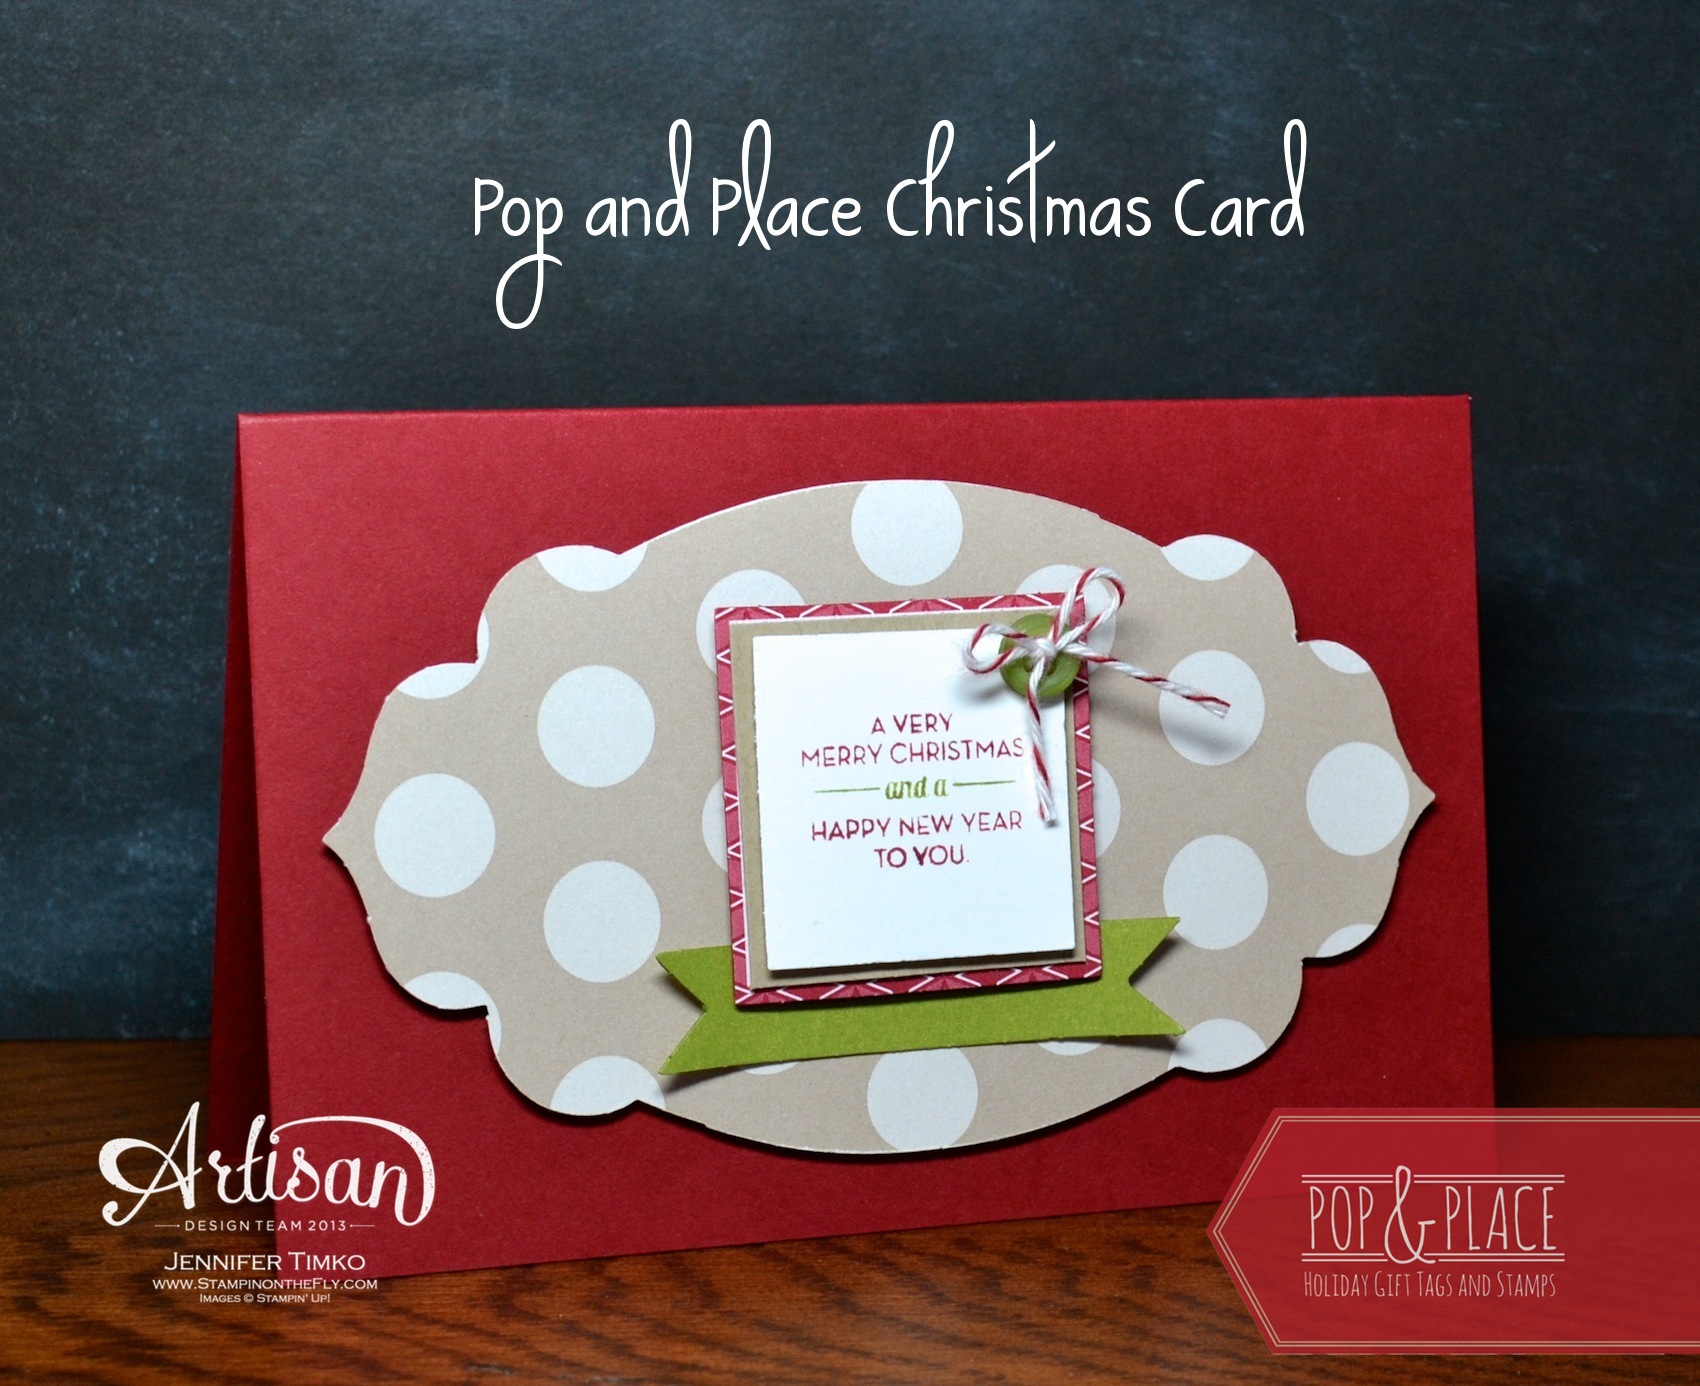
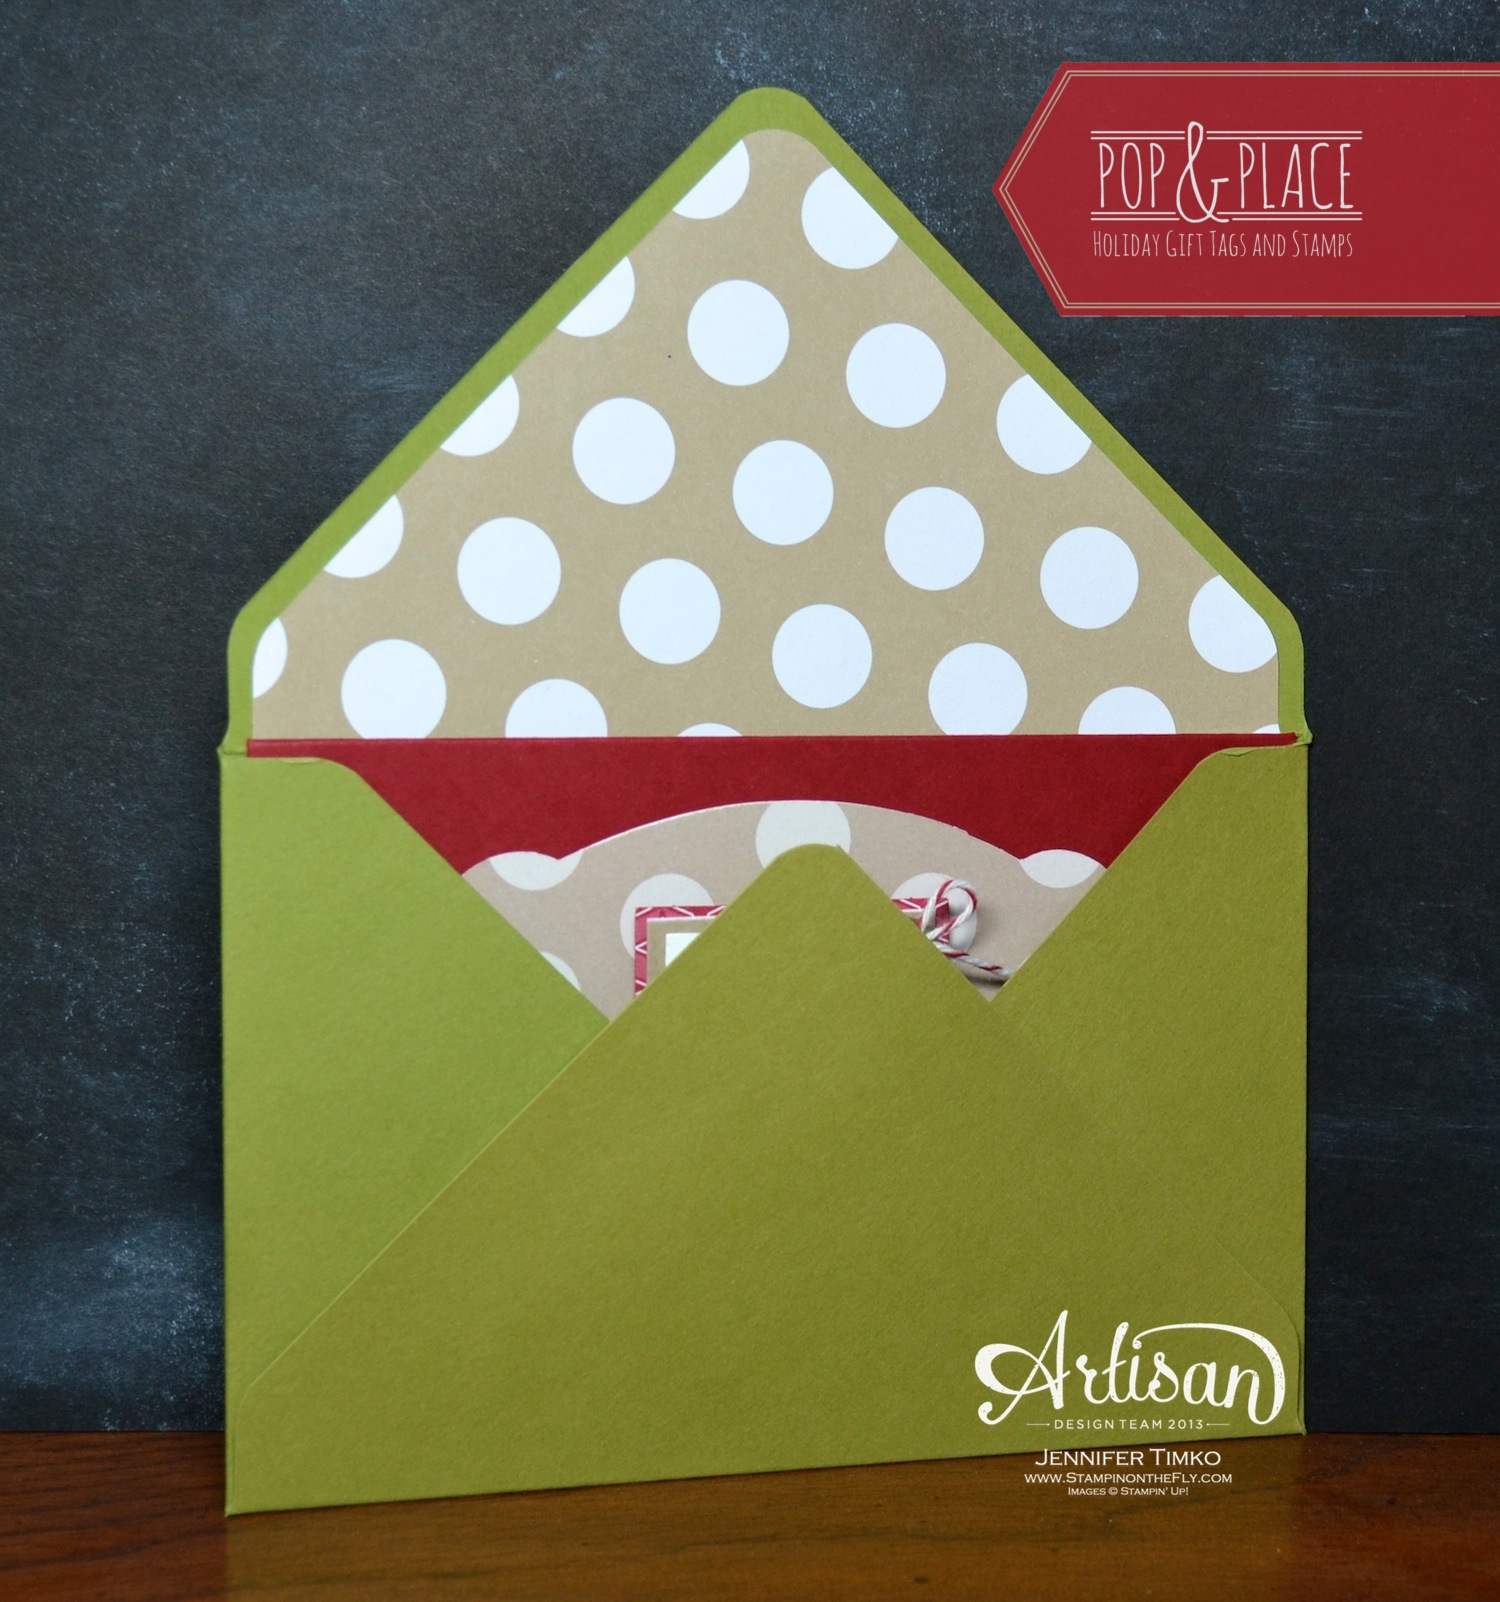
I started this card with the tag that is a match to an Apothecary Accents Die. I added some layering tags from the kit as well as a square cut from Crumb Cake card stock. The sentiment comes from the coordinating stamp set and is stamped on Whisper White. I added a little Old Olive button and some Cherry Cobbler Baker’s Twine to top it off. Now my card is a non-standard size 3-1/2″ x 5-1/2″ so I thought it would be fun to create its own special envelope.
I pulled out my new Envelope Punch Board and the measurement was right there…cool! Using Old Olive card stock, I created this envelope. The print from Season of Style coordinates with the tags so I added a little liner too. Cute, huh?
Okay, off to go visit the awesome Mercedes Weber. You are sure to love what she has for you this week! Make sure hop around the whole loop to take a look at fabulous creations of the whole team…you’ll be happy you did!
Stamp: Christmas Tagables Photopolymer Stamp; Paper: Cherry Cobbler, Crumb Cake, Whisper White, Season of Style DSP; Ink: Cherry Cobbler, Old Olive; Accessories: Pop & Place Tags, Brights Buttons, Cherry Cobbler Baker’s Twine, Dimensionals, Sanding Block, Envelope Punch Board
Click HERE to purchase any of these fun Stampin’ Up products.
Happy Wednesday!! Did you miss me last week? Well, I know the rest of the team wow’d you with their projects and that awesome sketch! I am happy to say that I was on vacation. A real live vacation that included no traveling for work! We went to Orlando, FL for a week. YEA! First we got to visit my mom, then we got to go to Legoland and Busch Gardens (Tampa) with some swimming at our cool hotel in the middle. Finally, back to mom’s house. What a fantastic week! I still haven’t even downloaded the pics yet but soon (sorry mom!). We have been catching up…lots of homework and laundry and all the normal stuff you have to do to “recover” from vacation.
Ok…on to the sketch! This week’s challenge at Freshly Made Sketches is brought to us by Jen Mitchell. Oh, how I love her work! No surprise that she has given us a sketch that has so many possibilities.
I just had to pull out these Expressions Thinlits for some more fun. I really love them. I was looking at ways to layer the positive and negative images when I realized I could tuck the different colors tucked together. I think it has a fun look…what do you think?! I paired it with the Season of Style Paper Stack to create a fun and easy to re-create card. In order to hold the Cherry Cobbler word in the Old Olive negative, I simply put some Dimensionals behind the panel in places that keep them linked (Glue Dots would work if you don’t want the extra pop-up).
Ok…I am still catching up but plan to get some stamping done over the next week or so. Hopefully I will have a lot more holiday stuff in store for you soon! If you didn’t already see it, my Artisan Wednesday Wow project of the week went up earlier and is a continuation of projects with the Thankful Tablescape Kit.
I know you will love the projects from the rest of the team. Head on over and join in! Can’t wait to see what you create! Thanks so much for stopping in. See you again soon!
Paper: Season of Style Paper Pack, Chocolate Chip, Cherry Cobbler, Old Olive; Accessories: Big Shot, Expressions Thinlits, Neutrals Buttons, Cherry Cobbler Baker’s Twine, Dimensionals
Stampin’ Up’s Artisan Design Team is continuing with more projects from our October box! For those of you who are unfamiliar, the team gets a box of fabulous SU products to create our projects each month. This month we have a lot to be thankful for because Stampin’ Up has so many beautiful Thanksgiving and fall things. If you have come over from amazing Jeanna, welcome to the next stop. If you are starting here, just continue around using the next buttons until you get back to me.
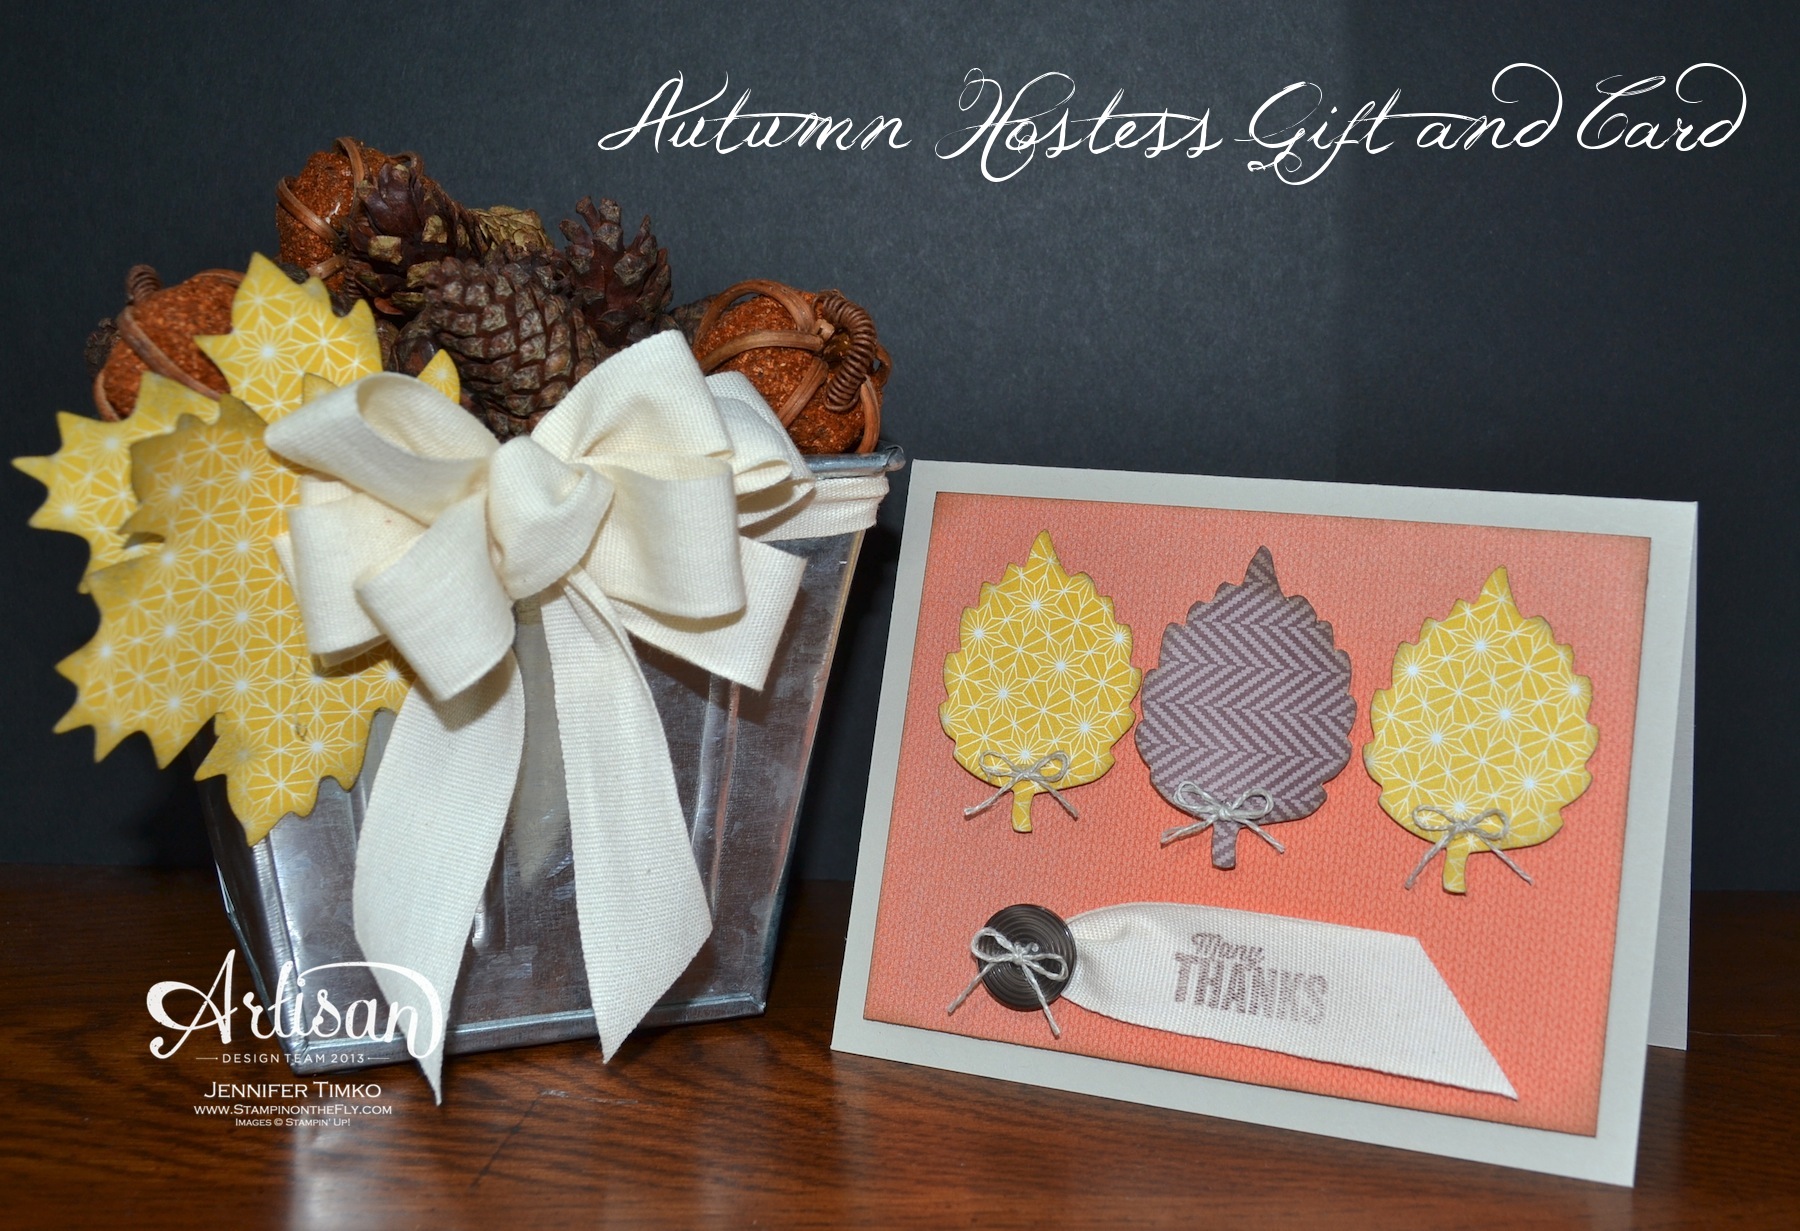
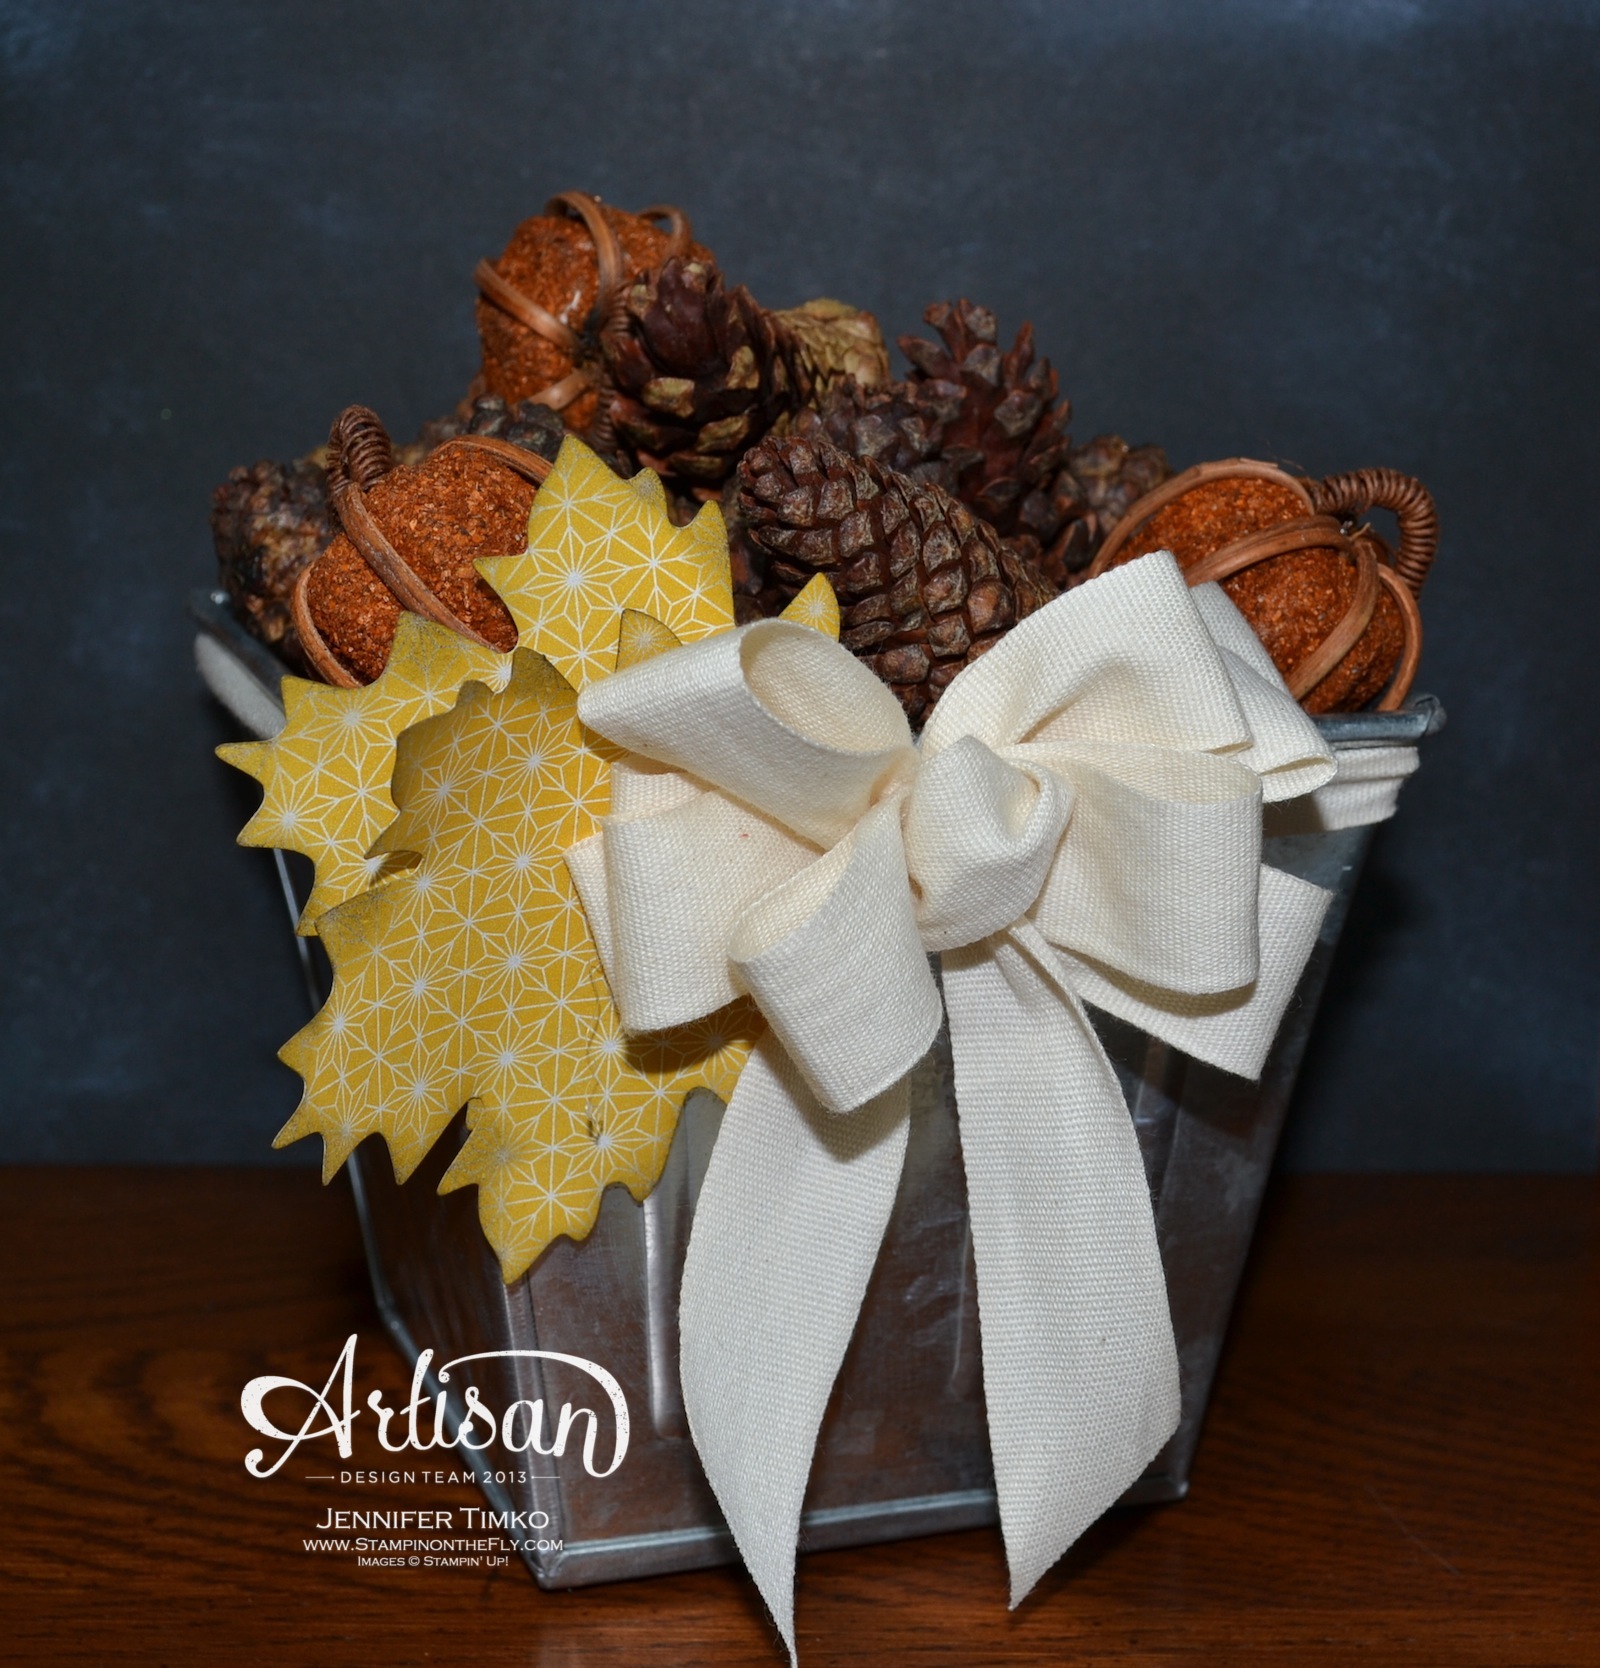
I am continuing on this week with using the Thankful Tablescape Kit. This kit is really versatile! One of the things I seem to need this time of year is an appropriate hostess gift. This kit helps you make one that is special but not all that difficult. I found this little tin at a craft store and knew it was perfect. All I had to do was tie on a pretty bow using the 7/8″ Cotton Ribbon and tuck in a couple of the leaves from the kit. I added some seasonal pinecones scented with cinnamon (yum!) and done. For a card to match, I chose the other style of leaves from the kit. I traced one of them onto the Chocolate Chip Paper Ribbon and cut out the middle leaf (or you can use the Autumn Accents Bigz Die). I like that you don’t have to have the dies to use this kit though. I stamped the sentiment from Another Thank You onto the ribbon and added some little Linen Thread bows. The background paper is from Sweater Weather DSP.
Conveniently enough, I have already used this set for a friend. My family was invited over on Sunday for this amazing dinner. The least I could do was bring a little treat for the chef! With the cinnamon scent, it was perfect for her kitchen. Yea!
Okay, off to go visit the awesome Mercedes Weber. You are sure to love what she has for you this week! Make sure hop around the whole loop to take a look at fabulous creations of the whole team…you’ll be happy you did!
Stamp: Another Thank You Photopolymer; Paper: Sweater Weather DSP, Sahara Sand; Ink: Chocolate Chip; Accessories: Thankful Tablescape Simply Created Kit, 7/8″ Cotton Ribbon, Neutrals Buttons, Linen Thread, Sticky Strip, Hot Glue
Click HERE to purchase any of these fun Stampin’ Up products.
Stampin’ Up’s Artisan Design Team is continuing with more projects from our October box! For those of you who are unfamiliar, the team gets a box of fabulous SU products to create our projects each month. This month we have a lot to be thankful for because Stampin’ Up has so many beautiful Thanksgiving and fall things. If you have come over from amazing Jeanna, welcome to the next stop. If you are starting here, just continue around using the next buttons until you get back to me.
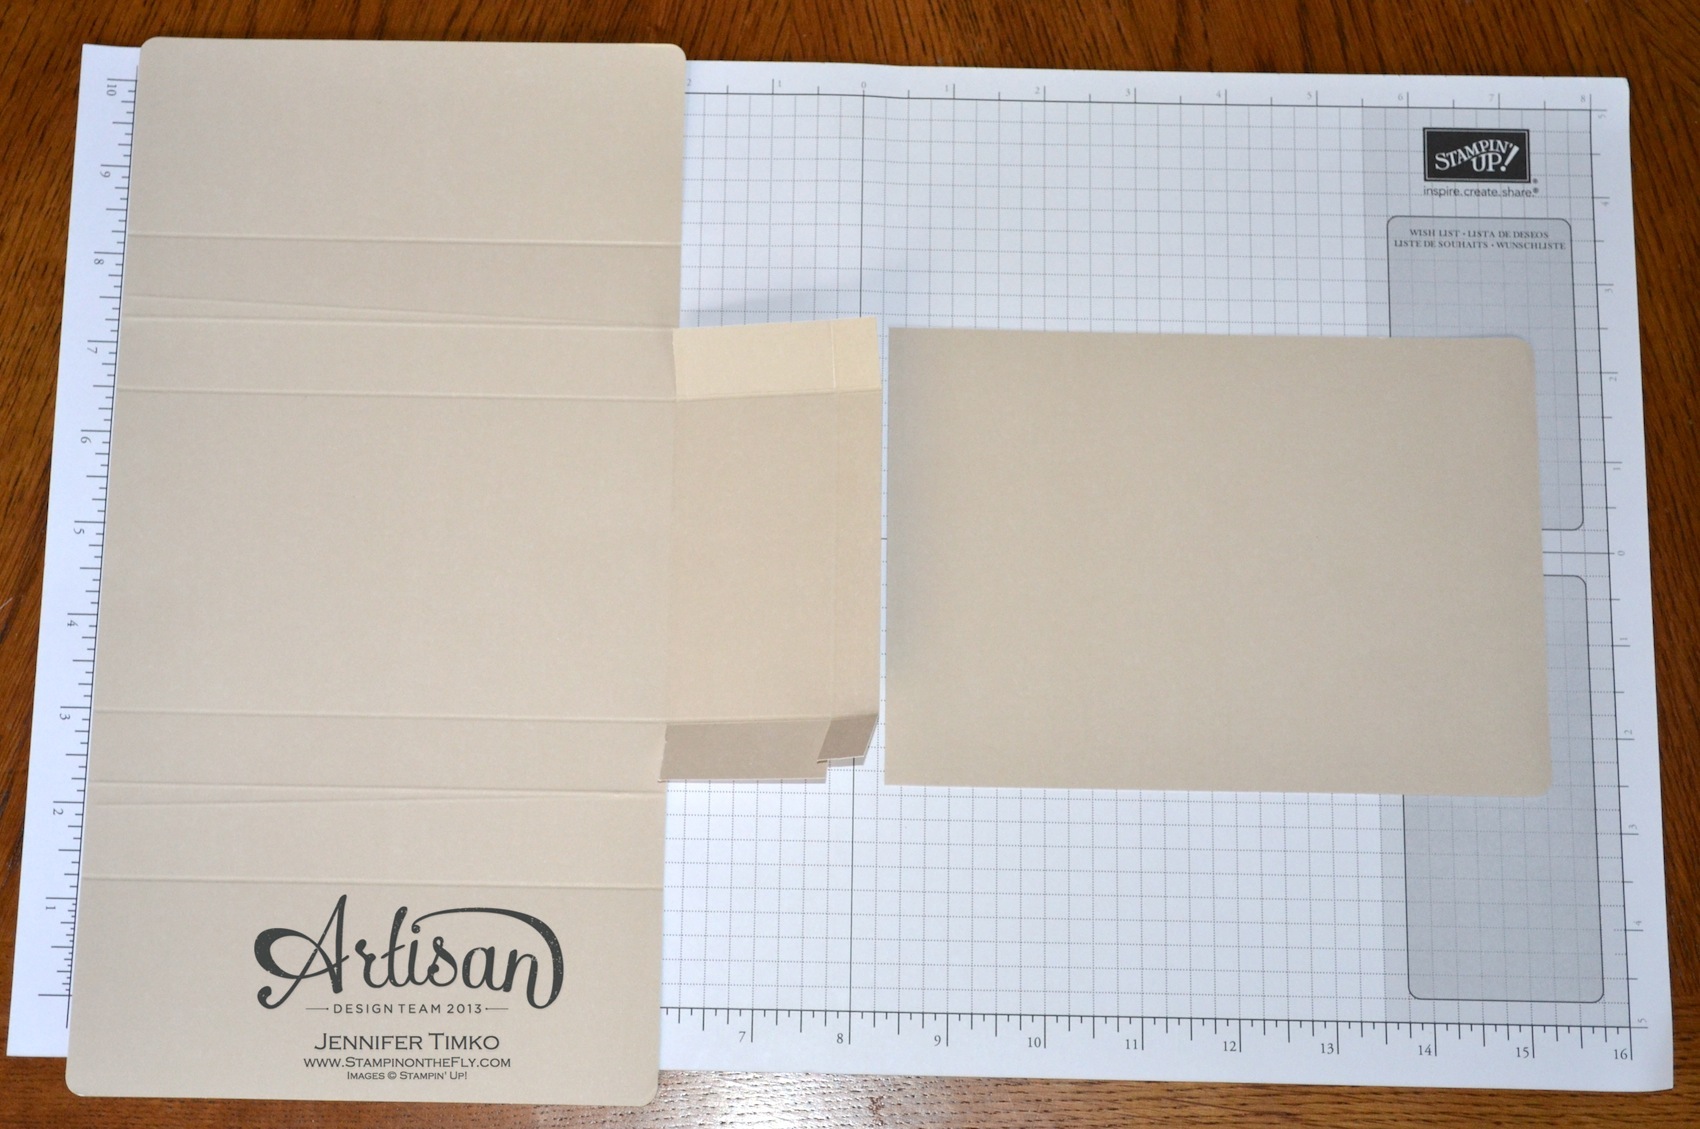
I told you last week that I was looking to show you how you could create things with the Thankful Tablescape Simply Created Kit. One of the fun items in the kit is a napkin holder. While it is adorable used exactly as designed, I wanted to show you something else you can make. Using just one of the holders, you can created a quick and fun little gift bag.
I simply cut off a portion of the long flap, scored and created the bag. Really fun and easy! With the remaining flap portion, I created the note card with just a little trimming and created matching rounded corners with my 3/16″ Corner Punch. The decoration was super fast too. I used a portion of the Chocolate Chip Paper Ribbon from the kit and snipped off the corners to create a tag. Then I used the Chalk Talk Framelits for that little oval at the top. The “thx” comes from the new Circle Card Thinlits using paper from the kit and leaves are from the kit too. I added buttons and some Linen Thread for extra detail and topped the bag with a mini clothespin I have from the Tag a Bag Accessory Kit. The little sentiment on the note card? It is from the new Photopolymer Another Thank You stamp set. Talk about a useful set! I always need another thank you sentiment, it seems.
Okay, off to go visit the awesome Mercedes Weber. You are sure to love what she has for you this week! Make sure hop around the whole loop to take a look at fabulous creations of the whole team…you’ll be happy you did!
Stamp: Another Thank You Photopolymer; Accessories: Thankful Tablescape Simply Created Kit, Big Shot, Circle Card Thinlits, Tag a Bag Accessory Kit, 3/16″ Corner Punch, Simply Scored Scoring Tool, Neutrals Buttons, Linen Thread, Sticky Strip
Click HERE to purchase any of these fun Stampin’ Up products.
I am excited to bring you the Freshly Made Sketches challenge sketch today. I am the sketch hostess this week! As I pondered what to make, I thought it would be fun to keep in really simple. This sketch can use a punch, a die cut or a stamp…I’m sure you will wow me with your creations. The Design Team certainly has!
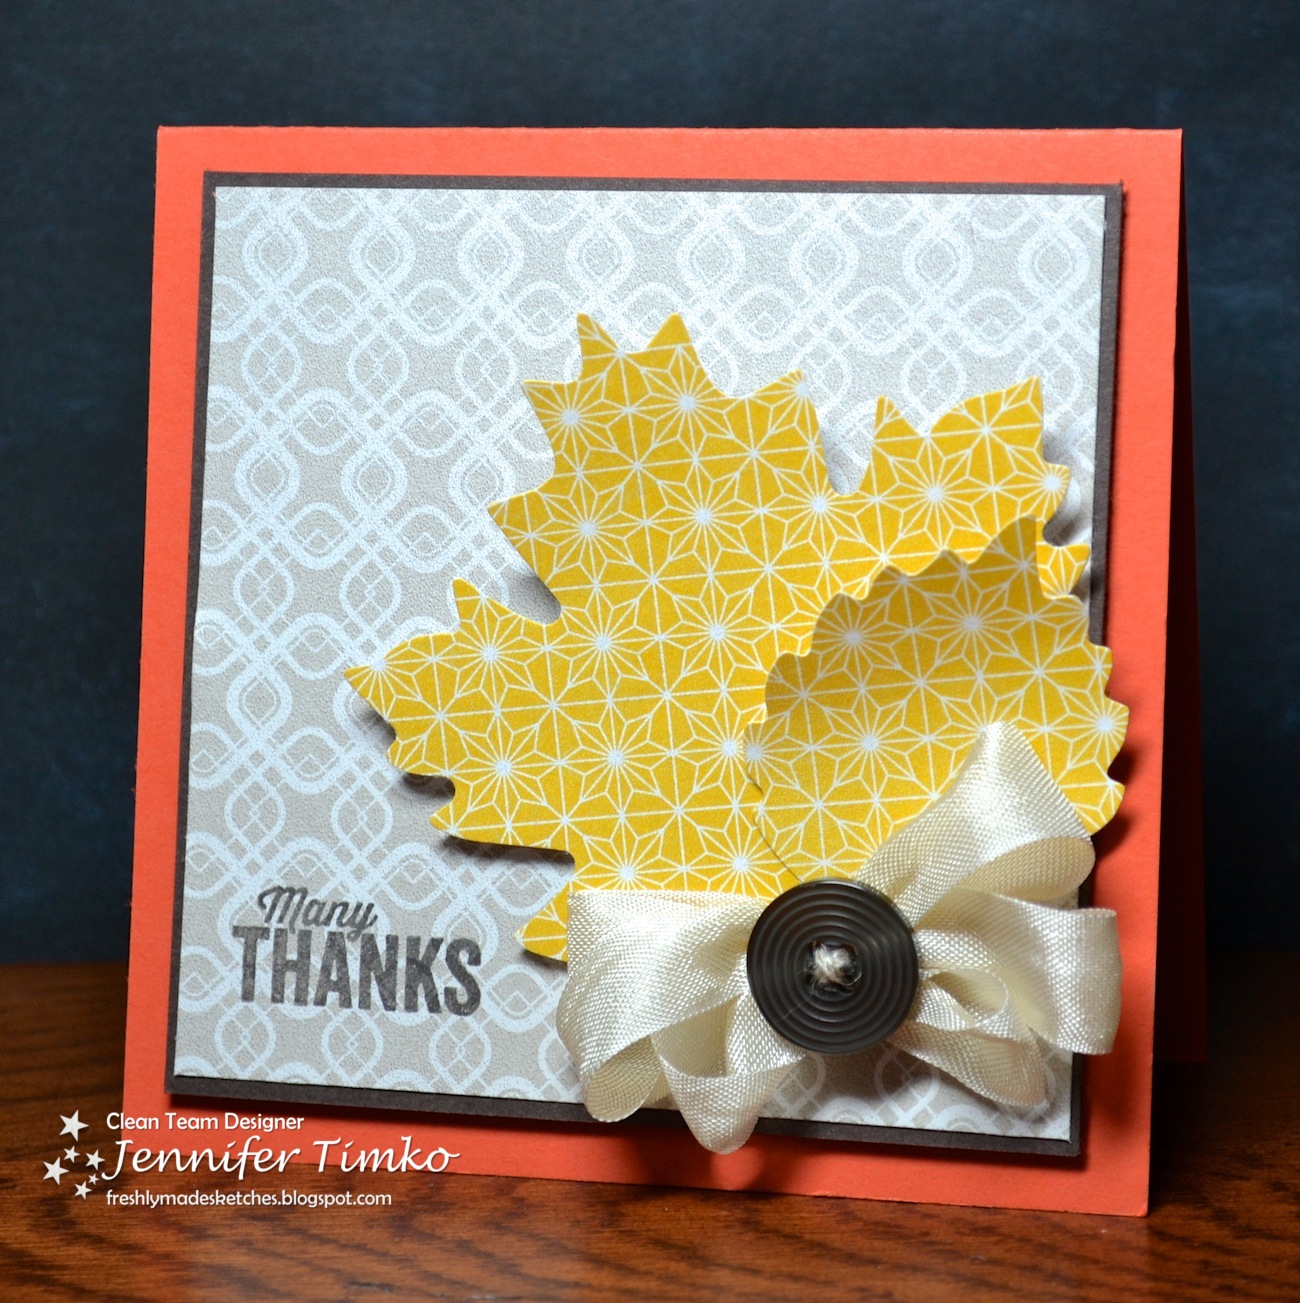
In my Artisan Wednesday Wow post that went up earlier, I told you I was starting a series of projects that could be created with the Thankful Tablescape Simply Created Kit. This card uses the leaves (just like the present) to embellish the card. I combined them with a pattern from Sweater Weather DSP, which is also a pattern from the kit. The sentiment is from the new and awesome photopolymer set Another Thank You. You’ll be seeing more of that too! I created the bow in the same way as the one on the present, this time using Very Vanilla Seam Binding.
Short and sweet today. I hope you like the sketch and I can’t wait to see the gallery! Thanks so much for dropping in today. I’ll see you again soon!
Stamp: Another Thank You Photopolymer; Paper: Sweater Weather DSP, Early Espresso, Tangerine Tango; Ink: Early Espresso; Accessories: Thankful Tablescape Simply Created Kit, Neutrals Button, Linen Thread, Dimensionals
As I told you last week, Stampin’ Up’s Artisan Design Team is on to our October box! For those of you who are unfamiliar, the team gets a box of fabulous SU products to create our projects each month. This month we have a lot to be thankful for because Stampin’ Up has so many beautiful Thanksgiving and fall things. If you have come over from amazing Jeanna, welcome to the next stop. If you are starting here, just continue around using the next buttons until you get back to me.
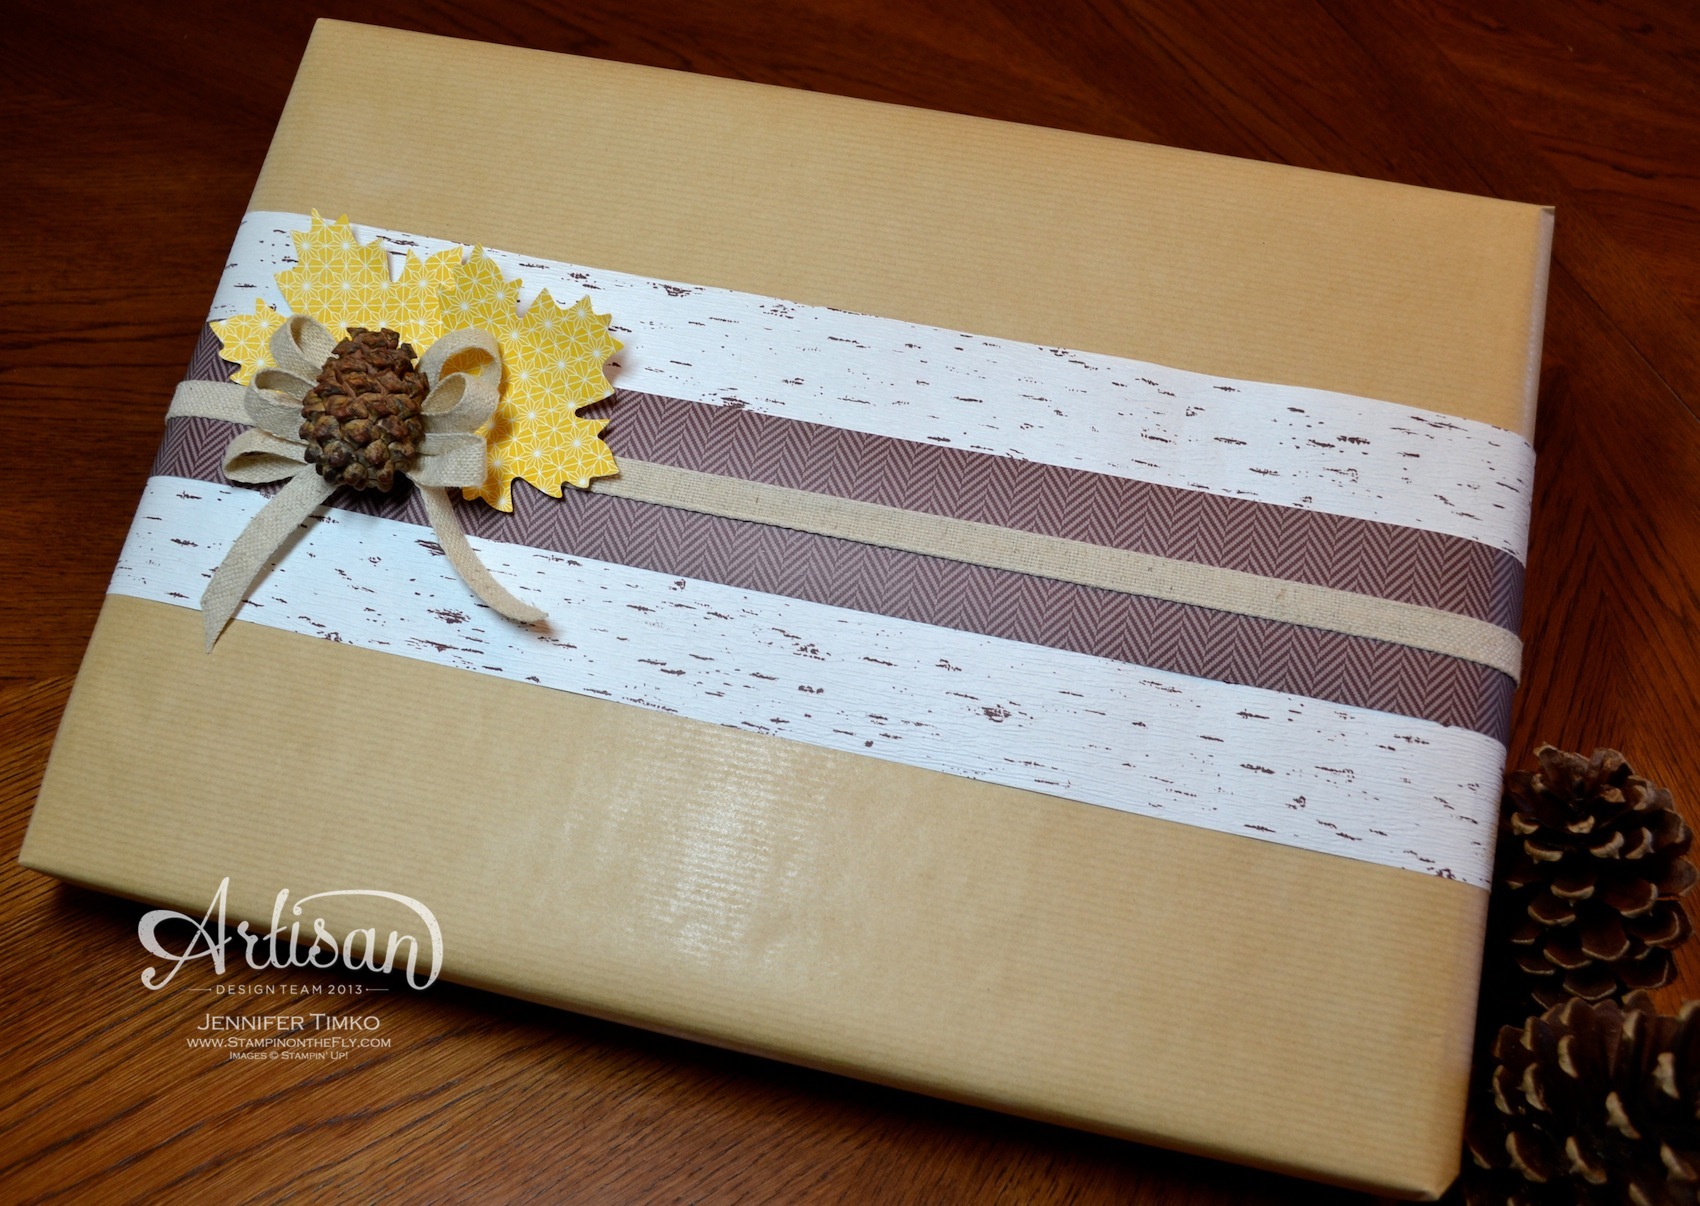
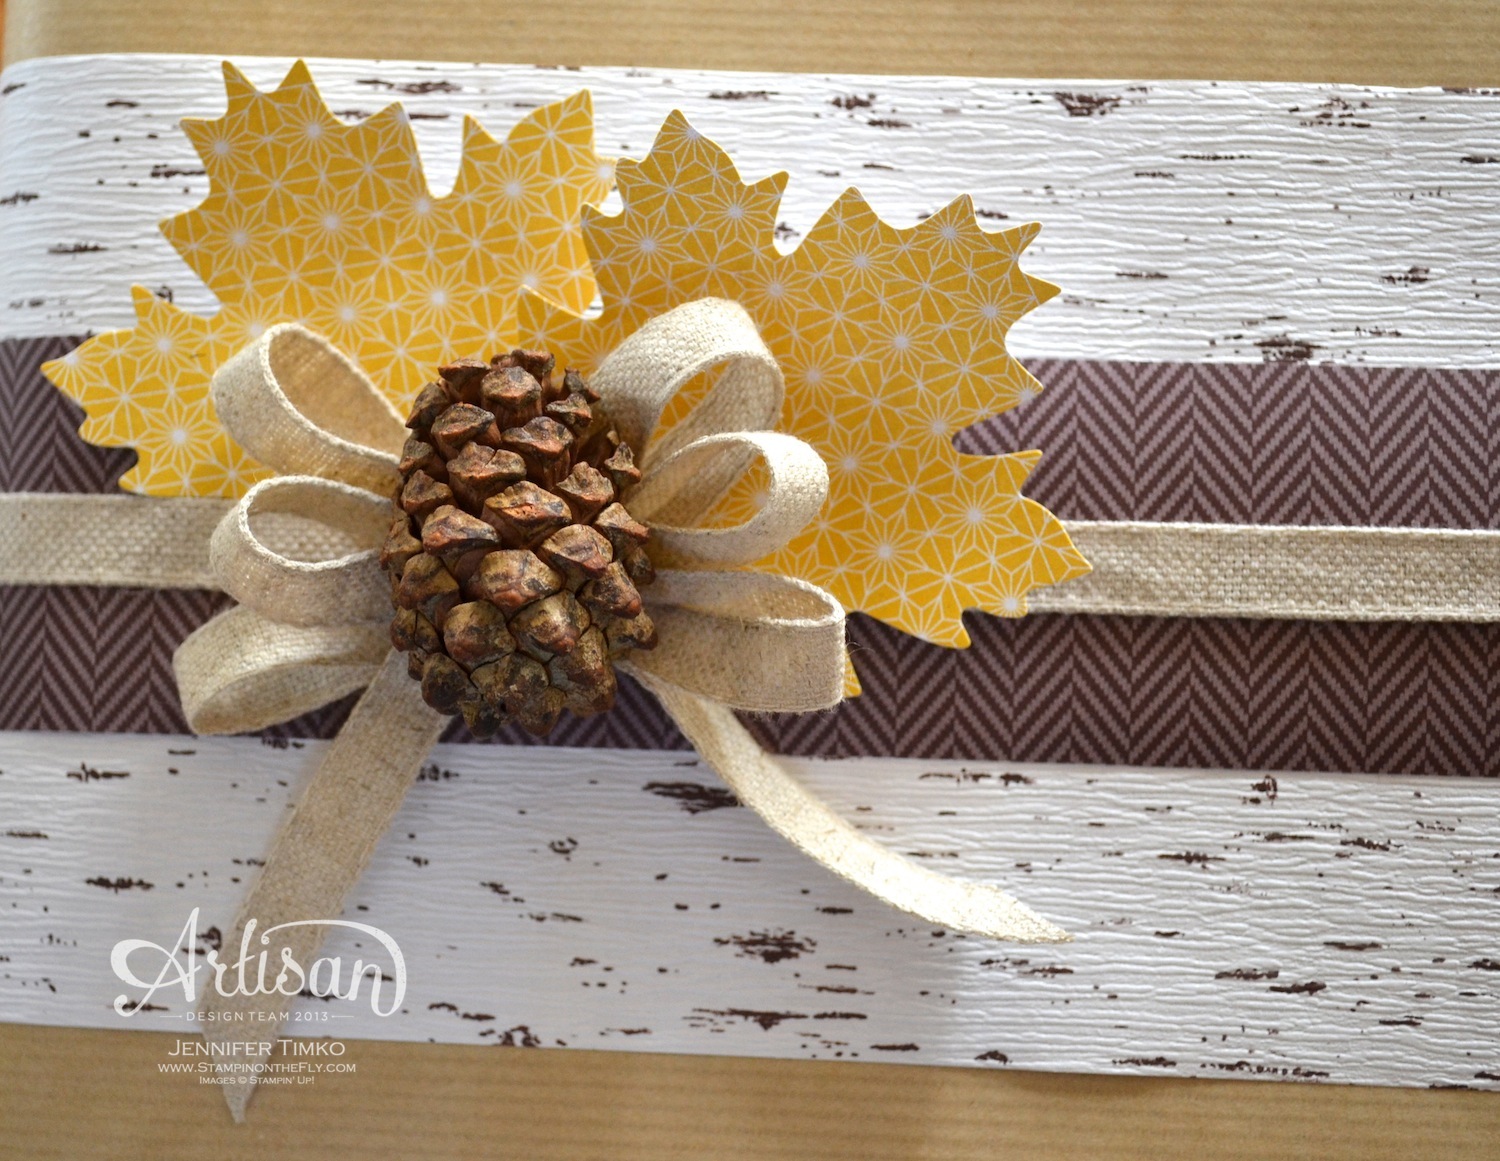
I mentioned that I would be starting a series of projects using one of the perfectly designed kits from the Holiday Catalog and now you know which one. The Thankful Tablescape Simply Created Kit is just wonderful! Of course it is perfect for its intended use…a tablescape. But my job is to show you what else you can create with it! This week, I’m showing you a packaging idea. I took a standard shirt box (with a present for my dear brother-in-law) and wrapped it in this brown kraft wrapping paper. Now for the fun part! The Birch Paper Ribbon and the Chocolate Chip Paper Ribbon are exactly the right size to wrap around the box (and there are three of each in the kit). All I did then was add a bit of the Natural Trim Ribbon around the box then create a focal embellishment.
I looped the ribbon and cinched it up with some Linen Thread. Then I tucked two of the leaves from the kit underneath. I added a little pine cone on top to finish it off (the pinecone, leaves and bow are attached using hot glue). Now isn’t that a great way to dress up a fall present?! I know…now you need this kit (as if you already didn’t). For the next two weeks I will use the same kit for more projects…I can’t wait!
Now it is time to go visit the awesome Mercedes Weber. You are sure to love what she has for you this week! Make sure hop around the whole loop to take a look at fabulous creations of the whole team…you’ll be happy you did!
Accessories: Thankful Tablescape Simply Created Kit, 7/16″ Natural Trim Ribbon, Hot Glue, Pinecone
Click HERE to purchase any of these fun Stampin’ Up products.
Welcome to the Winter Holiday Blog Hop from the Stampin’ Addicts! I am so excited to share this hop with some of my favorite stampers. The Stampin’ Addicts are a supportive group of crafters who love Stampin’ Up. I have been an “Addict” for years and love hopping with them. If you have come over from Debra Burgin of Heartfelt Inkspiration, I know you were wow’d by her Wonderful Wreath projects! I love all of the seasonal projects she created! If you are starting here, just hop all the way around using the buttons on each post. You won’t want to miss a thing!
I chose to make projects using the Expressions Thinlits and I am so happy I did! These little words are so fun to use! I made one card for each word and will show them in order of their respective holidays.
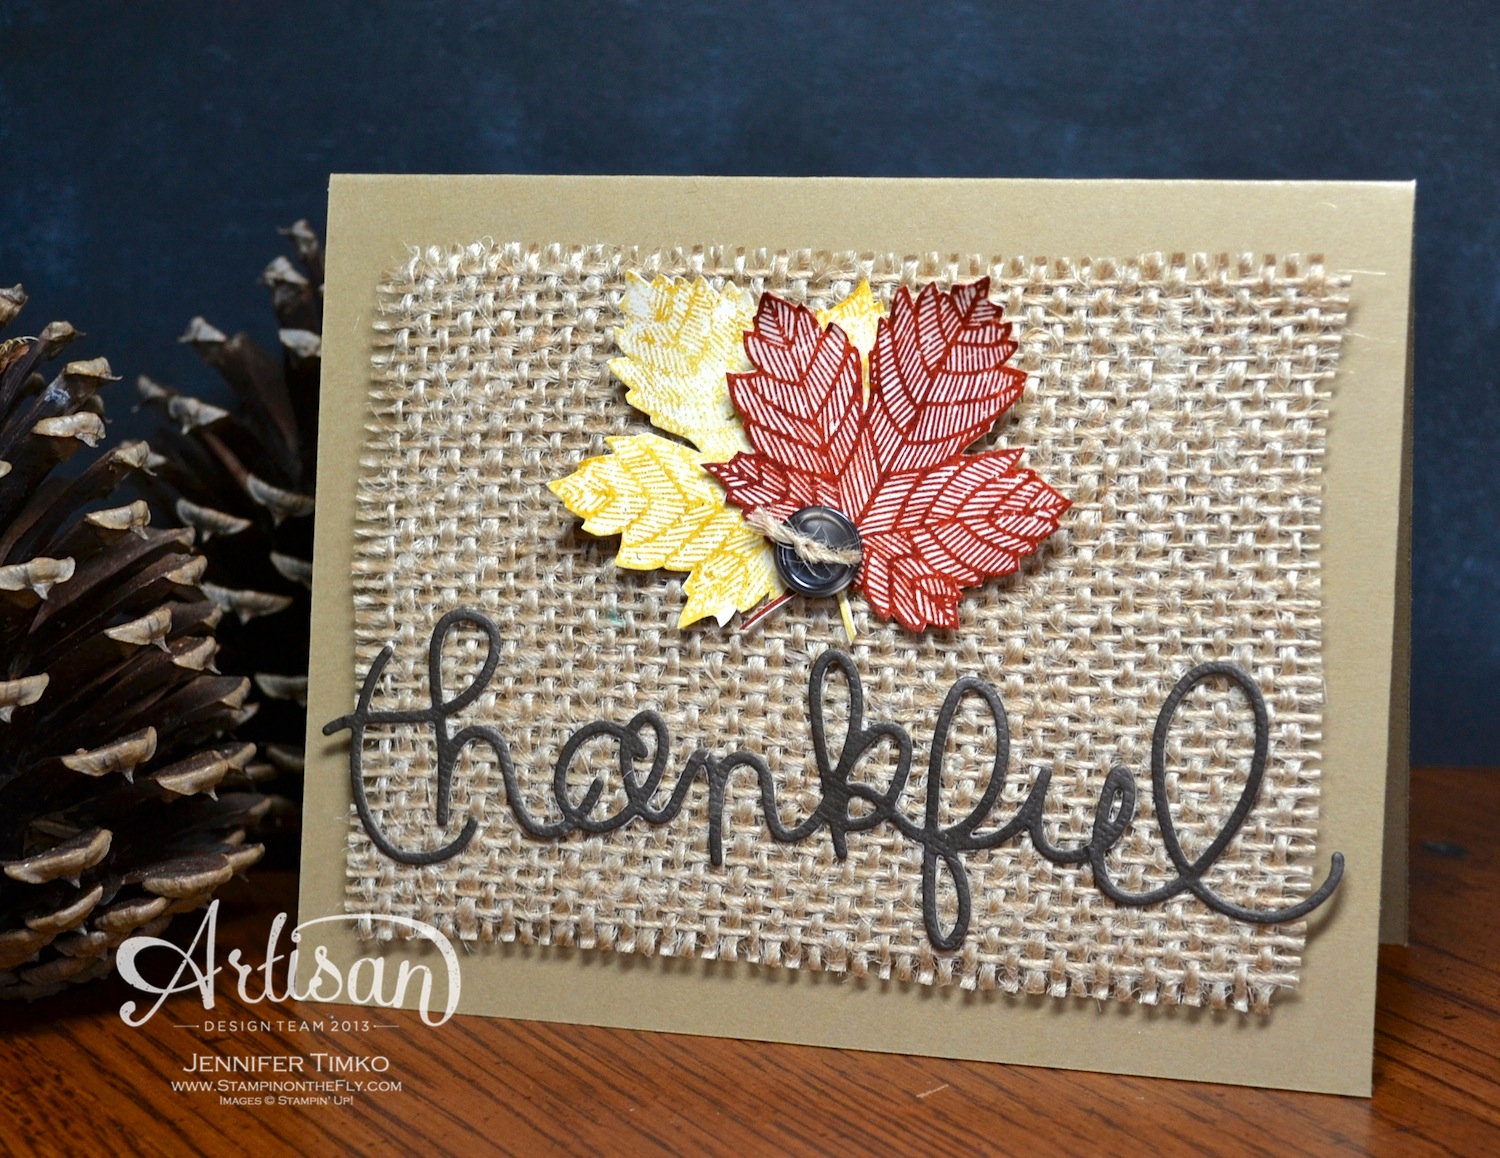
First up is Thanksgiving! Ok, this really could be used all autumn long but it really looks like Thanksgiving to me. I used some burlap and attached it to a Baked Brown Sugar layer then added the leaves from Magnificent Maple and the thinlit word. That whole panel is popped up on Dimensionals. The thinlit and leaves are attached using Crystal Effects (a light hand).
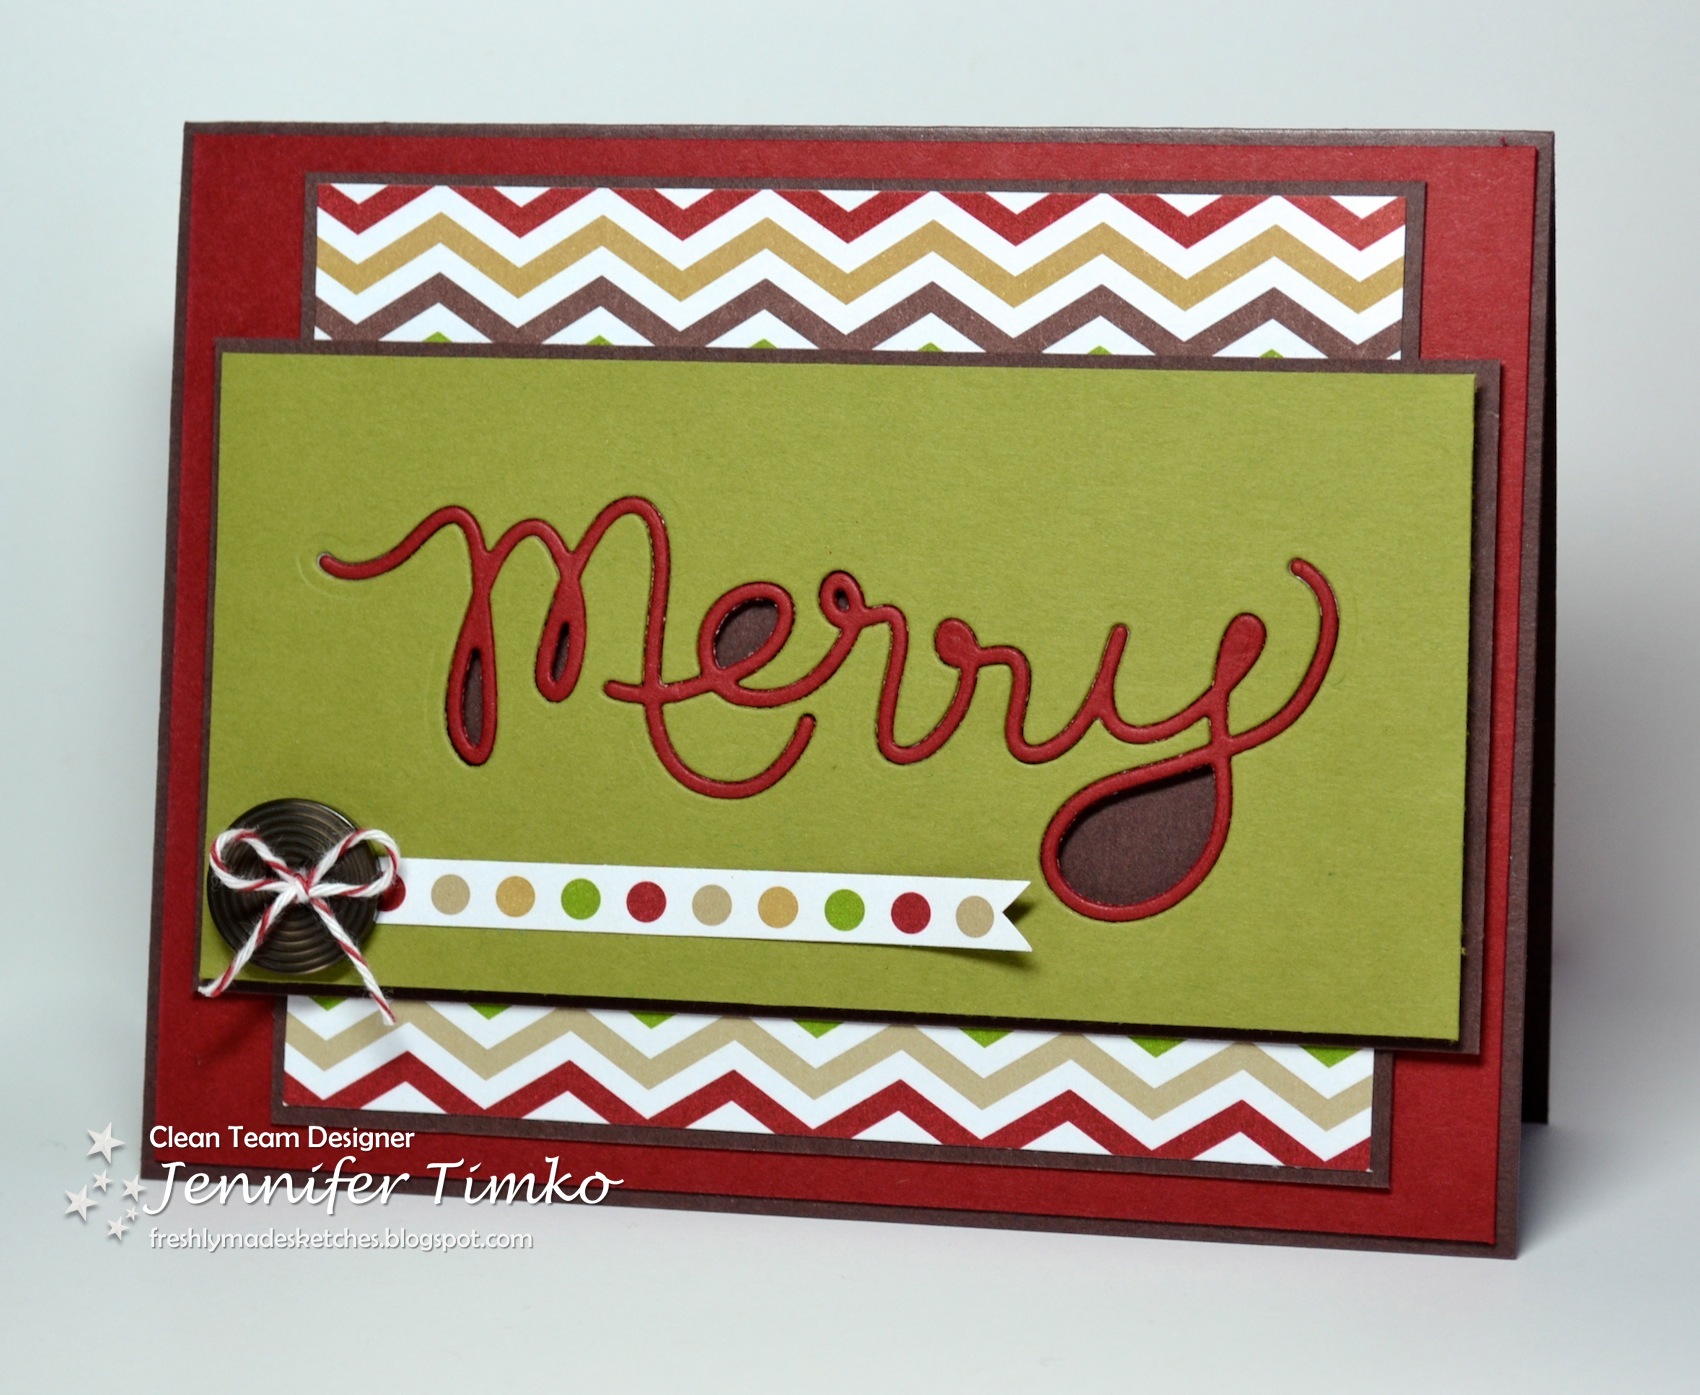
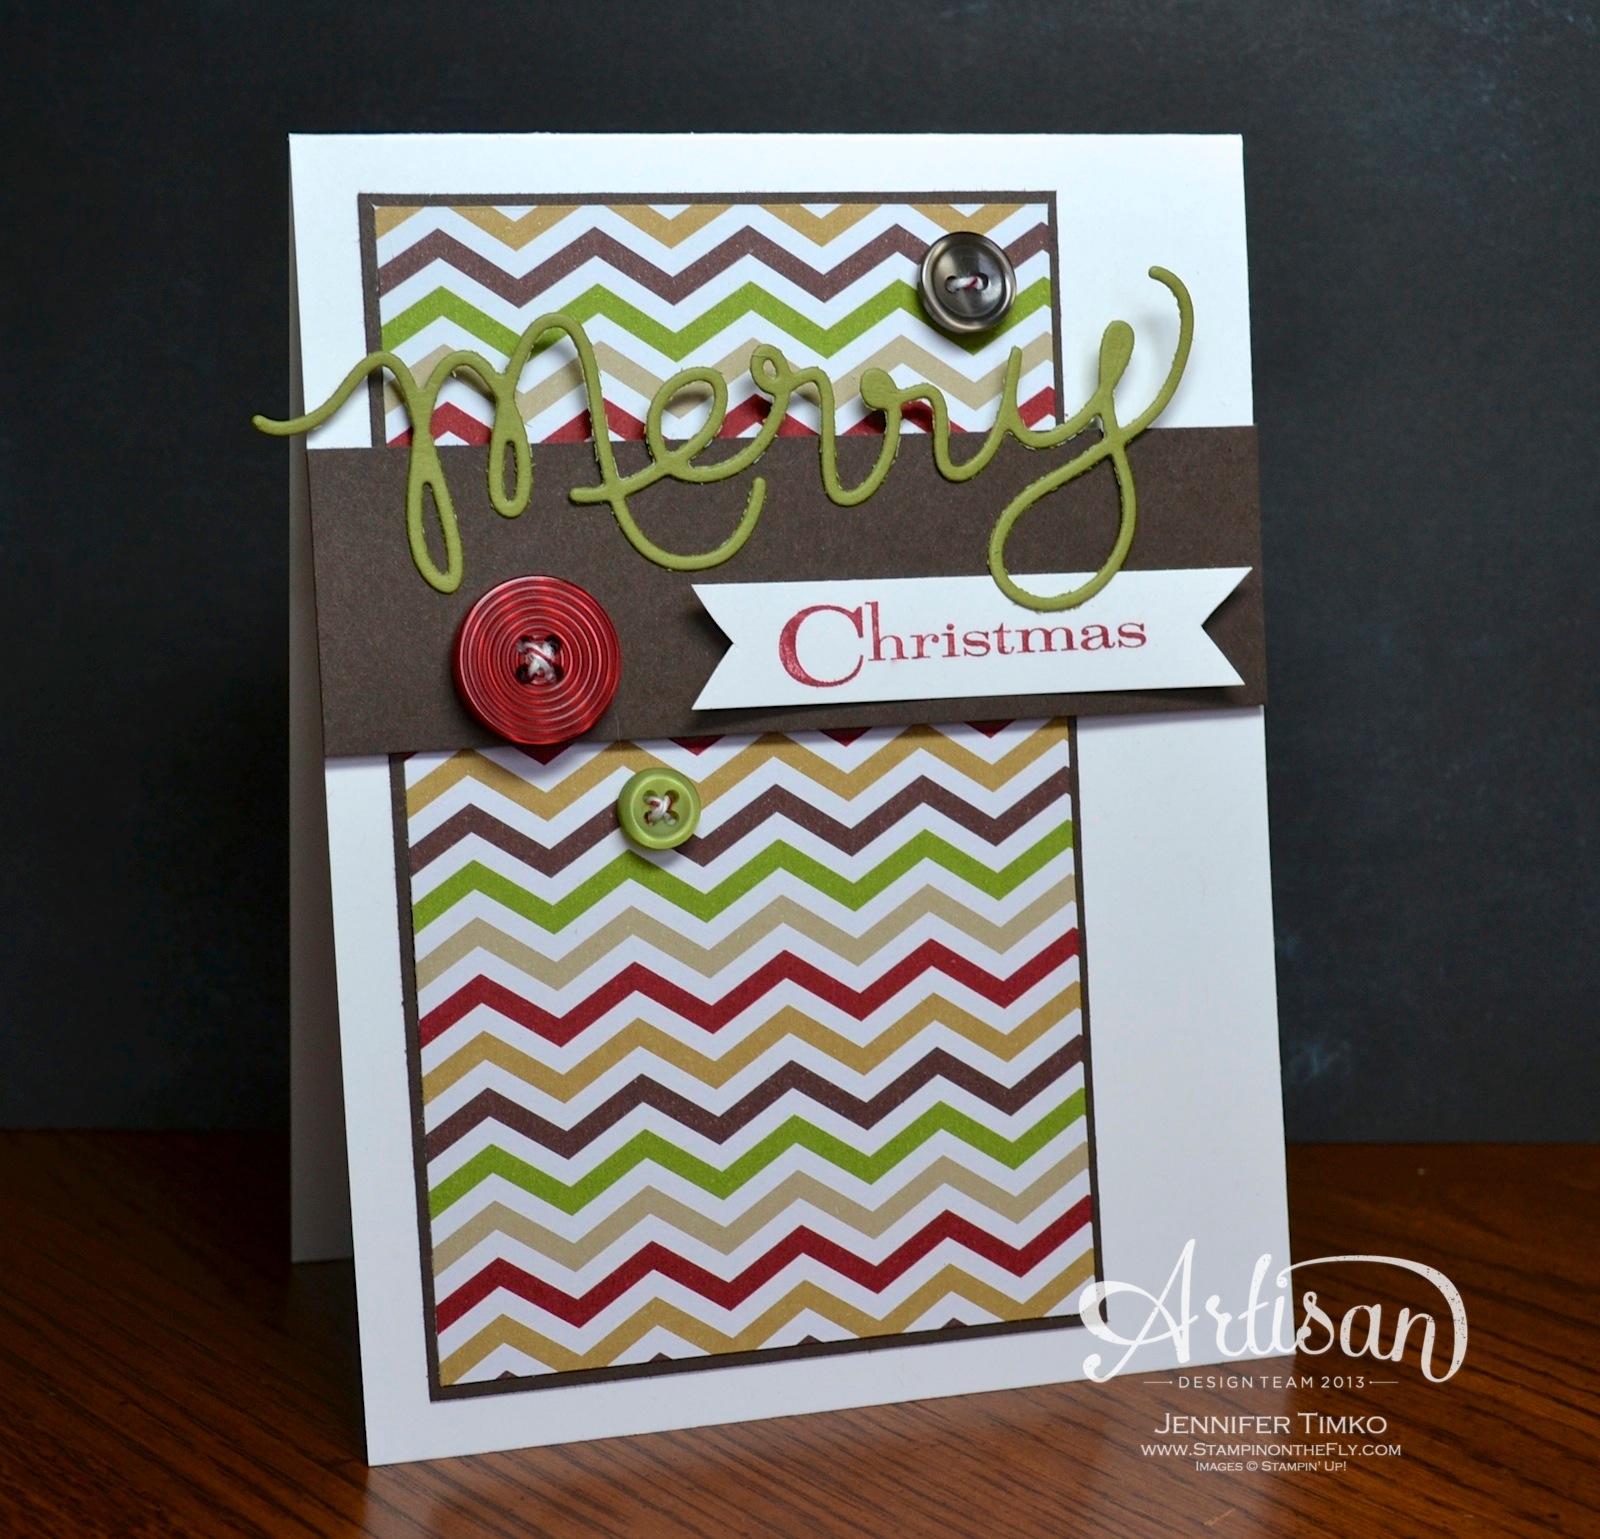
Next up is Christmas and what better than combining the thinlit with a great sentiment stamp. I chose More Merry Messages because I like the script paired with the traditional font. Just add in this great print from Season of Style and you get a fun card that is easy to duplicate. A few buttons finish it off!
Finally, a little bit of of a Valentine’s preview. Although this is just a great card for any special person! Ok, Jennifer, where did you get the thought bubble?! It is just an oval cut out with the Ovals Framelits and then I snipped the extra triangle out…yep, quick and fun! The “you!” comes from Yippee Skippee and I added in a little bit of Epic Day Washi Tape that I placed first on Whisper White card stock. There is Cherry Cobbler behind the thought bubble so it seemed perfect to add in Cherry Cobbler Baker’s Twine too.
Ok. Now you can see why you NEED these little thinlits. You may have seen this tip before but add a little piece of waxed paper between the paper you are cutting and the thinlit to make it easier to pop it out.
Now off to the fantastic blog of Paula Wright of Stampin’ with Paula! You will love what she has created with the Gift Bow Die!
Primary Sidebar
We use cookies on our website to give you the most relevant experience by remembering your preferences and repeat visits. By clicking “Accept”, you consent to the use of ALL the cookies.
This website uses cookies to improve your experience while you navigate through the website. Out of these, the cookies that are categorized as necessary are stored on your browser as they are essential for the working of basic functionalities of the website. We also use third-party cookies that help us analyze and understand how you use this website. These cookies will be stored in your browser only with your consent. You also have the option to opt-out of these cookies. But opting out of some of these cookies may affect your browsing experience.
Necessary cookies are absolutely essential for the website to function properly. This category only includes cookies that ensures basic functionalities and security features of the website. These cookies do not store any personal information.
Any cookies that may not be particularly necessary for the website to function and is used specifically to collect user personal data via analytics, ads, other embedded contents are termed as non-necessary cookies. It is mandatory to procure user consent prior to running these cookies on your website.


 All of the specifics are over at the Stampin’ Up Blog but I’m glad I get to share here too!